Hoover WH20100 Manual - Page 8
Caution - handheld steam cleaner
 |
UPC - 073502033401
View all Hoover WH20100 manuals
Add to My Manuals
Save this manual to your list of manuals |
Page 8 highlights
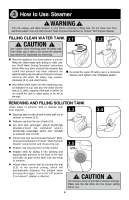
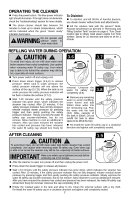
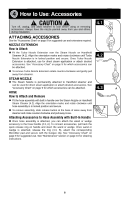
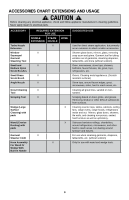
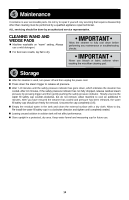
4 How to Use: Accessories ! CAUTION ! Turn off, unplug, and allow steamer to cool before using or removing accessories. Always have the nozzle pointed away from you and others during installation. 4.1 ATTACHING Accessories See the "Accessories Chart" on page 9 for suggested use and extensions required. Nozzle Extension How to Attach „„ Fit the Turbo Nozzle Extension over the Steam Nozzle on Handheld Steamer (4.1). Align the orientation marks and rotate clockwise until Turbo Nozzle Extension is in locked position and secure. Once Turbo Nozzle Extension is attached, use for direct steam application or attach desired accessories. See "Accessory Chart" on page 9 for which accessories can be attached. 4.2 „„ To remove Turbo Nozzle Extension rotate counter-clockwise and gently pull away from steamer. Steam NOZZLE „„ The Steam Nozzle is permanently attached to Handheld steamer and can be used for direct steam application or attach desired accessories. See "Accessory Chart" on page 9 for which accessories can be attached. 4.3 A Hose How to Attach and Remove „„ Fit the hose assembly with built in handle over the Steam Nozzle on Handheld Steam Cleaner (4.2). Align the orientation marks and rotate clockwise until hose assembly is in locked position and secure. B „„ To remove assembly, slide release button at the base of Hose away from steamer and rotate counter-clockwise and pull away Hose. Attaching Accessories to Hose Assembly with Built-In Handle „„ Once hose assembly is attached, you can attach the wand or wedge accessory to the hose handle (4.3, A). To connect accessories, pull back the quick release ring on handle and insert the wand or wedge. Once wand or wedge is attached, release the ring (4.3, B), attach the corresponding Microfiber pad and secure with the bungee clip. See "Accessory Chart" on page 9 for suggested use. See "Maintenance" section on page 10 for cleaning instructions. 8
-
 1
1 -
2
-
 3
3 -
 4
4 -
 5
5 -
 6
6 -
 7
7 -
 8
8 -
 9
9 -
 10
10 -
 11
11 -
 12
12 -
 13
13 -
14
-
15
-
16
-
17
-
18
-
19
-
20
-
21
-
22
-
23
-
24
-
25
-
26
-
27
-
28
-
29
-
30
-
31
-
32
-
33
-
34
-
35
-
36
-
37
 |
 |
