Husqvarna AUTOMOWER 550 EPOS Owner Manual
Husqvarna AUTOMOWER 550 EPOS Manual
 |
View all Husqvarna AUTOMOWER 550 EPOS manuals
Add to My Manuals
Save this manual to your list of manuals |
Husqvarna AUTOMOWER 550 EPOS manual content summary:
- Husqvarna AUTOMOWER 550 EPOS | Owner Manual - Page 1
Operator's manual HUSQVARNA AUTOMOWER® 550 EPOS Read the operator's manual carefully and make sure that you understand the instructions before you use the product. EN, English - Husqvarna AUTOMOWER 550 EPOS | Owner Manual - Page 2
Contents 1 Introduction 1.1 Support 3 1.2 System description 3 1.3 Product description 3 1.4 System overview 4 1.5 Product overview 5 1.6 Symbols on the product 5 1.7 Symbols on the battery 6 1.8 Symbols in the Automower® Connect app............6 1.9 General manual instructions 6 2 Safety - Husqvarna AUTOMOWER 550 EPOS | Owner Manual - Page 3
number: PIN code: The serial number is on the product rating plate and on the product carton. 1.1 Support For support about the product, speak to your Husqvarna servicing dealer. 1.2 System description The EPOS system contains a robotic lawn mower, a charging station and a reference station. The - Husqvarna AUTOMOWER 550 EPOS | Owner Manual - Page 4
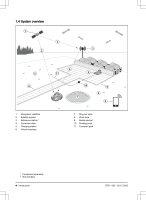
1.4 System overview 1 2 3 2 8 6 1. Navigation satellites 2. Satellite signals 3. Reference station1 4. Correction data 5. Charging station 6. Virtual boundary 4 11 5 10 7 6 8 9 7. Stay-out zone 8. Work area 9. Mobile device2 10. Docking point 11. Transport path 1 Purchased separately. 2 Not - Husqvarna AUTOMOWER 550 EPOS | Owner Manual - Page 5
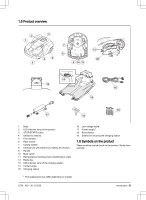
1.5 Product overview 2 1 5 3 4 6 7 8 9 10 11 12 20 14 13 16 15 19 17 18 1. Body 2. LED indicator lamp of the product 3. STOP/START button 4. Ultrasonic sensors 5. Front wheels 6. Rear wheels 7. Cutting system 8. Chassis box with electronics, battery and motors 9. Handle 10. Main switch - Husqvarna AUTOMOWER 550 EPOS | Owner Manual - Page 6
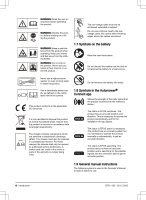
manner. For these reasons the chassis shall only be opened by authorized service technicians. A broken seal can result in the entire or parts of data to get an accurate position. 1.9 General manual instructions The following system is used in the Operator's Manual to make it easier to use: 6 - - Husqvarna AUTOMOWER 550 EPOS | Owner Manual - Page 7
• Text written in italics is a text that is in the Automower® Connect app, or is a reference to another section in the Operator's manual. • Text written in bold is one of the buttons on the product or in appDrive. 1576 - 003 - 30.12.2020 Introduction - 7 - Husqvarna AUTOMOWER 550 EPOS | Owner Manual - Page 8
and above and persons with reduced physical, sensory or mental capabilities or lack of experience and knowledge if they have been given supervision or instruction concerning use of the appliance in a safe way and understand the hazards involved. Local regulations may restrict the age of the operator - Husqvarna AUTOMOWER 550 EPOS | Owner Manual - Page 9
be dangerous if used incorrectly. CAUTION: Used if there is a risk of damage to the product, other materials or the adjacent area if the instructions in the manual are not obeyed. WARNING: Do not use the product when persons, especially children, or animals are in the work area. WARNING: Keep your - Husqvarna AUTOMOWER 550 EPOS | Owner Manual - Page 10
that is below, or within 60 • Do not run when operating the product manually cm / 24 in. from, any combustible material. Do not with appDrive. about the battery, refer to • Switch on the product according to the instructions. Technical data on page 38 When the product is switched on; make sure - Husqvarna AUTOMOWER 550 EPOS | Owner Manual - Page 11
2.3.3.1 How to lift the product 1. Push the STOP button to stop the product. 2. Set the Main switch in position 0. CAUTION: Never use a high-pressure washer or even running water to clean the product, charging station and reference station. Never use solvents for cleaning. CAUTION: Use the plug to - Husqvarna AUTOMOWER 550 EPOS | Owner Manual - Page 12
has operated for some time. 3.4 To examine where to put the reference station Read and understand the instructions about where to put the reference station. Refer to the Operator's manual for the reference station. 3.5 To examine where to put the charging station • Put the charging station in - Husqvarna AUTOMOWER 550 EPOS | Owner Manual - Page 13
• If the product must not operate in a part of the docking area, put a protective wall that is minimum 15 cm / 6 in. in height. The docking area (A) is a circular area around the charging station with a radius of 3 m / 9.8 ft. • If the work area has 2 parts separated with a steep slope, we - Husqvarna AUTOMOWER 550 EPOS | Owner Manual - Page 14
3.7 To examine where to install the objects on the map CAUTION: If the work area is adjacent to water bodies, slopes, precipices or a public road, the virtual boundary must have a protective wall. The wall must be minimum 15 cm / 6 in. in height. CAUTION: Do not let the product operate on gravel. - Husqvarna AUTOMOWER 550 EPOS | Owner Manual - Page 15
for the product. 3.8.2 Installation tools • Hex key, 8 mm. Included in the carton. 3.8.3 Installation of the charging station Read and understand the instructions about the charging station. Refer to To examine where to put the charging station on page 12. WARNING: Obey national regulations about - Husqvarna AUTOMOWER 550 EPOS | Owner Manual - Page 16
station Install the reference station according to the instructions in the Operator's manual for the reference station. 3.8.5 Automower® Connect not support cellular connection to Automower® Connect because of regional specified cellular systems. The included Automower® Connect lifetime service only - Husqvarna AUTOMOWER 550 EPOS | Owner Manual - Page 17
product can be parked at. This can for example be used for a service point where maintenance of the product is done. The point of interest is of the map. F C G A B D E A Read and understand the instructions about where to install the map objects. Refer to To examine where to install the - Husqvarna AUTOMOWER 550 EPOS | Owner Manual - Page 18
Note: The position of the waypoint when you install a work area or a stay-out zone is in the front left corner of the product. A E C DF B Note: The position of the waypoint when you install a transport path or a path to a point of interest is in the middle of the product. Note: Walk 2-3 m / - Husqvarna AUTOMOWER 550 EPOS | Owner Manual - Page 19
• Add the waypoint at the outer corner to install the virtual boundary around a corner. • Do not set waypoints that make a virtual boundary go across itself in the same work area. • Save the work area to automatically connect the first and last waypoint with a virtual boundary. 8 1 2 3 To make - Husqvarna AUTOMOWER 550 EPOS | Owner Manual - Page 20
has a lot of slopes or obstacles, you need to increase the Schedule settings. A 3.9 Settings in Automower® Connect The product has factory settings but the settings can be adapted to each work area. 3.9.1 Schedule Model Automower® 550 EPOS Approximate operation capacity, m2/h / ft2/h 208 / 2240 - Husqvarna AUTOMOWER 550 EPOS | Owner Manual - Page 21
default settings. 3.9.5.1 Time & date The time and date can be changed manually, or by using the time and date from the mobile device. 3.9.5.2 Reset be reset. 3.9.6 Security (Bluetooth® only) Note: To start the product manually in the work area, push the STOP button before you remove the product - Husqvarna AUTOMOWER 550 EPOS | Owner Manual - Page 22
3.9.6.2 Change PIN code You can change the PIN code in the Automower® Connect app. Make a note of the new PIN code in Memo. Refer to Introduction on page 3. 3.9.6.3 Theft protection In the Theft protection menu it is possible to set the alarm duration and also what events should trigger the alarm. - Husqvarna AUTOMOWER 550 EPOS | Owner Manual - Page 23
4.1 Main switch WARNING: Read the safety instructions carefully before you start the product. WARNING: , or animals are in the work area. 4.3.2 appDrive Use the appDrive to operate the product manually. 4.3.2.1 To operate the product with appDrive Use the buttons to operate the product: • Use - Husqvarna AUTOMOWER 550 EPOS | Owner Manual - Page 24
operation mode is selected and the START button is pushed. 4.4.2 Select duration The product goes back to the charging station and stays for the selected park duration. Use the operation selection to temporary stop an ongoing mowing cycle and let the product to stay in the charging station. 4.4.3 - Husqvarna AUTOMOWER 550 EPOS | Owner Manual - Page 25
life, make sure to clean the product regularly and replace worn parts. All maintenance and servicing must be done according to Husqvarna's instructions. Refer to Warranty on page 41. When the product is first used, the blade disc and blades should be inspected once a week. If the amount - Husqvarna AUTOMOWER 550 EPOS | Owner Manual - Page 26
screws for the blade. 5. Remove the 3 screws with a screwdriver. 6. Remove the 3 blades. 5.5 Winter service Take your product to your Husqvarna central service for service prior to winter storage. Regular winter service will maintain the product in good condition and create the best conditions for - Husqvarna AUTOMOWER 550 EPOS | Owner Manual - Page 27
6 Troubleshooting 6.1 Introduction - troubleshooting All messages can be found in the Messages menu in Automower® Connect. More suggestions for steps to take in the there are obstacles which make it hard for the product to move away from this location. 1576 - 003 - 30.12.2020 Troubleshooting - 27 - Husqvarna AUTOMOWER 550 EPOS | Owner Manual - Page 28
charging station is flashing green. The product has been started manually in the work area without pushing the STOP button before installed correctly. Install the charging station according to the instruction. Refer to To install the charging station on page Troubleshooting 1576 - 003 - 30.12.2020 - Husqvarna AUTOMOWER 550 EPOS | Owner Manual - Page 29
flashes red. Refer to LED indicator lamp on the charging station on page 34. This problem requires action by authorized service technician. The product has hit an obstacle and stopped or the wheels cannot move on the the product and rectify the reason. 1576 - 003 - 30.12.2020 Troubleshooting - 29 - Husqvarna AUTOMOWER 550 EPOS | Owner Manual - Page 30
related issue in the product. Restart the product. If the problem stays, speak to your approved servicing dealer. Temporary battery or firmware related issue in the product. the product. If the problem stays, speak to your approved servicing dealer. 30 - Troubleshooting 1576 - 003 - 30.12.2020 - Husqvarna AUTOMOWER 550 EPOS | Owner Manual - Page 31
Message Map problem Wheel drive problem, right/ left Searching for position good. Examine the installation of the reference station. Refer to the Operator's manual for the Reference station. Weak satellite signal to the product. The satellite 18 1576 - 003 - 30.12.2020 Troubleshooting - 31 - Husqvarna AUTOMOWER 550 EPOS | Owner Manual - Page 32
of the reference rectly. station. Refer to the Operator's manual for the Reference station. The reference station radio signal does restart the reference station. If the problem stays, speak to your approved servicing dealer. Unexpected cutting height adj Troubleshooting 1576 - 003 - 30.12.2020 - Husqvarna AUTOMOWER 550 EPOS | Owner Manual - Page 33
e-mail address, speak to your local Husqvarna representative. Ultrasonic problem GPS navigation problem Temporary electronic or firmware related issue in the product. Restart the product. If the problem stays, speak to your approved servicing dealer. 1576 - 003 - 30.12.2020 Troubleshooting - 33 - Husqvarna AUTOMOWER 550 EPOS | Owner Manual - Page 34
solid or flashing green light. If another color shows, follow the troubleshooting guide below. There is more help on www.husqvarna.com. If in the charging station. The fault must be correct by an authorized service technician. Speak to your local Husqvarna representative. 6.5 LED indicator lamp on - Husqvarna AUTOMOWER 550 EPOS | Owner Manual - Page 35
6.6 Symptoms If your product does not work as expected, follow the symptoms guide below. Symptoms Cause Action The Main switch is set to 0 but the product is not switched off. successively lower it. Replace the battery. Refer to Battery on page 26. 1576 - 003 - 30.12.2020 Troubleshooting - 35 - Husqvarna AUTOMOWER 550 EPOS | Owner Manual - Page 36
and easily. If not, screw off the blade disc and remove grass and foreign objects. Refer to Chassis and blade disc on page 25. 36 - Troubleshooting 1576 - 003 - 30.12.2020 - Husqvarna AUTOMOWER 550 EPOS | Owner Manual - Page 37
7 Transportation, storage and disposal 7.1 Transportation The supplied Li-ion batteries obey the Dangerous Goods Legislation requirements. • Obey all applicable national regulations. • Obey the special requirement on package and labels for commercial transportations, including by third parties and - Husqvarna AUTOMOWER 550 EPOS | Owner Manual - Page 38
8 Technical data 8.1 Technical data Dimensions Length, cm / in. Width, cm / in. Height, cm / in. Weight, kg / lbs Electrical system Battery, Lithium-Ion 18V, 5.0 Ah, Art. No Battery, Lithium-Ion 18V, 4.9 Ah, Art. No Power supply (28V DC), V AC Low-voltage cable for charging station, length m/ft. - Husqvarna AUTOMOWER 550 EPOS | Owner Manual - Page 39
15 5000 / 1.25 IP-classification Robotic lawn mower Charging station Power supply charging station Automower® 550 EPOS IPX4 IPX1 IP44 Frequency Band Support Bluetooth® Frequency range Automower® Connect 2G Automower® Connect 4G SRD868 (Europe) SRD915 (North America) 2400.0-2483.5 MHz GSM 850 MHz - Husqvarna AUTOMOWER 550 EPOS | Owner Manual - Page 40
8.2 Registered trademarks The Bluetooth® word mark and logos are registered trademarks owned by Bluetooth SIG, inc. and any use of such marks by Husqvarna is under license. 40 - Technical data 1576 - 003 - 30.12.2020 - Husqvarna AUTOMOWER 550 EPOS | Owner Manual - Page 41
station may only be used in compliance with the instructions in this Operator's Manual. This manufacturer's warranty does not affect warranty Husqvarna product, please contact Husqvarna customer service for further instructions. Please have the receipt and the product's serial - Husqvarna AUTOMOWER 550 EPOS | Owner Manual - Page 42
in the upper chassis. They must only be accessed by an authorized service technician. WARNING: To comply with RF exposure requirements, please maintain a separation if not installed and used in accordance with the instructions, may cause harmful interference to radio communications. However, - Husqvarna AUTOMOWER 550 EPOS | Owner Manual - Page 43
1576 - 003 - 30.12.2020 Applicable to US/CA market - 43 - Husqvarna AUTOMOWER 550 EPOS | Owner Manual - Page 44
AUTOMOWER® is a trademark owned by Husqvarna AB. Copyright© 2021 HUSQVARNA. All rights reserved. www.husqvarna.com Original instructions 1142663-95 2021-01-14
-
 1
1 -
 2
2 -
 3
3 -
 4
4 -
 5
5 -
 6
6 -
 7
7 -
8
-
9
-
10
-
11
-
12
-
13
-
14
-
15
-
16
-
17
-
18
-
19
-
20
-
21
-
22
-
23
-
24
-
25
-
26
-
27
-
28
-
29
-
30
-
31
-
32
-
33
-
34
-
35
-
36
-
37
-
38
-
39
-
40
-
41
-
42
-
43
-
44
 |
 |

EN, English
Operator's manual
HUSQVARNA AUTOMOWER
®
550 EPOS
Read the operator's manual carefully and make sure that you
understand the instructions before you use the product.