IBM 8482 User Manual - Page 46
Replacing the diskette drive in bay 3, Installing a hot-swap SCSI hard disk drive in bay 5
 |
UPC - 000435244659
View all IBM 8482 manuals
Add to My Manuals
Save this manual to your list of manuals |
Page 46 highlights
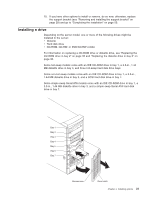
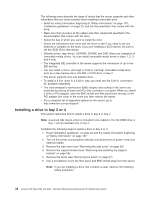
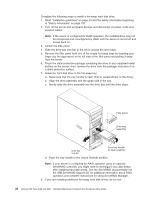
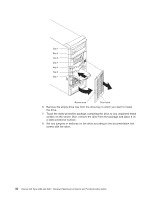
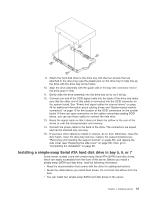
Replacing the diskette drive in bay 3 Complete the following steps to replace a diskette drive: 1. Read "Installation guidelines" on page 23, "Handling static-sensitive devices" on page 24, and the safety information beginning at "Safety information" on page 107. 2. Turn off the server and all attached devices. 3. Disconnect all power cords; then, disconnect all external cables. 4. Remove the cover (see"Removing the side cover" on page 26). 5. Disconnect the diskette drive connectors and cables. Note: The illustrations in this document might differ slightly from your hardware. Drive clip 6. Press on the blue latch in the direction of the arrow to release the drive; then, while pressing the latch, grasp the diskette drive from the front and pull it through the aperture in the front of the server. 7. Remove the clip from the side of the diskette drive and snap it into the screw holes on the side of the new diskette drive, making sure that the blue side of the clip is facing outward and the arrow on the clip is pointing toward the front of the drive. To install the diskette drive, reverse the previous steps. Installing a hot-swap SCSI hard disk drive in bay 5, 6, or 7 Some server models come with hot-swap hard disk drives. Before you install a hot-swap hard disk drive, read the following information: v Inspect the drive tray for signs of damage. v Make sure that the drive is correctly installed in the tray. v To maintain proper system cooling, do not operate the server for more than 10 minutes without either a drive or a filler panel installed in each drive bay. v All hot-swap drives being used in the server must have the same speed rating; mixing speed ratings will cause all drives to operate at the speed of the slowest drive. 36 xSeries 206 Type 8482 and 8487: Hardware Maintenance Manual and Troubleshooting Guide
-
 1
1 -
2
-
3
-
4
-
5
-
6
-
7
-
8
-
9
-
10
-
11
-
12
-
13
-
14
-
15
-
16
-
17
-
18
-
19
-
20
-
21
-
22
-
23
-
24
-
25
-
26
-
27
-
28
-
29
-
30
-
31
-
32
-
33
-
34
-
35
-
36
-
37
-
38
-
39
-
40
-
 41
41 -
 42
42 -
 43
43 -
 44
44 -
 45
45 -
 46
46 -
 47
47 -
 48
48 -
 49
49 -
 50
50 -
 51
51 -
52
-
53
-
54
-
55
-
56
-
57
-
58
-
59
-
60
-
61
-
62
-
63
-
64
-
65
-
66
-
67
-
68
-
69
-
70
-
71
-
72
-
73
-
74
-
75
-
76
-
77
-
78
-
79
-
80
-
81
-
82
-
83
-
84
-
85
-
86
-
87
-
88
-
89
-
90
-
91
-
92
-
93
-
94
-
95
-
96
-
97
-
98
-
99
-
100
-
101
-
102
-
103
-
104
-
105
-
106
-
107
-
108
-
109
-
110
-
111
-
112
-
113
-
114
-
115
-
116
-
117
-
118
-
119
-
120
-
121
-
122
-
123
-
124
-
125
-
126
-
127
-
128
-
129
-
130
-
131
-
132
-
133
-
134
-
135
-
136
-
137
-
138
-
139
-
140
-
141
-
142
-
143
-
144
-
145
-
146
-
147
-
148
-
149
-
150
-
151
-
152
-
153
-
154
-
155
-
156
-
157
-
158
-
159
-
160
 |
 |
