IBM 8482 User Manual - Page 60
Completing the installation, Replacing the bezel, Replacing the side cover, Connecting the cables
 |
UPC - 000435244659
View all IBM 8482 manuals
Add to My Manuals
Save this manual to your list of manuals |
Page 60 highlights
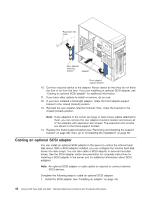
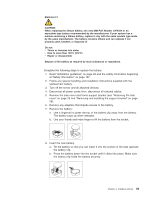
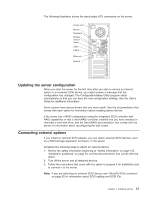
9. Replace the frame-support bracket and side cover (see "Removing and installing the support bracket" on page 28 and "Replacing the side cover"). 10. Connect all external cables; then, connect the power cords. 11. Turn on the server. 12. Start the Configuration/Setup Utility program and set configuration parameters as needed. See the User's Guide on the IBM xSeries Documentation CD. Completing the installation To complete the installation, you must reinstall the bezel, reinstall the side cover, connect all the cables and, for certain options, run the Configuration/Setup Utility program. Follow the instructions in this section. Replacing the bezel Complete the following steps to replace the bezel: 1. Insert the two tabs on the bottom of the bezel into the matching holes on the server chassis. 2. Push the top of the bezel toward the server until the two tabs at the top of the bezel snap into place. 3. Make sure that the side cover is unlocked; then, slide the drive-bay lock bar to the right. The lock bar locks when you lock the side cover key lock. Replacing the side cover If you removed the support bracket or bezel, reinstall it before you replace the side cover (see "Removing and installing the support bracket" on page 28 and "Replacing the bezel"). Note: The rear adapter retaining bracket rests against the server side cover. You might find it easier to lay the server on its side to replace the side cover. Complete the following steps to replace the side cover: 1. Before installing the cover, check that all cables, adapters, and other components are installed and seated correctly and that you have not left loose tools or parts inside the server. 2. Insert the tabs inside the cover into the slots on the server chassis. Note: The cover-release latch must be in the unlocked (opened) position before you install the side cover. 3. Close the cover-release latch to secure the side cover in place. Note: Make sure that each tab on the side cover is in its corresponding slot before closing the cover-release latch. 4. Lock the side cover. Connecting the cables If the server cables and connector panel have color-coded connections, match the color of the cable end with the color of the connector. For example, match a blue cable end with a blue panel connector, a red cable end with a red connector, and so on. Attention: To prevent damage to equipment, connect the power cords last. 50 xSeries 206 Type 8482 and 8487: Hardware Maintenance Manual and Troubleshooting Guide
-
 1
1 -
2
-
3
-
4
-
5
-
6
-
7
-
8
-
9
-
10
-
11
-
12
-
13
-
14
-
15
-
16
-
17
-
18
-
19
-
20
-
21
-
22
-
23
-
24
-
25
-
26
-
27
-
28
-
29
-
30
-
31
-
32
-
33
-
34
-
35
-
36
-
37
-
38
-
39
-
40
-
41
-
42
-
43
-
44
-
45
-
46
-
47
-
48
-
49
-
50
-
51
-
52
-
53
-
54
-
 55
55 -
 56
56 -
 57
57 -
 58
58 -
 59
59 -
 60
60 -
 61
61 -
 62
62 -
 63
63 -
 64
64 -
 65
65 -
66
-
67
-
68
-
69
-
70
-
71
-
72
-
73
-
74
-
75
-
76
-
77
-
78
-
79
-
80
-
81
-
82
-
83
-
84
-
85
-
86
-
87
-
88
-
89
-
90
-
91
-
92
-
93
-
94
-
95
-
96
-
97
-
98
-
99
-
100
-
101
-
102
-
103
-
104
-
105
-
106
-
107
-
108
-
109
-
110
-
111
-
112
-
113
-
114
-
115
-
116
-
117
-
118
-
119
-
120
-
121
-
122
-
123
-
124
-
125
-
126
-
127
-
128
-
129
-
130
-
131
-
132
-
133
-
134
-
135
-
136
-
137
-
138
-
139
-
140
-
141
-
142
-
143
-
144
-
145
-
146
-
147
-
148
-
149
-
150
-
151
-
152
-
153
-
154
-
155
-
156
-
157
-
158
-
159
-
160
 |
 |
