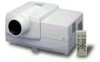
JVC DLA-S15U DLA-S15U User instruction manual (2.1MB) - Page 28
Select the video input to be projected
 |
View all JVC DLA-S15U manuals
Add to My Manuals
Save this manual to your list of manuals |
Page 28 highlights
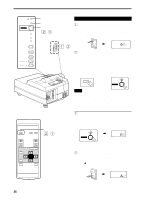
Basic Operations (Cont.) s Projector's buttons STAND BY OPERATE LAMP TEMP EMERGENCY VIDEO COMPUTER SETTING +3 QUICK ALIGN. -2 VIDEO button COMPUTER button 2. Select the video input to be projected s Press the VIDEO button or the COMPUTER button to switch the input. • Each time you press either button, the selected input changes as follows. s When you press VIDEO: Y/C VIDEO Y,PB/B-Y,PR/R-Y s When you press COMPUTER: COMPUTER 1 COMPUTER 2 Remote control unit COMPUTER VIDEO Screen display VIDEO Projector VIDEO COMPUTER NTSC(480i) s Remote control unit OPERATE COMPUTER VIDEO COMPUTER button VIDEO button VOL. PAGE BACK FOCUS MENU/ENTER * When the input is switched, the line display (ex. VIDEO) and the source display (ex. NTSC(480i)) are shown on the upper part of the screen (they disappear in about five seconds). However, they will not be shown if LINE DISPLAY in "Setting and Adjusting Other Functions (OPTIONS)" on page 43 is set to OFF. (For setting the source, see page 46.) Note • To select the proper audio input for video input The video input terminal (AV IN input terminal) can be switched with the VIDEO button. However, since this projector has only a single audio input terminal, reconnect audio input in accordance with the AV device to be used. PRESET QUICK ALIGN. AV MUTING ENGLISH ATTENTIONS • DO NOT give any shock to this projector while operating it; otherwise, the light-source lamp goes off (the EMERGENCY indicator lights up). If the shock turns off the light-source lamp - Turn off the power by pressing the MAIN POWER switch, then turn it on again. Now you can operate the projector as usual. 27
-
 1
1 -
2
-
3
-
4
-
5
-
6
-
7
-
8
-
9
-
10
-
11
-
12
-
13
-
14
-
15
-
16
-
17
-
18
-
19
-
20
-
21
-
22
-
 23
23 -
 24
24 -
 25
25 -
 26
26 -
 27
27 -
 28
28 -
 29
29 -
 30
30 -
 31
31 -
 32
32 -
 33
33 -
34
-
35
-
36
-
37
-
38
-
39
-
40
-
41
-
42
-
43
-
44
-
45
-
46
-
47
-
48
-
49
-
50
-
51
-
52
-
53
-
54
-
55
-
56
-
57
-
58
-
59
-
60
-
61
-
62
-
63
-
64
-
65
-
66
-
67
-
68
-
69
-
70
-
71
-
72
-
73
-
74
-
75
-
76
-
77
-
78
-
79
-
80
-
81
-
82
-
83
-
84
-
85
-
86
-
87
-
88
-
89
-
90
-
91
-
92
-
93
-
94
-
95
-
96
-
97
-
98
-
99
-
100
-
101
-
102
-
103
-
104
-
105
-
106
-
107
-
108
-
109
-
110
-
111
-
112
-
113
-
114
-
115
-
116
-
117
-
118
 |
 |
