JVC DLA-S15U DLA-S15U User instruction manual (2.1MB) - Page 7
Controls and Features
 |
View all JVC DLA-S15U manuals
Add to My Manuals
Save this manual to your list of manuals |
Page 7 highlights
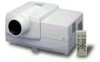
Controls and Features Front Side / Top Surface / Right Side 1 ALQIUGINCK SETTICNO GMPUTEREVIMDEEROGENCTYEMPLAMOPPERATE STAND BY + - 9 2 8 7 65 4 3 1 Control panel For details, refer to "Control Panel" (page 9). 2 Exhaust vents Vents for cooling fans through which warm air comes out. 4 Adjustable foot (for adjusting upper/lower angles) It is adjusted to be level when shipped from the factory. Turning to extend the foot allows adjustment up to +7˚. * This adjustable foot can be removed. Turn the foot and extend it until removed. (Screw size available here is M8.) CAUTION • Do not block the exhaust vents, or heat builds up inside, possibly causing a fire. Also, do not touch the vents, or this could cause a low-temperature burn. COMPUTER IN-1 COMPUTER IN-2 AV IN CONTROL MAIN POWER AC IN ~ ON OFF 3 Carrying handle Raise this handle when carrying the projector. How to use the carrying handle 5 Built-in speaker (left) 6 Built-in speaker (right) +7˚ Extend Shorten ALIQGUINCK SETTICNO GMPUTEREVIMDEEROGENCTYEMPLAMOPPERATE STAND BY + -2 3 7 Lens Before projection, remove the lens cap. Carrying handle 8 Lens cap The cap has a string attached and the string is fixed to the projector when shipped from the factory. It is recommended that the cap be fitted on to prevent the lens becoming dirty when the projector is not used. CAUTIONS • When carrying the projector, do not give a shock to it. Be careful to keep its balance. • Do not carry it while the light source lamp is on or the cooling fan is operating. This could cause personal injury. 9 Remote sensor When operating with the remote control, aim it toward this sensor. You can also operate the remote control by pointing it to a screen and allowing the remote sensor to receive the reflected light. 6
-
 1
1 -
 2
2 -
 3
3 -
 4
4 -
 5
5 -
 6
6 -
 7
7 -
 8
8 -
 9
9 -
 10
10 -
 11
11 -
 12
12 -
13
-
14
-
15
-
16
-
17
-
18
-
19
-
20
-
21
-
22
-
23
-
24
-
25
-
26
-
27
-
28
-
29
-
30
-
31
-
32
-
33
-
34
-
35
-
36
-
37
-
38
-
39
-
40
-
41
-
42
-
43
-
44
-
45
-
46
-
47
-
48
-
49
-
50
-
51
-
52
-
53
-
54
-
55
-
56
-
57
-
58
-
59
-
60
-
61
-
62
-
63
-
64
-
65
-
66
-
67
-
68
-
69
-
70
-
71
-
72
-
73
-
74
-
75
-
76
-
77
-
78
-
79
-
80
-
81
-
82
-
83
-
84
-
85
-
86
-
87
-
88
-
89
-
90
-
91
-
92
-
93
-
94
-
95
-
96
-
97
-
98
-
99
-
100
-
101
-
102
-
103
-
104
-
105
-
106
-
107
-
108
-
109
-
110
-
111
-
112
-
113
-
114
-
115
-
116
-
117
-
118
 |
 |
