JVC DT-V1710CGU Instruction Manual - Page 5
INPUT SELECT button
 |
UPC - 046838208102
View all JVC DT-V1710CGU manuals
Add to My Manuals
Save this manual to your list of manuals |
Page 5 highlights
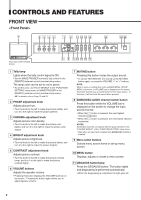
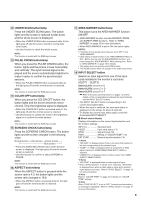
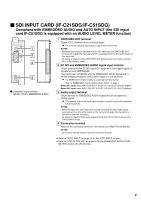
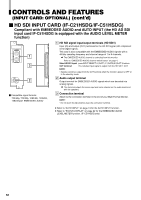
[ 12 UNDER SCAN button/lamp Press the UNDER SCAN button. The button lights and the screen is reduced (under-scan) and the whole screen is displayed. • When the UNDER SCAN button is pressed while lit, the light goes off and the screen returns to normal size (over-scan). • Use this function to check the whole screen. NOTE: This function is invalid with the RGB-input screen. 13 PULSE CROSS button/lamp When you press the PULSE CROSS button, the button lights and the picture moves horizontally and vertically. The synchronized signal is displayed and the screen automatically brightens to make it easier to confirm the synchronized sections. • When the PULSE CROSS button is pressed while lit, the light goes off and the normal screen is restored. NOTE: This function is invalid with the RGB-input screen. 14 COLOR OFF button/lamp When you press the COLOR OFF button, the button lights and the screen becomes monochrome. Only the brightness signal is displayed. • When the COLOR OFF button is pressed while lit, the light goes off and the normal screen is restored. • Use this function to confirm the noise in the brightness signal or to confirm the white balance. NOTE: This function is invalid with the RGB-input screen. 15 SCREENS CHECK button/lamp Press the SCREENS CHECK button. The button lights and the screen changes in the following order: Normal screen[Red screen[Green screen Blue screen • Press the SCREENS CHECK button when the blue screen is displayed. The light goes off and the normal screen is restored. • Use this function to confirm or adjust CHROMA or PHASE. NOTE: This function is invalid with the RGB-input screen. 16 ASPECT button/lamp When the ASPECT button is pressed while the screen ratio is 4:3, the button lights and the screen ratio changes to 16:9. • When the ASPECT button is pressed while lit, the light goes off and the normal screen is restored. NOTE: This function is invalid with the RGB-input screen. 17 AREA MARKER button/lamp This button turns the AREA MARKER function ON/OFF. • AREA MARKER function includes MARKER, ZOOM, and SAFETY AREA functions. Refer to "AREA MARKER" on page 16 for more information. • When AREA MARKER is set to ON, the button lights. NOTES: • Functions do not operate when they are set to OFF in the "AREA MARKER". • Initial setting of each function in the "AREA MARKER" Menu is OFF. Before you can use the AREA MARKER function, you must change the "AREA MARKER" Menu settings first. Refer to "AREA MARKER" on page 16 for details. • This button does not operate when RGB is input. • The ZOOM function does not operate in the under-scan mode. 18 INPUT SELECT button Selects an input signal from one of the input cards installed in the monitor's card slots (SLOT1 - SLOT3). Select SLOT1: press A or B Select SLOT2: press C or D Select SLOT3: press E or F Refer to the input card instructions on pages 7 and 8 for details on the correspondence between the input terminals and the INPUT SELECT buttons. • The INPUT SELECT button corresponding to the current input signal lights. • When the input is switched, the new input status is displayed on the screen for about 3 seconds. • To display the current input status again, press the illuminated INPUT SELECT. Ⅵ About status display Displays information on the current input selection and the monitor settings. INPUT C Selected input VIDEO Input card status (*1) NTSC Signal format (*2) HIGH Setting of "COLOR TEMP." (*3) EXT SYNC External synchronization (*4) *1 Notes • "NO SLOT" is displayed when there is no input card inserted in the slot corresponding to the selected input. • "COMP." or "RGB" is displayed when a component or RGB signal (input from COMPONENT/RGB INPUT CARD) is selected. • "VIDEO(Y/C)" is displayed when S-video is input from VIDEO 2(INPUT SELECT B/D/F). *2 Notes • "NO SYNC" is displayed when no video signal is input. • When "SYNC SELECT" is set as "EXT" (external), "NO SYNC" is displayed even when a video signal is input and a synchronized signal is not input. Refer to "SYNC SELECT" on page 19 for more information. *3 Note Refer to "COLOR TEMP." on page 20 for details on "COLOR TEMP" settings. *4 Note When "SYNC SELECT" is set to "INT." (internal synchronization), no message is displayed. Refer to "SYNC SELECT" on page 19 for more information. 5
-
 1
1 -
 2
2 -
 3
3 -
 4
4 -
 5
5 -
 6
6 -
 7
7 -
 8
8 -
 9
9 -
 10
10 -
 11
11 -
12
-
13
-
14
-
15
-
16
-
17
-
18
-
19
-
20
-
21
-
22
-
23
-
24
-
25
-
26
-
27
-
28
-
29
-
30
-
31
-
32
 |
 |
