JVC HR-S5900U Instructions
JVC HR-S5900U - Super-VHS VCR Manual
 |
UPC - 046838158841
View all JVC HR-S5900U manuals
Add to My Manuals
Save this manual to your list of manuals |
JVC HR-S5900U manual content summary:
- JVC HR-S5900U | Instructions - Page 1
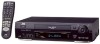
TV CH - MULTI BRAND REMOTE CONTROL UNIT POWER S VIDEO VIDEO (MONO)L-AUDIO-R REC LINK S-VHS ET SP EP VCR A.DUB INSERT PLAY REW - FF + CH- /+ PUSH / TURN 24HR QUICK PROGRAM REC PAUSE STOP/EJECT HR-S5900U/5910U POWER VIDEO (MONO)L-AUDIO-R REC LINK S-VHS ET SP EP VCR DISPLAY SP / EP - JVC HR-S5900U | Instructions - Page 2
DE LA PRISE ET POUSSER JUSQU'AU FOND. Declaration of Conformity Model Number :HR-S5900U HR-S5910U HR-S3900U HR-S3910U Trade Name : JVC Responsible Party :JVC Americas Corp. Address :1700 Valley Road Wayne, N.J. 07470 Telephone Number :973-315-5000 This device complies with Part 15 of - JVC HR-S5900U | Instructions - Page 3
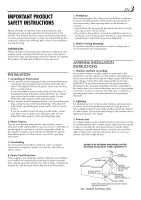
servicing. ATTENTION: Follow and obey all warnings and instructions marked on your product and its operating instructions. For your safety, please read all the safety and operating instructions Code, ANSI/NFPA 70, provides information with regard to proper grounding of the mast and supporting - JVC HR-S5900U | Instructions - Page 4
part. Unauthorized substitutions may result in fire, electric shock or other hazards. 4. Safety Check Upon completion of any service or repairs to this product, ask the service used in this instruction manual is of HR-S5900U/5910U, unless mentioned otherwise. BEFORE YOU INSTALL YOUR NEW VCR . . . - JVC HR-S5900U | Instructions - Page 5
54 Changing Remote Control Code 55 TROUBLESHOOTING 56 Questions and answers 59 INDEX 60 List of terms 60 Front panel (HR-S5900U/5910U 61 Front panel (HR-S3900U/3910U 61 Front display panel 62 Rear panel 63 On-screen display 63 Remote 64 SPECIFICATIONS 65 FOR SERVICING (Only in - JVC HR-S5900U | Instructions - Page 6
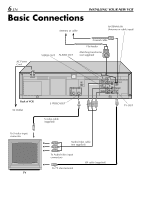
Cord VIDEO OUT AUDIO OUT Coaxial cable Flat feeder Matching transformer (not supplied) Back of VCR AC Outlet To S-video input connector TV S IN V I D E O CABLE BOX OUT S VIDEO OUT S-video cable (supplied) REMOTE PAUSE/ AV COMPU -LINK AUDIO VIDEO IN OUT ANTENNA IN R L VHF/UHF TV OUT TV - JVC HR-S5900U | Instructions - Page 7
rear of the VCR and the audio/video input connectors on the TV. S-video Connection (allows you to make the most of the S-VHS picture performance.) and - on the Remote to select "3CH" or "4CH" for only RF connection, "-CH" (OFF) for RF and AV connection, then press OK. ● The VCR channel is preset to - JVC HR-S5900U | Instructions - Page 8
VCR to complete the Plug & Play setting. ● Do not press any buttons on the front panel or on the Remote while Plug & Play is in progress. POWER S VIDEO VIDEO (MONO)L-AUDIO-R REC LINK S-VHS ET you want to add or delete channels, refer to Manual Channel Set on page 14. During Initial Auto Clock - JVC HR-S5900U | Instructions - Page 9
7 8 9 0 4 1 1 4 3 2 3 2 3 EN 9 This VCR offers you the language choice to view menus and some messages (excluding the on-screen display the desired language is selected. INITIAL SET CLOCK SET = LANGUAGE ENGLISH GUIDE CHANNEL SET CABLE BOX SET DBS RECEIVER SET SELECT WITH (5,∞) AND - JVC HR-S5900U | Instructions - Page 10
10 EN Clock Setting Turn on the VCR and the TV, and select the VCR channel 3 or 4 (or AV mode) on the TV. 1 2 3 2 4 5 6 7 8 9 0 4 ENGLISH GUIDE CHANNEL SET CABLE BOX SET DBS RECEIVER SET SELECT WITH (5,∞) AND (OK) PRESS (MENU) TO END ● "CABLE BOX USERS SET CLOCK MANUALLY" appears - JVC HR-S5900U | Instructions - Page 11
"AUTO" for the host channel in step , 8 be sure to select the correct time zone manually. Return to normal screen Press MENU. * Auto Daylight Saving Time This function enables automatic adjustment of the VCR's clock at the start and end of Daylight Saving Time. With Auto DST activated on the first - JVC HR-S5900U | Instructions - Page 12
any time during the process Press OK or SHUTTLE PLUS # repeatedly until the item you want to change blinks, then press SHUTTLE PLUS %fi. Setting clock manually - Manual Clock Set First follow steps 1 to 3 on page 10, then go to the following steps. Set time 4 Press SHUTTLE PLUS %fi until the desired - JVC HR-S5900U | Instructions - Page 13
VCR channel 3 or 4 (or AV mode) on the TV. 1 2 3 2 4 5 6 7 8 9 0 4 1 1 4 3 2 3 2 3 EN 13 Setting channels automatically - Auto Channel Set Use Auto Channel Set only if channels have not been set correctly by the Plug & Play setting. If you want to add 1or delete channels, use Manual - JVC HR-S5900U | Instructions - Page 14
or SHUTTLE PLUS #. SELECT WITH (5,∞) AND (OK) PRESS (MENU) TO END Add or skip desired channels 4 To add channels 1 Press the Number keys to input a MANUAL CHANNEL SET channel number you 2 want to add. Press OK or SHUTTLE PLUS # to 3 1 2 set to "ADD". Repeat and to (CATV) CH 45 ADD PRESS - JVC HR-S5900U | Instructions - Page 15
box, refer to its instruction 4 manual. Connect Controller to VCR Connect the Controller to the CABLE BOX Controller connector on the rear panel. How to control the cable box This VCR has two separate methods to control your cable box. ● The VCR's wireless Remote can control your cable box. This - JVC HR-S5900U | Instructions - Page 16
or SHUTTLE PLUS #. INITIAL SET CLOCK SET LANGUAGE ENGLISH GUIDE CHANNEL SET = CABLE BOX SET DBS RECEIVER SET SELECT its brand correctly; otherwise, the Controller cannot work correctly. Turn on cable your VCR's AUDIO/VIDEO IN connectors on the front panel Press SHUTTLE PLUS %fi on the Remote - JVC HR-S5900U | Instructions - Page 17
box with the one compatible with your VCR. ● The VCR can only change the cable box channel through the Controller during timer recording. ● If your cable box cannot be operated with a remote control (because it has no remote sensor), you cannot use the Controller to change its channels. Make sure to - JVC HR-S5900U | Instructions - Page 18
, refer to its 4 instruction manual. Connect Controller to VCR Connect the Controller to the CABLE BOX Controller connector on the rear panel. How to control the DBS receiver This VCR has two separate methods to control your DBS receiver. ● The VCR's wireless Remote can control your DBS receiver - JVC HR-S5900U | Instructions - Page 19
Controller cannot work correctly. Turn on DBS receiver 1 Select a channel other than channel 55, 100 or 205 on your DBS receiver. EN 19 Access Main Menu screen on VCR SET LANGUAGE ENGLISH GUIDE CHANNEL SET VCR's AUDIO/VIDEO IN connectors on the front panel Press SHUTTLE PLUS %fi on the Remote - JVC HR-S5900U | Instructions - Page 20
JVC (DISH Network) ECHOSTAR (DISH Network) PRIMESTAR SONY (DSS) RCA (DSS) CODE VCR can only change the satellite channel through the Controller during timer recording. ● If your DBS receiver cannot be operated with a remote control (because it has no remote sensor), you cannot use the Controller - JVC HR-S5900U | Instructions - Page 21
VHS mode or in SVHS ET mode (੬ pg. 27) ● If "VIDEO CALIBRATION" is set to "ON" (default setting: ੬ pg. 40), "VIDEO CALIBRATION" appears on the screen, and this VCR for a few seconds and the VCR starts rewinding the tape automatically. To stop playback Press STOP ( 7 ) on the Remote or STOP/EJECT ( 7 - JVC HR-S5900U | Instructions - Page 22
S VIDEO VIDEO (MONO)L-AUDIO-R REC LINK S-VHS ET E 1 4 7 A C. RESET 1 F , press C. RESET on the Remote. The counter reading becomes "0:00 : ● When you change the VCR operation mode from the B +++ COUNT 0:33:27 Search (੬ pg. 24) or Instant Review (੬ pg. 24). The position of " " in relation - JVC HR-S5900U | Instructions - Page 23
manual tracking following the procedures below. ● You can also use the manual tracking during slow motion playback (੬ pg. 29). 1 Activate manual tracking Press SP/EP on the Remote Next Function Memory "tells" the VCR what to do after rewinding is complete. ● Ensure that the VCR is in stop mode. a- - JVC HR-S5900U | Instructions - Page 24
running, press SHUTTLE PLUS 4 or ¢ on the Remote. 2 Access distant code To access a recording of 2 to 9 index codes away, press SHUTTLE PLUS 4 or ¢ repeatedly until the VCR is turned off and that the timer mode is disengaged, press REVIEW. ● The VCR turns on, and rewinds to the index code indicating - JVC HR-S5900U | Instructions - Page 25
VCR and the TV, and select the VCR channel 3 or 4 (or AV mode) on the TV. POWER JOG dial PLAY ( 3 ) POWER S VIDEO VIDEO (MONO)L-AUDIO-R REC LINK S-VHS ET recording, press PLAY ( 3 ). To stop recording Press STOP ( 7 ) on the Remote or STOP/EJECT ( 7 / 0 ) on the front panel. To rewind the tape - JVC HR-S5900U | Instructions - Page 26
in sequence. Time Counter Tape Remaining Time POWER S VIDEO VIDEO (MONO)L-AUDIO-R REC LINK S-VHS ET E -1 C -1 C. RESET 1 2 4 5 7 8 0 STOP/EJECT ( 7 and the VCR only using the RF connection (੬ pg. 7) to view pictures from the VCR Press TV/VCR on the Remote so that VCR mode indicator - JVC HR-S5900U | Instructions - Page 27
and picture may be deteriorated. E Recording on VHS tapes with S-VHS quality - Super VHS ET This function allows you to record on VHS tapes with SVHS picture quality. Tapes recorded using this function can be played back on a VCR equipped with the S-VHS ET function. ● You can activate this function - JVC HR-S5900U | Instructions - Page 28
Effect Playback ABDE PLAY ( 3 ) POWER S VIDEO VIDEO (MONO)L-AUDIO-R REC LINK S-VHS ET A.DUB INSERT PLAY REW - FF + CH- /+ PUSH / TURN 24HR QUICK PROGRAM REC If you release the dial, picture search continues. On the Remote: Possible during normal playback or still picture playback. To do - JVC HR-S5900U | Instructions - Page 29
right. To reverse a still picture, turn the JOG dial to the left. On the Remote: During normal playback: Press PAUSE ( 8 ) to pause. To advance a still playback. To resume normal playback, press PLAY ( 3 ). NOTE: Manual tracking is possible during slow motion playback. During slow motion playback, - JVC HR-S5900U | Instructions - Page 30
PlusCode No. screen 2 Press PROG. on the Remote. PLUSCODE NO. ● The clock must be set to access the VCR Plus+ screen. If you have not set the THEN (OK) PRESS (PROG.) TO END Then; If the Guide Channel Set screen appears - go to step . 4 If the VCR Plus+ Program screen appears - go to step . 5 ● - JVC HR-S5900U | Instructions - Page 31
you input the PlusCode number of a station for which the guide channel number has not been set previously. ● If you receive your channels with a cable box and if you have properly set your Controller, "CABLE CH" appears in place of "VCR CH". If 5 not, refer to pages 15 - 17. Check program - JVC HR-S5900U | Instructions - Page 32
and the cable channels. These guide channel numbers are also called the VCR Plus+ channel codes. Most TV listings have a section, usually a chart, indicating the guide channel numbers assigned to each station. For accurate VCR Plus+ programing, the VCR Plus+ guide channel number for each station - JVC HR-S5900U | Instructions - Page 33
, then press OK or SHUTTLE PLUS #. GUIDE CHANNEL SET GUIDE CH : 6 VCR CH : - - - ● If you receive your channels with a cable box and if you have PRESS NUMBER KEY (0-9) OR (5,∞), THEN (OK) PRESS (MENU) TO END properly set your Controller, "CABLE CH" appears in place of "VCR CH". If not, refer to - JVC HR-S5900U | Instructions - Page 34
the hole with adhesive tape, then load it into the VCR. ● The VCR turns on, and the counter is reset, automatically. Access VCR PLUS+ screen 2 Press PROG.. Access Program screen 3 , see "ATTENTION FOR DBS RECEIVER USERS" on next page. ● Holding down CH +/- rapidly changes the channel numbers. - JVC HR-S5900U | Instructions - Page 35
standby mode. EN 35 NOTES: ● Even if a power failure occurs, the VCR keeps your timer programs. However, the clock time, channel settings, and other to keep the cable box or DBS receiver turned on. ATTENTION FOR DBS RECEIVER USERS If you are using a DBS receiver (unless "DBS RECEIVER SET" is set - JVC HR-S5900U | Instructions - Page 36
Programing JOG dial POWER S VIDEO VIDEO (MONO)L-AUDIO-R REC LINK S-VHS ET A.DUB INSERT PLAY REW - FF + CH- /+ PUSH / mode at that time. Press TIMER to put the VCR into timer recording standby mode. To clear the display, press CANCEL on the Remote. 3 Set program start time Turn the JOG - JVC HR-S5900U | Instructions - Page 37
mode. ● Auto SP = EP Timer (੬ pg. 41) If there is not enough tape to record the entire broadcast for recording in SP mode, the VCR automatically switches to EP mode to allow complete recording. This feature is especially handy when recording a broadcast of more than 2 hours in length. 1 Access - JVC HR-S5900U | Instructions - Page 38
" to the right. Without doing anything for about 1 minute, the VCR will finish the timer programing. TIMER RECORDING (cont.) 3 Cancel or conflict in the timer schedule and one program overlaps with another, only the parts shown below in gray will be recorded. Pattern 1: The program with the - JVC HR-S5900U | Instructions - Page 39
VCR and the TV, and select the VCR HR-S5900U/5910U FUNCTION = VIDEO CALIBRATION ON PICTURE CONTROL VHS MODE ON AV COMPU-LINK ON FRONT AUX INPUT VIDEO REAR AUX INPUT VIDEO SELECT WITH (5,∞) AND (OK) PRESS (MENU) TO END For HR-S3900U/3910U FUNCTION = VIDEO CALIBRATION ON PICTURE CONTROL - JVC HR-S5900U | Instructions - Page 40
first timer recording starts. ● When you play back rental tapes or tapes recorded on other VCRs, set this function either "ON" or "OFF" whichever gives you the best picture. Ⅵ PICTURE CONTROL AUTO (NORM): Normally select this. Picture quality is adjusted automatically. When "VIDEO CALIBRATION" is - JVC HR-S5900U | Instructions - Page 41
" before the timer-recording starts. NOTES: ● If you have programed the VCR to timer-record 2 or more programs, the second program and those thereafter In this case, do not use this function, but change the tape speed manually during timer programing. ● In order to ensure that the recording fits on - JVC HR-S5900U | Instructions - Page 42
that a conventional VHS VCR without SQPB cannot play back S-VHS tapes recorded in S-VHS mode.) • S-VHS MODE setting does not affect recording on VHS tapes. Recording on VHS tapes is always performed in VHS mode except when using S-VHS ET mode (੬ pg. 27). Ⅵ AV COMPU-LINK ON OFF The REMOTE PAUSE/AV - JVC HR-S5900U | Instructions - Page 43
43 * The default setting is bold in the table below. This VCR To AV COMPU LINK II (VCR ONLY) To AUDIO/ VIDEO IN Ⅵ FRONT AUX INPUT VIDEO S-VIDEO R L VHF/UHF TV OUT To REMOTE PAUSE/ AV COMPULINK To AUDIO/ VIDEO OUT This function is ONLY FOR HR-S5900U/5910U. You have to select which terminal - - JVC HR-S5900U | Instructions - Page 44
lamp POWER S VIDEO VIDEO (MONO)L-AUDIO-R REC LINK S-VHS ET 4 2 A.DUB INSERT PLAY REW - FF + CH- • For timer programing method, refer to the 2 manual supplied with the DBS receiver. Load a cassette 3 Make and on the DBS receiver once again, the VCR starts recording. ● If you have connected - JVC HR-S5900U | Instructions - Page 45
out of the children's reach. ● Timer recording programs will be performed even if the child lock function is activated. ● If any button on the VCR or on the Remote is pressed when the child lock function is activated, "CL" appears on the front display panel for about 5 seconds, then the clock time - JVC HR-S5900U | Instructions - Page 46
Connection This VCR (for recording) (HR-S5900U/5910U) POWER S VIDEO VIDEO (MONO)L-AUDIO-R REC LINK S-VHS ET A.DUB INSERT PLAY REW - FF + CH- /+ PUSH / TURN 24HR QUICK PROGRAM REC PAUSE STOP/EJECT To AUDIO/ VIDEO Input Audio/video cable (not supplied) To rear panel REMOTE PAUSE/ AV - JVC HR-S5900U | Instructions - Page 47
On the front panel: Press REC ( ¶ ). On the Remote: Press REC ( ¶ ) and PLAY ( 3 ) at the same time. ● If you are using a Master Edit Control-equipped JVC camcorder, recording starts automatically on this VCR. (Refer to camcorder's instruction manual.) NOTE: Be sure to select "AUTO" for "PICTURE - JVC HR-S5900U | Instructions - Page 48
REMOTE PAUSE/ AV COMPU -LINK AUDIO VIDEO IN OUT ANTENNA IN R L VHF/UHF TV OUT To AUDIO/ VIDEO OUT Audio/video cable (not supplied) To Audio/ video Input Another VCR (for recording) You can use your VCR as the playback or recording VCR. ● Refer also to the other VCR's instruction manual - JVC HR-S5900U | Instructions - Page 49
HR-S5900U/5910U) Connection This VCR (for recording) POWER S VIDEO VIDEO (MONO)L-AUDIO-R REC LINK S-VHS ET the other audio component's instruction manual for connection and its JOG dial, then turn it to the left or right. On the Remote: Press the Number key "0 (AUX)" or CH +/-. Locate start - JVC HR-S5900U | Instructions - Page 50
AV Dubbing (ONLY FOR HR-S5900U/5910U) Connection This VCR (for recording) POWER S VIDEO VIDEO (MONO)L-AUDIO-R REC LINK S-VHS ET A.DUB INSERT PLAY REW output EDITING (cont.) Refer also to the other component's instruction manual for connection and its operations. Insert Editing: You can - JVC HR-S5900U | Instructions - Page 51
Make sure to set the recording format (VHS, SVHS or S-VHS ET) on the VCR is the same as that of the VCR starts normal playback. To stop editing any time during recording Press STOP ( 7 ) on the Remote or STOP/EJECT ( 7 / 0 ) on the front panel. NOTES: ● Be sure to select "AUTO" for "PICTURE CONTROL - JVC HR-S5900U | Instructions - Page 52
VCR - 2 2 POWER 1 2 3 2 4 5 6 - 2 3 7 8 9 Number 0 4 1 - 2 4 ENTER 3 TV VOL +/- TV CH +/- TV BRAND NAME JVC HITACHI MAGNAVOX MITSUBISHI PANASONIC RCA SHARP SONY SAMSUNG SANYO SEARS TOSHIBA ZENITH BRAND CODE 01, 03 10 02 03 04, 11 05 06 07 12 13 13 08 09 MULTI-BRAND REMOTE CONTROL - JVC HR-S5900U | Instructions - Page 53
Remote can control some functions of the cable boxes listed below. Some cable box brands have more than one code. If your cable box does not function with a specified code, try other codes can be used to change the VCR's channels only.) NOTES: ● Depending on the type of cable box - JVC HR-S5900U | Instructions - Page 54
channels, press TV CH +/- or the Number keys. (The CH +/- button can be used to change the VCR's channels only.) DBS BRAND NAME JVC (DISH Network) ECHOSTAR (DISH Network) PRIMESTAR SONY (DSS) RCA (DSS) BRAND CODE 51 51 50 41 40 NOTES: ● Depending on the type of DBS receiver, some or all functions - JVC HR-S5900U | Instructions - Page 55
To control two VCRs with the same Remote You can control two JVC VCRs by switching the remote control code for the Remote between A and B (੬ step 1), keeping two VCRs to different control codes. ● Press the Number key "1" for A code control signals and the Number key "2" for B code control signals - JVC HR-S5900U | Instructions - Page 56
TROUBLESHOOTING Before requesting service, use this chart and see if you can repair the trouble yourself. Small problems are often easily corrected, and this can save you the trouble of sending your VCR off for repair. POWER SYMPTOM 1. The power will not come on. 2. The clock works, but the VCR - JVC HR-S5900U | Instructions - Page 57
Make sure you have compensated for guide channel and VCR or cable box channel number tape to record the entire broadcast. Connect the Controller correctly (੬ pg. 15). After confirming your number (੬ pg. 19). Set the correct DBS receiver brand code (੬ pg. 20). Make sure the power is on before - JVC HR-S5900U | Instructions - Page 58
58 EN OTHER PROBLEMS SYMPTOM 1. When scanning channels, some of them are skipped over. 2. The channel cannot be changed. 3. The Remote will not operate your TV or cable box or DBS receiver. 4. Even though Auto or Semiauto Clock Set has been performed, the clock is incorrect. TROUBLESHOOTING (cont.) - JVC HR-S5900U | Instructions - Page 59
p. o. i.n.ts Q. Can the VCR indefinitely remain in the recording pause mode? A. No. The VCR automatically stops after 5 minutes to protect TIMER RECORDING Q. REC and ‰ remain lit on the front display panel. Is there a problem? A. No. This is a normal condition for a timer recording . . . i.n. - JVC HR-S5900U | Instructions - Page 60
46 From another VCR 48 To another VCR 48 Express timer programing 34 F FRONT AUX INPUT 43 Function Set screen 39 G Guide channel 32 H Host channel 8 I Index Search 24 Instant Review 24 Instant Timer Recording (ITR) 26 L Language setting 9 M Manual tracking 23 Multi-Brand Remote Setting cable box - JVC HR-S5900U | Instructions - Page 61
HR-S5900U/5910U) : ੬ pg. 46, 50 6 AUDIO/VIDEO input connectors : ੬ pg. 49, 50 7 S VHS ET button and lamp : ੬ pg. 27 8 REC LINK button and lamp : ੬ pg. 44 9 Front display panel : ੬ pg. 62 0 Remote sensor ! INSERT button @ (ONLY FOR HR-S5900U/5910U) : ੬ pg. 51 A.DUB button (ONLY FOR HR-S5900U/5910U - JVC HR-S5900U | Instructions - Page 62
*: AUDIO DUBBING INSERT PAUSE*: * ONLY FOR HR-S5900U/5910U. 2 Tape speed indicators 3 Program start time and stop time indicator : ੬ pg. 36 4 Timer mode indicator : ੬ pg. 31, 35 5 Tape remaining time indicator : ੬ pg. 22, 26 6 S-VHS indicator : ੬ pg. 21, 27 7 VCR mode indicator : ੬ pg. 25, 26 - JVC HR-S5900U | Instructions - Page 63
power cord : ੬ pg. 6 2 CABLE BOX Controller connector : 3 ੬ pg. 15, 18 REMOTE PAUSE/AV COMPULINK terminal ● REMOTE PAUSE terminal : ੬ pg. 42, 46 ● AV pg. 23, 42 6 Timer warning display : ੬ pg. 36 7 VCR operation mode indication 8 Tape speed indication 9 Cassette indication 0 Tape position indicator - JVC HR-S5900U | Instructions - Page 64
) E TV CH - MULTI BRAND REMOTE CONTROL UNIT The glow-in-the-dark buttons shown in white on the illustration above holding down TV on the Remote. (੬ pg. 52). INDEX (cont.) 1 CABLE/DBS button : ੬ pg. 53, 54 2 TV button: ੬ pg. 52 3 TV/VCR button : ੬ pg. 25, 26, 52 4 REVIEW button : ੬ pg. 24 - JVC HR-S5900U | Instructions - Page 65
HR-S5900U/5910U: (IN x 2, OUT x 1) For HR VHS cassette. ** This VCR can record on regular VHS and Super VHS cassettes. While only VHS signals can be recorded on regular VHS cassettes 1), both VHS and Super VHS signals can be recorded and played back using Super VHS cassettes. 1) By using the S-VHS ET - JVC HR-S5900U | Instructions - Page 66
. From the 48 Continental United States call toll free: 1-800-882-2345 or on the web at www.JVC.com Don't service the product yourself. CAUTION To prevent electrical shock, do not open the cabinet. There are no user serviceable parts inside. Please refer to qualified service personnel for repairs. - JVC HR-S5900U | Instructions - Page 67
If this product is found to be defective, JVC will repair or replace defective parts at no charge to the original owner. Such repair and replacement services shall be rendered by JVC during normal business hours at JVC authorized service centers. Parts used for replacement are warranted only for the - JVC HR-S5900U | Instructions - Page 68
HR-S5900U/5910U HR-S3900U/3910U VICTOR COMPANY OF JAPAN, LIMITED COPYRIGHT © 2001 VICTOR COMPANY OF JAPAN, LTD. U/U(C) Printed in Malaysia * * 0101 IYV ID PJ
-
 1
1 -
 2
2 -
 3
3 -
 4
4 -
 5
5 -
 6
6 -
 7
7 -
8
-
9
-
10
-
11
-
12
-
13
-
14
-
15
-
16
-
17
-
18
-
19
-
20
-
21
-
22
-
23
-
24
-
25
-
26
-
27
-
28
-
29
-
30
-
31
-
32
-
33
-
34
-
35
-
36
-
37
-
38
-
39
-
40
-
41
-
42
-
43
-
44
-
45
-
46
-
47
-
48
-
49
-
50
-
51
-
52
-
53
-
54
-
55
-
56
-
57
-
58
-
59
-
60
-
61
-
62
-
63
-
64
-
65
-
66
-
67
-
68
 |
 |

HR-S5900U/5910U
HR-S3900U/3910U
VIDEO CASSETTE RECORDER
INSTRUCTIONS
LPT0503-001A
For Customer Use:
Enter below the Model No. and
Serial No. which are located on the
rear of cabinet. Retain this
information for future reference.
Model No.
Serial No.
T
V
C
H
+
T
V
V
O
L
–
T
V
C
H
–
T
V
V
O
L
+
TV
CANCEL
TIMER
START
STOP
DATE
PLAY
REW
REC
STOP
SHUTTLE
PLUS
PAUSE
FF
MENU
OK
CH
POWER
TV/VCR
C.RESET
DBS
DAILY(M-F)
AUX
WEEKLY
PROG
CHECK
PROG
SP/EP
SKIP SEARCH
DISPLAY
A. MONITOR
CABLE/
DBS
1
2
3
4
5
6
7
8
9
0
2
4
1
3
MULTI BRAND
REMOTE CONTROL UNIT
MBRSET
A/B
T
V
C
H
+
T
V
V
O
L
–
T
V
C
H
–
T
V
V
O
L
+
TV
CANCEL
TIMER
START
STOP
DATE
PLAY
REW
REC
STOP
SHUTTLE
PLUS
PAUSE
FF
MENU
OK
CH
POWER
TV/VCR
C.RESET
DBS
DAILY(M-F)
AUX
WEEKLY
PROG
CHECK
PROG
SP/EP
SKIP SEARCH
DISPLAY
A. MONITOR
CABLE/
DBS
1
2
3
4
5
6
7
8
9
0
2
4
1
3
MULTI BRAND
REMOTE CONTROL UNIT
MBRSET
A/B
HR-S5900U/5910U
HR-S3900U/3910U
VIDEO (MONO)L—AUDIO—R
S VIDEO
A.DUB
S-VHS ET
FF
REW
POWER
SP
EP
VCR
REC
PAUSE
STOP/EJECT
PLAY
–
+
CH– /+
PUSH / TURN
INSERT
24HR QUICK
PROGRAM
REC LINK
VIDEO (MONO)L—AUDIO—R
DISPLAY
S-VHS ET
FF
REW
POWER
SP
EP
VCR
REC
PAUSE
STOP/EJECT
PLAY
–
+
CH– /+
PUSH / TURN
SP / EP
24HR QUICK
PROGRAM
REC LINK