Kenmore 9757 Use and Care Guide
Kenmore 9757 - 6.7 cu. Ft. HE2 Gas Dryer Manual
 |
View all Kenmore 9757 manuals
Add to My Manuals
Save this manual to your list of manuals |
Kenmore 9757 manual content summary:
- Kenmore 9757 | Use and Care Guide - Page 1
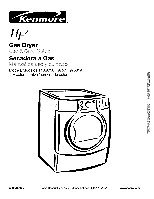
® Gas Dryer Secadora a Gas Models/Modelos 110.9756", 9757", 9758"_ = color number/n0mero de color W10035060 Sears Roebuck and Co., Hoffman Estates, IL 60179 U.S.A. www.sears.com - Kenmore 9757 | Use and Care Guide - Page 2
Lint 22 Vacation and Moving Care 22 TROUBLESHOOTING 23 PROTECTION AGREEMENTS 24 SERVICE NUMBERS BACK COVER KENMORE APPLIANCE AND OPTIONAL PEDESTAL WARRANTY ONE YEAR LIMITED WARRANTY When installed, operated and maintained according to all instructions supplied with the product, if this - Kenmore 9757 | Use and Care Guide - Page 3
on the product. Have this information available to help you obtain assistance or service more quickly whenever you contact Sears concerning your pedestal. Model number Serial number Purchase date Save these instructions and your sales receipt for future reference. DRYER SAFETY Your safety and the - Kenmore 9757 | Use and Care Guide - Page 4
not tamper with controls. [] Do not repair or replace any part of the dryer or attempt any servicing unless specifically recommended in this Use and Care Guide or in published user-repair instructions that you understand and have the skills to carry out. [] Do not use fabric softeners or products - Kenmore 9757 | Use and Care Guide - Page 5
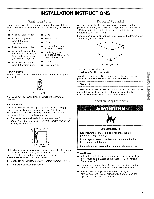
purchase from your local Sears store or Sears Service Center. For further information, please call 1-800 Kenmore washer and dryer? To do so, find the stack kit in the dryer drum. Follow instructions See "Electrical Requirements." • A sturdy floor to support the total dryer weight of 127 Ibs (57.6 - Kenmore 9757 | Use and Care Guide - Page 6
and rear. Recommended spacing should be considered for the following reasons: • Additional spacing should be considered for ease of installation and servicing. • Additional clearances might be required for wall, door and floor moldings. • Additional spacing should be considered on all sides of the - Kenmore 9757 | Use and Care Guide - Page 7
Do not use an adapter. Do not use an extension cord. Failure to follow these instructions can result in death, fire, or electrical shock. 120 Volt, 60 Hz., AC only a risk of electric shock. Check with a qualified electrician or service representative or personnel if you are in doubt as to whether - Kenmore 9757 | Use and Care Guide - Page 8
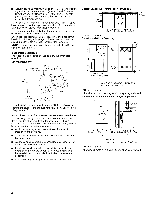
, contact your local Sears store or Sears Service Center. LP gas conversion: Conversion must be include a shutoff valve: An individual manual shutoff valve must be installed in accordance with reduction of the burner Btu rating shown on the model/serial number plate is required for each 1,000 - Kenmore 9757 | Use and Care Guide - Page 9
use a plastic vent. Do not use a metal foil vent. Failure to follow these instructions can result in death or fire. WARNING: To reduce the risk of fire, this for cleaning. • Flexible metal vent must be fully extended and supported when the dryer is in its final location. • Remove excess flexible - Kenmore 9757 | Use and Care Guide - Page 10
latch. Improper venting can cause moisture and lint to collect indoors, which may result in: [] Moisture damage to woodwork, furniture, paint, wallpaper, carpets, etc. [] Housecleaning problems and health problems. 10 - Kenmore 9757 | Use and Care Guide - Page 11
installations Fire Hazard Cover unused exhaust holes with the following kit: 279818 (white) Contact your local dealer. Failure to follow these instructions can result in death, fire, electrical shock, or serious injury. A B A. Over-No-top installation (also available with one offset elbow - Kenmore 9757 | Use and Care Guide - Page 12
Determine vent length and elbows needed for best drying performance • Use the following Vent system chart to determine type of vent material and hood combinations acceptable to use. • NOTE: Do not use vent runs longer than those specified in the Vent system chart. Exhaust systems longer than those - Kenmore 9757 | Use and Care Guide - Page 13
vent is secured to exhaust hood with a 4" (10.2 cm) clamp. 2. Move dryer into its final location. Do not crush or kink vent. 3. (On gas models) Make sure that there are no kinks in the flexible gas line. 1-®TEFLON is a registered trademark of E.L Du Pont De Nemours and Company. o _ 4= Lift the - Kenmore 9757 | Use and Care Guide - Page 14
5. Rotate outer door 180 °. 180 ° 6. Reassemble the inner and outer door assemblies with the 6 screws. Reverse hinge 1. Use a small flat-blade screwdriver to remove 2 plug strips from the inner door. Slide the head of the screwdriver under the plugs, being certain not to scratch the inner door - Kenmore 9757 | Use and Care Guide - Page 15
a grounded 3 prong outlet. Do not remove ground prong. Do not use an adapter. Do not use an extension cord, Failure to follow these instructions can result in death, fire, or electrical shock. 6. Plug into a grounded 3 prong outlet. Turn on power. 7. Remove any protective film or tape remaining - Kenmore 9757 | Use and Care Guide - Page 16
steps to start your dryer. Please refer to specific sections of this manual for more detailed information. 1. Clean lint screen before each load. See on a clothesline or by using an Air Cycle. Failure to follow these instructions can result in death or fire. To make changes to the Dryness Level - Kenmore 9757 | Use and Care Guide - Page 17
available. • If desired, add a fabric softener sheet. Follow package instructions. • To reduce wrinkling, remove the load from the dryer as or Timed Cycles Preset Settings chart (in the "Cycles" section) for a guide to drying various loads. • Drying temperature and Dryness Level are preset when you - Kenmore 9757 | Use and Care Guide - Page 18
Follow the progress of your dryer with the drying Status indicator lights. STATUS wet? Damp ? Cool Down? Clothes Dry9 Wrinkle GuardO ControlsLocked CheckLint Screen Wet The Wet light illuminates at the beginning of an Auto Cycle if a wet item is detected. • In an Auto Cycle, if a wet item is not - Kenmore 9757 | Use and Care Guide - Page 19
Auto Cycles Preset Settings Auto Cycles Load Type Temperature HEAVY DUTY Heavyweight mixed loads, towels JEANS Denim pants, jackets NORMAL Sheets, corduroys, sturdy work clothes CASUAL Permanent press, synthetics, casual business clothes DELICATE Lingerie, blouses High Medium High Medium Low Extra - Kenmore 9757 | Use and Care Guide - Page 20
You can customize your cycles by selecting options. O WrinkleGuard90 LOCK/ bNLOCKCONIROLS WRINKLE GUARD e_90 WRINKLE GUARD ®90 helps smooth out wrinkles that form when you cannot unload the dryer promptly at the end of a cycle. During this option, the dryer periodically starts and stops, tumbling - Kenmore 9757 | Use and Care Guide - Page 21
This chart shows examples of items that can be rack dried and the suggested temperature setting and drying time. Actual drying time will depend on the amount of moisture items hold. Rack Dry Setting Temp. Time* Wool Sweaters Timed Low 60 Block to shape and lay flat on the rack. Cycles - Kenmore 9757 | Use and Care Guide - Page 22
To clean dryer drum 1. Make a paste with powdered laundry detergent and very warm water. 2. Apply paste to a soft cloth. OR Apply a liquid, nonflammable household cleaner to the stained area and rub with a soft cloth until all excess dye and stains are removed. 3. Wipe drum thoroughly with a damp - Kenmore 9757 | Use and Care Guide - Page 23
TROUBLESHOOTING First try the solutions suggested here and possibly avoid the cost of a service call... Dryer will not run • Has a household fuse blown, or circuit breaker tripped? Replace the fuse or reset the circuit breaker. If the problem . See "Installation Instructions." Is the clothing - Kenmore 9757 | Use and Care Guide - Page 24
the dryer requires 5" (12.7 cm). See "Installation Instructions." • Has an air dry modifier been selected? Select smart purchase. Your new Kenmore ®product is designed help by phone - phone support from a Sears technician on 827-6655. Sears Installation Service For Sears professional installation - Kenmore 9757 | Use and Care Guide - Page 25
DE PROBLEMAS 45 CONTRATOS DE PROTECCION 47 NUMEROS DE SERVICIO CONTRAPORTADA GARANTiA DE LOS ELECTRODOMI:!:STICOSY LOS PEDESTALES OPCIONALES KENMORE GARANTIA LIMITADA DE UN AI_IO Cuando este electrodomestico haya sido instalado, operado y mantenido segQn las instrucciones provistas con el - Kenmore 9757 | Use and Care Guide - Page 26
DE LA SECADORA Su seguridad y la seguridad de los demas es muy importante. Hemos incluido muchos mensajes importantes de seguridad en este manual yen su electrodomestico. Lea y obedezca siempre todos los mensajes de seguridad. Este simbolo le llama la atenci6n sobre peligros potenciales que pueden - Kenmore 9757 | Use and Care Guide - Page 27
los controles. [] No repare o reemplace ninguna pieza de la secadora ni trate de repararla a menos que esto se recomiende especificamente en el Manual del propietario o en instrucciones de reparaci6n publicadas para el usuario que usted comprenda y s61o si cuenta con la experiencia necesaria para - Kenmore 9757 | Use and Care Guide - Page 28
de Sears. Para mas informaci6n, Ilame per favor al 1-800-4-MY-HOME ® (1-800-469-4663). Juego para apilar _,Esta usted planeando apilar la lavadora y secadora Kenmore? Para hacer eso, busque el juego para apilar en el tambor de la secadora. Siga las instrucciones que se incluyen con el juego. Vea - Kenmore 9757 | Use and Care Guide - Page 29
• Un contacto con conexi6n a tierra ubicado a no mas de 2 pies (61 cm) de cualquiera de los lades de la secadora. Vea "Requisitos electricos." • Un piso resistente para soportar la secadora con un peso total de 127 Ibs (57,6 kgs). Asimismo se debe considerar el peso de otro artefacto que la acompa_e - Kenmore 9757 | Use and Care Guide - Page 30
Instalacibn empotrada o en el cl6set - Secadora sobre el pedestal eelI-1t 14f_ 27"---_- (2,5cm) (68,6cm) A 4E-- 1" {2,5cm) I1"*1_28,65"_5-I""1 {2,5cm) (72,77cm) (12,7crn) B A. Lugar empotrado B. Vista lateral - cldset o lugar confinado *Espacio necesario **Para la ventilaci6n lateral o por la - Kenmore 9757 | Use and Care Guide - Page 31
Peligro de Choque Electrico Conecte a un contacto de pared de conexi6n a tierra de 3 terminales. No quite la terminal de conexi6n a tierra. No use un adaptador. No use un cable electrico de extensi6n. No seguir estas instrucciones puede ocasionar la muerte, incendio o choque el_ctrico. Se necesita - Kenmore 9757 | Use and Care Guide - Page 32
que resistan la accidn del gas LR No use cinta de TEFLON% • Debe incluir una valvula de cierre: Debe instalarse una valvula de cierre individual manual a una distancia de no mas de 6 pies (1,8 m) de la secadora de acuerdo con el C6digo Nacional de Gas combustible (National Fuel Gas Code), ANSI Z223 - Kenmore 9757 | Use and Care Guide - Page 33
Si este es un nuevo sistema _J_YAYAYAYAY_ Material de ventilaci6n de ventilacibn • Use un ducto de escape de metal pesado. No use ducto de escape de plastico o de hoja de metal. • Se debe usar un ducto de escape de metal pesado de 4" (10,2 cm) y abrazaderas. Los productos de ventilaci6n DURASAFF - Kenmore 9757 | Use and Care Guide - Page 34
S ,;::,%_t {¢:_(}@ Seleccione su tipo de instalacibn de ventilacibn Instalaciones recomendadas de escape Las instalaciones tipicas tienen la ventilaci6n en la parte posterior de la secadora. Otras instalaciones son posibles. B Instalaciones alternas para espacios limitados Los sistemas de - Kenmore 9757 | Use and Care Guide - Page 35
Determinacibn de la via del ducto de escape • Seleccione la vfa que proporcione el trayecto mas recto y directo al exterior. • Planifique la instalaci6n a fin de usar el menor nQmero posible de codes y vueltas. • Cuando use los codos o haga vueltas, deje todo el espacio que sea posible. • Doble el - Kenmore 9757 | Use and Care Guide - Page 36
Para su uso en casas rodantes Las secadoras a gas deben set aseguradas al piso en el momento de la instalaci6n. 3. Abra la vMvula de cierre en la linea de suministro. La vMvula esta abierta cuando la manija esta paralela al tube de gas. La instalaci6n en casas rodantes requiere el Juego de - Kenmore 9757 | Use and Care Guide - Page 37
Usted puede invertir el cierre de la puerta de la apertura a la derecha a la apertura a la izquierda, si Io desea. 1. Coloque una toalla o un patio suave en la parte superior de la secadora o de la superficie de trabajo, para proteger la superficie. C6mo quitar el ensamblaje de la puerta 1. Quite - Kenmore 9757 | Use and Care Guide - Page 38
Invierta el tope 1. Use un pequer_o destornillador de hoja plana para quitar la cinta del tapdn de la abertura de la puerta de la secadora. Deslice la cabeza del destornillador debajo de los tapones, siendo cuidadoso de no rayar la superficie de la secadora. Levantela. 2. Saque el tope. 3. Inserte - Kenmore 9757 | Use and Care Guide - Page 39
la muerte, explosi6n o incendio. Siga estos pasos basicos para poner su secadora en marcha. Per favor consulte las secciones especfficas de este manual para obtener informaci6n mas detallada. 1. Limpie el filtro de pelusa antes de cada carga. Vea "Limpieza del filtro de pelusa". 2. Coloque la - Kenmore 9757 | Use and Care Guide - Page 40
NOTA: Las selecciones de Nivel de secado automatico (Dryness Level) funcionan Qnicamente con los ciclos de secado automatico. AI seleccionar Mas (More), Normal o Menos (Less) se regula automaticamente el tiempo detectado que se necesita. More Normal Less © Dryness Level AUTO CYCES ONLY Los ciclos de - Kenmore 9757 | Use and Care Guide - Page 41
Sugerencias de ciclos • Sequela mayorfa de las cargas usando los ajustes prefijados de ciclos. • Consulte el cuadro de Ajustes prefijados automaticos o programados (en la secci6n "Ciclos") a fin de obtener una guia para el secado de diversas cargas de ropa. • La temperatura de secado y el nivel de - Kenmore 9757 | Use and Care Guide - Page 42
Ropa delicada (Delicate) Use este ciclo para obtener calor extra bajo para secar fibras sinteticas, tejidos de punto lavables y de acabado inarrugable. Ajustes prefijados de ciclos automaticos Ciclos automaticos Tipo de carga Secado intenso (HEAVY DUTY) Cargas mixtas de ropa pesada, toallas - Kenmore 9757 | Use and Care Guide - Page 43
Cuando use s61o aire • Revise las cubiertas para ver si las costuras estan firmes. • Sacuda y palmotee las almohadas con la mano peri6dicamente durante el ciclo. • Seque el art[culo completamente. Las almohadas de goma espuma tardan en secar. NOTA: El modificador de s61o aire no esta disponible en - Kenmore 9757 | Use and Care Guide - Page 44
NOTA: No permita que los arlculos cuelguen del borde del estante de secado. Secado con estante Ajuste Temp. Tiempo* Su6teres de lana Ciclos Baja 60 Darles la forma original y colocarlos extendidos sobre el estante de secado, programados (Low) 4. Cierre la puerta. 5. Oprima el bot6n de - Kenmore 9757 | Use and Care Guide - Page 45
Limpieza segt_n la necesidad Los residuos de detergente de lavandena y suavizante de telas pueden acumularse en el filtro de pelusa. Esta acumulaci6n puede ocasionar tiempos de secado mils prolongados para su ropa, o hacer que la secadora se detenga antes de que su carga este completamente seca. Si - Kenmore 9757 | Use and Care Guide - Page 46
&Hay una moneda, botbn o sujetapapeles entre el tambor y la parte frontal o trasera de la secadora? Revise los bordes frontales y traseros del tambor para verificar si hay objetos pequeSos. Limpie los bolsillos antes del lavado. Es una secadora a gas? El chasquido de la valvula de gas es un sonido - Kenmore 9757 | Use and Care Guide - Page 47
, vuelva a lavar y secar la ropa. CONTRATOS DE PROTECCION Contratos Maestros de Proteccibn iFelicitaciones per su inteligente adquisici6n! Su nuevo producto Kenmore _ ha side dise_ado y fabricado para brindarle a_os de funcionamiento confiable. Pero al igual que todos los productos, puede necesitar - Kenmore 9757 | Use and Care Guide - Page 48
sold it! For the replacement parts, accessories and owner's manuals that you need to do-it-yourself. For Sears professional installation © 2006 Sears Brands, LLC ® Registered Trademark TM / Trademark SM • / Service Mark of Sears Brands, LLC @ Marca Registrada TM • SM .. / Marca de
-
 1
1 -
 2
2 -
 3
3 -
 4
4 -
 5
5 -
 6
6 -
 7
7 -
8
-
9
-
10
-
11
-
12
-
13
-
14
-
15
-
16
-
17
-
18
-
19
-
20
-
21
-
22
-
23
-
24
-
25
-
26
-
27
-
28
-
29
-
30
-
31
-
32
-
33
-
34
-
35
-
36
-
37
-
38
-
39
-
40
-
41
-
42
-
43
-
44
-
45
-
46
-
47
-
48
 |
 |
®
Gas Dryer
Secadora
a Gas
Models/Modelos
110.9756",
9757",
9758"_
= color
number/n0mero
de color
W10035060
Sears Roebuck
and Co., Hoffman
Estates,
IL
60179 U.S.A.
www.sears.com