Kenmore 9757 Use and Care Guide - Page 20
WrinkleGuard90, WRINKLE, GUARD, Cycle Signal, Changing, Cycles, after, pressing, Start, Modifiers,
 |
View all Kenmore 9757 manuals
Add to My Manuals
Save this manual to your list of manuals |
Page 20 highlights
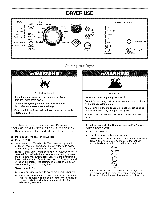
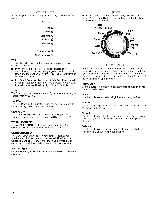
You can customize your cycles by selecting options. O WrinkleGuard90 LOCK/ bNLOCKCONIROLS WRINKLE GUARD e_90 WRINKLE GUARD ®90 helps smooth out wrinkles that form when you cannot unload the dryer promptly at the end of a cycle. During this option, the dryer periodically starts and stops, tumbling the load for 90 minutes. • Press WRINKLE GUARD ®90 to get up to 90 minutes of heatfree, periodic tumbling at the end of a cycle. • Stop WRINKLE GUARD ® 90 at any time by pressing WRINKLE GUARD ®90 or opening the dryer door. • WRINKLE GUARD ®90 is preset to OFF. The Auto Dry cycles will retain the WRINKLE GUARD ®90 setting. For example, if you select WRINKLE GUARD ®90 in the Normal cycle, WRINKLE GUARD ®90 will be on the next time you select the Normal cycle. NOTE: WRINKLE GUARD ® 90 must be selected with a cycle in order to work. If you do not select WRINKLE GUARD _ 90, the dryer stops after cool down. Cycle Signal The Cycle Signal produces an audible sound when the drying cycle is finished. Promptly removing clothes at the end of the cycle reduces wrinkling. Press CYCLE SIGNAL to turn the signal off. NOTE: When WRINKLE GUARD _ 90 is selected and the Cycle Signal is on, a tone sounds every 5 minutes until the clothes are removed, or WRINKLE GUARD ®90 ends. The dryer rack is shipped in place in your dryer. Remove and discard any packing material before use. Use the TUMBLE FREF M Non-Heated Dryer Rack for items that you do not want to tumble dry, such as sweaters. To use the dryer rack Do not remove the lint screen. 1. Open dryer door. A. Front edge 2. Place dryer rack inside dryer drum, positioning the back wire on the ledge of the inner dryer back panel. Push down on front edge of dryer rack to secure over the lint screen. A A. Dryer rack front edge B. Dryer back panel 3. Put the wet items on top of the rack. Leave space between the items so air can reach all the surfaces. NOTE: Do not allow items to hang over the edge of the rack. You can change Auto Cycles, Timed Cycles, Modifiers and Options anytime before pressing Start. • Three short tones sound if an unavailable combination is selected. The last selection will not be accepted. Changing Cycles after pressing Start 1. Press STOP twice. This ends the current cycle. 2. Select the desired cycle and options. 3. Press and hold START. The dryer starts at the beginning of the new cycle. NOTE: If you do not press Start within 5 minutes of selecting the cycle, the dryer automatically shuts off. Changing Modifiers and Options after pressing Start You can change a Modifier or Option anytime before the selected Modifier or Option begins. 1. Press STOP once. 2. Select the new Modifier and/or Option. 3. Press and hold START to continue the cycle. NOTE: If you happen to press Stop twice, the program clears and your dryer shuts down. Restart the selection process. 4. Close the door. 5. Press the POWER button. 6. Select a timed cycle and temperature (see following chart). Items containing foam, rubber, or plastic must be dried on a clothesline or by using the Air Only temperature setting. 7. You may change the cycle time by pressing MORE TIME or LESS TIME. Reset time as needed to complete drying. Refer to the following table. 8. Press (and hold) START button (about 3 seconds). NOTE: You must remove rack for normal tumbling. Do not use automatic cycles with the dryer rack. 20
-
 1
1 -
2
-
3
-
4
-
5
-
6
-
7
-
8
-
9
-
10
-
11
-
12
-
13
-
14
-
 15
15 -
 16
16 -
 17
17 -
 18
18 -
 19
19 -
 20
20 -
 21
21 -
 22
22 -
 23
23 -
 24
24 -
 25
25 -
26
-
27
-
28
-
29
-
30
-
31
-
32
-
33
-
34
-
35
-
36
-
37
-
38
-
39
-
40
-
41
-
42
-
43
-
44
-
45
-
46
-
47
-
48
 |
 |
