Kodak P460 User Guide - Page 10
Automatic Image Cropping, Connect Scanner to a PC, PC System Requirements - manual
 |
View all Kodak P460 manuals
Add to My Manuals
Save this manual to your list of manuals |
Page 10 highlights
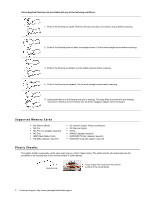
When scanning is completed, the Power and Status/Card indicator lights blink while the scanner stores the photo on the memory card. Wait until the indicator lights stop blinking before inserting and scanning the next photo. CAUTION: Insert only one filmstrip at a time, and insert the next filmstrip only when the previous one is done. Otherwise the scanner may malfunction. Do not remove the memory card or disconnect the power supply while the indicators are blinking. This scanner produces JPEG (.jpg) file formats. The date/ time attribute will not be added. If the memory card is nearly full (less than 1 MB remaining), the Status/Card indicator blinks (refer to "Indicator Lights" on page 5). Use another card or transfer pictures to your computer. To remove the 35mm Negative adapter after all filmstrips are scanned, gently pull it out from the feed slot. To power down the scanner, press and hold the power button for one second. The power indicator will blink and then go off. Now you can safely disconnect the power and remove the memory card from the scanner. Automatic Image Cropping The scanner has a built-in cropping function that detects and crops dark edges of an original during the scan process (see following illustration). Cropping size (as measured on the original) Max. 1.5mm Max. 1.5mm Max. 1.5mm Original Max. 1.5mm Scanned image Use the plastic sheath when scanning originals that are sized or shaped other than the standard 3.5"x5" or 4"x6". Depending on the shape, you may want to perform additional manual cropping on the scanned image, using your own photo editing software, to achieve your desired final image. When scanning darker originals (for example, a photo of the night sky), over-cropping may occur. Please insert the original in a different direction (orientation) and try again. When scanning over-exposed, older or lighter color (faded) filmstrip originals, an irregular auto-cropping may occur. Cut the filmstrip into individual films and rescan them. Connect Scanner to a PC By connecting the scanner to a computer, you can access the scanned pictures on the memory card directly, or use the scanner as a memory card reader, so that you can freely copy, paste or delete files to and from the memory card using the PC. PC System Requirements Operating system: WINDOWS XP, VISTA, WINDOWS 7 or later - 32 bit USB Port Supported: USB 1.1 or 2.0 port 1. Connect the plug on the power adapter cord to the power connector on the scanner. 10 Customer Support: http://www.pandigital.net/kodaksupport
-
 1
1 -
2
-
3
-
4
-
 5
5 -
 6
6 -
 7
7 -
 8
8 -
 9
9 -
 10
10 -
 11
11 -
 12
12 -
 13
13 -
 14
14 -
 15
15 -
16
-
17
-
18
-
19
-
20
-
21
-
22
-
23
-
24
-
25
-
26
-
27
-
28
-
29
-
30
-
31
-
32
-
33
-
34
-
35
-
36
-
37
-
38
-
39
-
40
-
41
-
42
-
43
-
44
-
45
-
46
-
47
-
48
-
49
-
50
-
51
-
52
-
53
-
54
-
55
-
56
-
57
-
58
-
59
 |
 |
