Kodak P460 User Guide - Page 4
Introduction, Scanner Overview - photo scanner
 |
View all Kodak P460 manuals
Add to My Manuals
Save this manual to your list of manuals |
Page 4 highlights
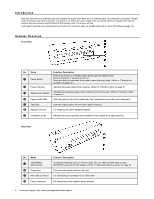
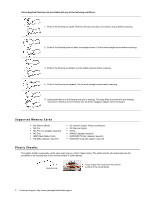
Introduction Now you can scan your printed photos and negative films and store them on your memory card. No computer is necessary. Simply insert a memory card into the scanner, and power it on. When the unit is ready, feed your printed photo or negative film into the scanner and your pictures will be stored on the memory card. It's as easy as that. If you want to transfer your photos directly into your PC, it's just as easy via a USB cable and our Scan PC Software (page 12). Scanner Overview Front View No. Name Power Button Power Indicator Status/Card Indicator Paper Guide Slide Feed Slot Adapter Grooves Orientation guide Function/ Description Press once to turn on in 600dpi mode; press again for 300dpi mode. Press and hold for 2 seconds to turn off. Press and hold for more than 6 seconds to enter cleaning mode. (Refer to "Cleaning the Scanner" on page 15.) Indicates the power status of the scanner. (Refer to "Indicator Lights" on page 5.) Indicates the operating status of the scanner and memory card. (Refer to "Indicator Lights" on page 5.) Slide the guide to adjust for smaller than 4x6" originals to ensure the proper alignment. Insert an original photo into this slot to begin scanning. For installing the 35mm Negative adapter. Indicates the correct position and orientation of the original for proper scanning. Rear View No. Name SD/xD/MMC/ MS Card slot Output slot Mini USB connector Power connector Function/ Description Accepts the following types of memory cards: SD, xD, MMC and MS. Also accepts MICROSD Cards with an SD adapter. (Refer to "Supported Memory Cards" on page 6.) The scanned original exits from this slot. For connecting to a computer via a USB cable. For connecting to the supplied power adapter. 4 Customer Support: http://www.pandigital.net/kodaksupport
-
 1
1 -
 2
2 -
 3
3 -
 4
4 -
 5
5 -
 6
6 -
 7
7 -
 8
8 -
 9
9 -
 10
10 -
11
-
12
-
13
-
14
-
15
-
16
-
17
-
18
-
19
-
20
-
21
-
22
-
23
-
24
-
25
-
26
-
27
-
28
-
29
-
30
-
31
-
32
-
33
-
34
-
35
-
36
-
37
-
38
-
39
-
40
-
41
-
42
-
43
-
44
-
45
-
46
-
47
-
48
-
49
-
50
-
51
-
52
-
53
-
54
-
55
-
56
-
57
-
58
-
59
 |
 |
