Konica Minolta Kodak i4600 User Guide
Konica Minolta Kodak i4600 Manual
 |
View all Konica Minolta Kodak i4600 manuals
Add to My Manuals
Save this manual to your list of manuals |
Konica Minolta Kodak i4600 manual content summary:
- Konica Minolta Kodak i4600 | User Guide - Page 1
- Konica Minolta Kodak i4600 | User Guide - Page 2
and disconnect the power cord from the power outlet. Contact Kodak Service. • Do not disassemble, service or modify the scanner except as explained in the User's Guide. • Do not move the scanner with the power cord and interface cable attached. This may cause damage to the cord/cable. Remove the - Konica Minolta Kodak i4600 | User Guide - Page 3
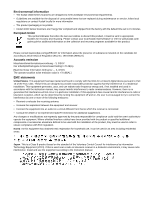
or service; follow local regulations or contact Kodak locally for more information. • The product packaging is recyclable. • Kodak i4000 Series Scanners are generates, uses, and can radiate radio frequency energy and, if not installed and used in accordance with the instruction manual, may - Konica Minolta Kodak i4600 | User Guide - Page 4
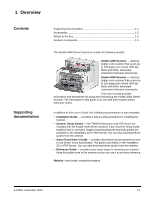
) lettersize documents. Kodak i4600 Scanner - desktop duplex color scanner than scans up to 120 pages per minute (200 dpi, black and white, landscape orientation) lettersize documents. This User's Guide provides information and procedures for using and maintaining the Kodak i4000 Series Scanner. The - Konica Minolta Kodak i4600 | User Guide - Page 5
Kit for Ultra-Lightweight Paper includes a feed module and separation roller that are specially designed to feed light-weight paper through the scanner transport. Kodak A3 Flatbed Accessory - the Kodak A3 Flatbed adds scanning capability for exception documents up to 11 x 17-inch (A3) size paper to - Konica Minolta Kodak i4600 | User Guide - Page 6
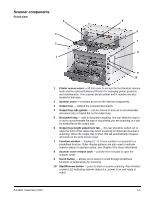
Enhanced Printer for changing printer positions and maintenance. The scanner serial number and K number are also located in this area. 2 Scanner cover - provides access to the internal components. 3 Output tray - collects the scanned documents. 4 Output tray side guides - can be moved in and out to - Konica Minolta Kodak i4600 | User Guide - Page 7
hold for one second to turn the scanner off. 13 Input Elevator side guides - slide the guides in or out to accommodate the document size you want to scan. Side guides can be left-, center- and right-adjusted to accommodate documents of various widths. The side guides can also be locked into position - Konica Minolta Kodak i4600 | User Guide - Page 8
Printer access view Even if you do not have the Kodak Enhanced Printer Accessory, you will still need to access this area of the scanner. The feed module release knob is located in this area. 3 4 2 1 1 Printer cable - this cable connects directly to the printer carrier to allow communication to - Konica Minolta Kodak i4600 | User Guide - Page 9
on one side, you can use the white background to help eliminate bleed-through in the final image. See the User's Guide for Image Processing - TWAIN Datasource/ISIS Driver for more information. 4 Rollers - provides smooth transport of documents through the scanner. 5 Feed module - provides smooth - Konica Minolta Kodak i4600 | User Guide - Page 10
of the scanner allowing exception documents to be outputted through the rear document exit. 3 USB ports - connects the scanner to the scanner. 5 Security lock port - connects a security lock to the scanner. You can purchase a standard security lock at an office supply store. Refer to the instructions - Konica Minolta Kodak i4600 | User Guide - Page 11
the scanner 2-1 Installing the Kodak Driver Software 2-2 Attaching the output tray 2-3 Connecting the power cord and USB cable 2-3 Turning on the scanner 2-4 Turning off the scanner 2-4 Installing the scanner This section provides detailed information supporting the Installation Guide that - Konica Minolta Kodak i4600 | User Guide - Page 12
systems Do not install the USB cable before installing the Kodak Driver Software. 1. Insert the Kodak i4000 Series Scanners Installation CD in the CD-ROM drive. The installation program starts automatically. 2. Select Install Scanner Software. NOTES: • If the CD does not start automatically, open - Konica Minolta Kodak i4600 | User Guide - Page 13
When you unpack the Kodak i4000 Series Scanner, the output tray is packed in a separate box. • Locate the output tray slots on the scanner, align the output tray with the slots and set the output tray in place. Connecting the power cord and USB cable When the drivers have been installed, connect - Konica Minolta Kodak i4600 | User Guide - Page 14
elevator will open if it is not already opened and the green indicator on the Start/Resume button will flash as the scanner goes through a series of self tests. The scanner takes less than 15 seconds to complete the power-up sequence and be ready to scan. When the installation process is - Konica Minolta Kodak i4600 | User Guide - Page 15
ready to scan 3-6 Selecting your scanning application 3-7 Quick start Kodak i4000 Series Scanners were designed to be easy to use and get you scanning quickly. All you need to do to start scanning to PDF is place your documents in the input elevator, press the Scroll button to display "2" and - Konica Minolta Kodak i4600 | User Guide - Page 16
feeding or independently for offset feeding (right-edge or leftedge). Before moving the side guides, be sure the locking switch is not in the locked position (see below). NOTE: When using the optional Enhanced Printer, documents should be placed in the input elevator in a manner that will align the - Konica Minolta Kodak i4600 | User Guide - Page 17
Datasource) or the Longest Document option on the Scanner tab (ISIS Driver) is set to longer than the longest document being scanned. NOTES: • Operator assistance may be required for scanning documents greater than 43.2 cm (17 inches). • It is recommended that you use a document extender if you are - Konica Minolta Kodak i4600 | User Guide - Page 18
, you can quickly and easily remove the scanned documents from the front-, right- or left-side of the scanner. Try using this method before using the side guides and document stop. NOTE: If you find it more convenient to use the side guides and document stop, see the next section for adjustment - Konica Minolta Kodak i4600 | User Guide - Page 19
than the output tray will accommodate, fold the document stop flat on the output tray. • Opening the rear document exit - documents that require special handling (i.e., fragile documents, shipping envelopes, etc.) can be outputted using the rear document exit. This exit provides the straight-through - Konica Minolta Kodak i4600 | User Guide - Page 20
transported through the scanner, place the document in a clear protective sleeve and use the rear document exit. Sleeves should be manually fed, one at a time, folded edge first, using the gap release toggle switch. NOTE: The optional Kodak A3 Flatbed Accessory can also be used for scanning fragile - Konica Minolta Kodak i4600 | User Guide - Page 21
- such as Microsoft SharePoint. Kodak Capture Pro Software is also available for use with the Kodak i4000 Series Scanners. Go to www.Kodak.com/go/capturepro for more information. Many other companies have included support for Kodak i4000 Series Scanners in their scanning applications. Contact - Konica Minolta Kodak i4600 | User Guide - Page 22
Accessory. NOTE: See the instructions that came with the Enhanced Printer Accessory for procedures on how to install this accessory. Refer to the Scanning Setup Guide for the TWAIN Datasource or ISIS Driver on the CD or your scanning application documentation for more information about enabling - Konica Minolta Kodak i4600 | User Guide - Page 23
Print orientation Font size Print side Minimum printing distance from document lead edge Ink cartridge Characters per ink cartridge Static fields available Dynamic fields available Languages supported Description 1 40 (including spaces) 8 front manually set Set by the scanning application 0 and 90 - Konica Minolta Kodak i4600 | User Guide - Page 24
Installing/Replacing the ink cartridge You must install the ink cartridge before using the printer. Refer to the section entitled, "Supplies and consumables" in Chapter 5 for ordering information. After initial installation, replace the ink cartridge when: • printed characters - Konica Minolta Kodak i4600 | User Guide - Page 25
3. If you are installing the ink cartridge for the first time, push the connector on the printer cable firmly into the printer carrier. NOTE: If you are replacing an ink cartridge, the printer cable will already be installed and you just need to remove the printer carrier from it's position and - Konica Minolta Kodak i4600 | User Guide - Page 26
test by using the Kodak Scan Validation Tool. 1. Place a blank sheet of paper in the input elevator. 2. Ensure that the ink cartridge is properly installed. 3. Select Start>Programs>Kodak>Document Imaging>Scan Validation Tool. 4. Select TWAIN for the Driver Type and the KODAK Scanner: i4000. The - Konica Minolta Kodak i4600 | User Guide - Page 27
5. Click the Setup displayed. icon. The Scan Validation Tool main window will be 6. Select the Default Setting Shortcut and click Settings. 7. On the General tab, click the Device button. 4-6 A-61651 November 2010 - Konica Minolta Kodak i4600 | User Guide - Page 28
8. On the Device - General tab, click the Diagnostics button. The GeneralDiagnostics window will be displayed. 9. Check the Printer check box and click Done. 10. Scan the blank sheet of paper that is in the input elevator. 11. Check the quality of the test pattern. If the test pattern is - Konica Minolta Kodak i4600 | User Guide - Page 29
manually. 1. Remove the output tray. 2. Open the printer access cover. NOTES: • The horizontal print positions are visible by a small detent on the printer rail. • Printing automatically stops approximately 1.27 cm (½-inch) from the trailing edge of the document can be used as a guide to verify your - Konica Minolta Kodak i4600 | User Guide - Page 30
the ink blotter channels at installation, are located in the scanner transport to collect ink overflow. To order additional ink blotter channels. A-61651 November 2010 NOTE: Improperly aligned blotter strips may cause document jams. 7. Press the adhesive side of the blotter strip down firmly - Konica Minolta Kodak i4600 | User Guide - Page 31
the section entitled, "Running a print test" earlier in this chapter. • Clean the print head (see "Printing problems when starting up due to dry print head" below.) Remove the ink cartridge from the scanner and using a damp cloth or swab, dab (do not wipe) the ink jets on the ink cartridge, replace - Konica Minolta Kodak i4600 | User Guide - Page 32
or separation roller tires 5-14 Replacing the pre-separation pad 5-15 Replacing the imaging guides 5-16 Replacing the Flippable White Background strip(s 5-16 Supplies and consumables 5-17 This chapter describes the required cleaning and maintenance procedures for the Kodak i4000 Series Scanners - Konica Minolta Kodak i4600 | User Guide - Page 33
materials when performing routine maintenance on your scanner. Use of any other cleaning materials could damage your scanner. • Kodak Digital Science Transport Cleaning Sheets • Kodak Digital Science Roller Cleaning Pads • Staticide wipes for Kodak Scanners • A vacuum cleaner and tools Opening the - Konica Minolta Kodak i4600 | User Guide - Page 34
document types generate more paper dust and debris and may require more frequent cleaning. Before cleaning your scanner or roller or feed module if necessary. • When cleaning rollers/tires, allow the rollers/tires to dry completely before scanning. • Use only the recommended cleaning supplies. Using - Konica Minolta Kodak i4600 | User Guide - Page 35
input elevator area. Cleaning the rollers includes all of the rollers in the transport area, the separation roller tires and the feed module tires. 1. Open the scanner cover. 2. Manually rotate and wipe the rollers with a roller cleaning pad. 3. Dry the rollers with a lint-free cloth. 5-4 A-61651 - Konica Minolta Kodak i4600 | User Guide - Page 36
remove the separation roller. NOTE: The separation roller cover is spring-loaded. Hold the separation roller cover back until you remove the separation roller, then gently lower the roller cover back in place. 5. Manually rotate and wipe the separation roller tires with a roller cleaning pad. For - Konica Minolta Kodak i4600 | User Guide - Page 37
Cleaning the feed module tires 8. Clean the feed module tires by manually rotating and wiping the feed module tires with a roller cleaning pad. For best results wipe parallel to the ribs in order to remove any residue between the ribs. You do not need to remove - Konica Minolta Kodak i4600 | User Guide - Page 38
Cleaning the imaging guides - basic cleaning 12. Wipe the upper and lower imaging guides with a Staticide wipe. 13. Wipe the upper and lower imaging guides again with an almost-dry Staticide wipe to remove any streaks. 14. Close the scanner cover. A-61651 November 2010 5-7 - Konica Minolta Kodak i4600 | User Guide - Page 39
at the start of the day and beginning of each shift. NOTE: Hold the imaging guides at the green tabs to avoid getting fingerprints on the imaging guides during the cleaning procedure. Upper imaging guide 1. Open the scanner cover. 2. Turn the screw to the left on each end of the upper imaging - Konica Minolta Kodak i4600 | User Guide - Page 40
both the top and bottom of the lower imaging guide thoroughly with a Staticide wipe. 10. Wipe the imaging guide again with an almost-dry Staticide wipe to remove any streaks. 11. Reinstall the lower imaging guide. 12. Close the scanner cover. 13. When finished with all cleaning procedures, turn - Konica Minolta Kodak i4600 | User Guide - Page 41
gets dirty and/or loses its tackiness, discard it and use a new one. When finished running the transport cleaning sheet: 1. Open the scanner cover. 2. Wipe the exposed side of the upper and lower imaging guides with a lint- free cloth. 3. Close the scanner cover and scan a test image to ensure image - Konica Minolta Kodak i4600 | User Guide - Page 42
the following parts. Use the list below as a guideline for frequency of replacement. • Feed module tires and separation roller tires - tire life will vary depending upon paper types, environment and cleanliness. Nominal tire life is approximately 600,000 documents; results will vary. Degradation - Konica Minolta Kodak i4600 | User Guide - Page 43
the locking tabs (one on each side) while holding the lower housing with the other hand. Pull the upper housing up and away from the rollers. 6. Remove both core assemblies. 7. Replace each tire by sliding the tire off the core. 5-12 8. Install each new tire by gently pulling it over the - Konica Minolta Kodak i4600 | User Guide - Page 44
knob (4) to reengage the feed module. Verify that the feed module is securely in place and moves freely after you install it. 12. Close the scanner cover and the printer access cover. 13. Reinstall the output tray. A-61651 November 2010 5-13 - Konica Minolta Kodak i4600 | User Guide - Page 45
roller or separation roller tires 1. Open the scanner cover. 2. Pull the separation roller cover forward and remove the separation roller. NOTE: The separation roller cover is spring-loaded. Hold the separation roller cover back until you remove the separation roller, then gently lower the roller - Konica Minolta Kodak i4600 | User Guide - Page 46
to line up the slots on the separation roller with the holders. 8. Lower the separation roller holder back in place. 9. Close the scanner cover. Change the pre-separation pad when the frequency of multi-fed documents increases. 1. Open the scanner cover. 2. Remove the pre-separation pad by lifting - Konica Minolta Kodak i4600 | User Guide - Page 47
its position. Replacing the Flippable White Background strip(s) 3. Install the new imaging guide and tighten the screws to secure the imaging guide. 4. Repeat Steps 2 and 3 to replace the upper imaging guide. 5. Close the scanner cover. In the rare case that you may need to replace the Flippable - Konica Minolta Kodak i4600 | User Guide - Page 48
Transport Cleaning Sheets (qty 50) Kodak Digital Science Roller Cleaning Pads (qty 24) Staticide Wipes for Kodak Scanners (qty 144) Kodak Printer Ink Blotters Enhanced Printer Black Ink Cartridge Enhanced Printer Red Ink Cartridge Accessories 66.04 cm (26 in.) document extenders (qty 1 per box) 76 - Konica Minolta Kodak i4600 | User Guide - Page 49
6 Troubleshooting Contents Problem solving 6-1 Indicator lights and error codes 6-3 Upgrading software 6-4 Contacting Service 6-4 Problem solving Use the chart below as a guide to check possible solutions to problems you may encounter when using the Kodak i4000 Series Scanner. Problem - Konica Minolta Kodak i4600 | User Guide - Page 50
Kodak i4200 or i4600 Scanner should be displayed under Imaging Devices. 3. Click Action>Scan for hardware changes. • Make sure that the transport area is clean. Make sure the input elevator and output tray extenders are pulled out to provide support for long documents or use the optional document - Konica Minolta Kodak i4600 | User Guide - Page 51
are fed manually. • the gap release toggle switch is not pushed in. The document(s) you are trying to scan is too long. • Verify that the Document Management: Maximum Length option on the Device-General tab (TWAIN Datasource) or the Longest Document option on the Scanner tab (ISIS Driver) is set - Konica Minolta Kodak i4600 | User Guide - Page 52
inserted properly Multifeed pause Multifeed stop Document jam or the paper path is blocked • Be sure all cables are connected properly • Turn power off and then on again If problem persists, call Service. Upgrading software Kodak frequently updates drivers and firmware to correct issues and add - Konica Minolta Kodak i4600 | User Guide - Page 53
Acoustic Noise (Sound Power level) • i4200 Scanner: duplex color scanner with an automatic document feeder, 100 pages per minute (landscape) at 200 dpi; black and white. • i4600 Scanner: duplex color scanner with an automatic document feeder, 120 pages per minute (landscape) at 200 dpi; black - Konica Minolta Kodak i4600 | User Guide - Page 54
to run Kodak i4000 Series Scanners. • PC: Intel Core 2 duo, 2 GHz per core • USB port 2.0 high speed • 2 GB RAM • Supported operating systems: - Microsoft Windows 7 x64 Edition (Home and Professional) Included Drivers: • Windows operating systems: TWAIN, ISIS, WIA A-2 A-61651 November 2010 - Konica Minolta Kodak i4600 | User Guide - Page 55
to properly package and ship the Scanner back to Kodak for warranty service in accordance with Kodak's then current Packaging and Shipping Guidelines THE SALE, INSTALLATION, USE, SERVICING OR IMPROPER FUNCTIONING OF THIS PRODUCT, REGARDLESS OF THE CAUSE. SUCH DAMAGES FOR WHICH KODAK WILL NOT BE - Konica Minolta Kodak i4600 | User Guide - Page 56
DATA OR FILES. Warranty Service descriptions Eastman Kodak Company (Kodak) offers a range of service programs to support its Limited Warranty and to assist with the use and care of the Kodak Scanner ("Service Methods"). A Kodak Scanner represents an important investment. Kodak Scanners provide the - Konica Minolta Kodak i4600 | User Guide - Page 57
proper receipt and credit of the defective product. Depot service If the Kodak Scanner is not eligible for Advance Exchange or On-Site Service, an eligible purchaser may utilize our Depot Repair Service. The eligible purchaser will be instructed to ship the product to the nearest authorized Depot - Konica Minolta Kodak i4600 | User Guide - Page 58
on Kodak Scanners: Website: www.Kodak.com/go/docimaging For U.S. Service, Repair and Technical Assistance by Telephone: Telephone technical support is available Monday-Friday between the hours of 5 a.m. to 5 p.m. excluding Kodak holidays. Phone: (800) 822-1414 For Technical Documentation and - Konica Minolta Kodak i4600 | User Guide - Page 59
-
 1
1 -
 2
2 -
 3
3 -
 4
4 -
 5
5 -
 6
6 -
 7
7 -
8
-
9
-
10
-
11
-
12
-
13
-
14
-
15
-
16
-
17
-
18
-
19
-
20
-
21
-
22
-
23
-
24
-
25
-
26
-
27
-
28
-
29
-
30
-
31
-
32
-
33
-
34
-
35
-
36
-
37
-
38
-
39
-
40
-
41
-
42
-
43
-
44
-
45
-
46
-
47
-
48
-
49
-
50
-
51
-
52
-
53
-
54
-
55
-
56
-
57
-
58
-
59
 |
 |