Konica Minolta Kodak i4600 User Guide - Page 6
Scanner components, Front view
 |
View all Konica Minolta Kodak i4600 manuals
Add to My Manuals
Save this manual to your list of manuals |
Page 6 highlights
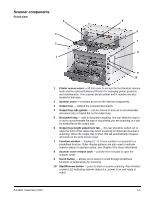
Scanner components Front view 4 3 2 1 5 6 7 8 9 10 1 Printer access cover - lift this cover to access the feed module release knob and the optional Enhanced Printer for changing printer positions and maintenance. The scanner serial number and K number are also located in this area. 2 Scanner cover - provides access to the internal components. 3 Output tray - collects the scanned documents. 4 Output tray side guides - can be moved in and out to accommodate document size or folded flat on the output tray. 5 Document stop - aids in document stacking. You can slide this stop in or out to accommodate the size of documents you are scanning or it can be folded flat on the output tray. 6 Output tray height adjustment tab - this tab should be pulled out to raise the front of the output tray when scanning for improved document scanning. When the output tray is lifted, this tab automatically releases and rests on the print access cover. 7 Function window - displays 0 - 9. These numbers correspond to a predefined function. Other display patterns are also used to indicate scanner status or operator action. See Chapter 6 for more information. 8 Scanner cover release latch - pull the lever forward to open the scanner cover. 9 Scroll button - allows you to select or scroll through predefined functions or applications for scanning. 10 Start/Resume button - press to start or resume scanning. Also includes a green LED indicating scanner status (i.e., power is on and ready to scan). A-61651 November 2010 1-3
-
 1
1 -
 2
2 -
 3
3 -
 4
4 -
 5
5 -
 6
6 -
 7
7 -
 8
8 -
 9
9 -
 10
10 -
 11
11 -
 12
12 -
13
-
14
-
15
-
16
-
17
-
18
-
19
-
20
-
21
-
22
-
23
-
24
-
25
-
26
-
27
-
28
-
29
-
30
-
31
-
32
-
33
-
34
-
35
-
36
-
37
-
38
-
39
-
40
-
41
-
42
-
43
-
44
-
45
-
46
-
47
-
48
-
49
-
50
-
51
-
52
-
53
-
54
-
55
-
56
-
57
-
58
-
59
 |
 |
