Konica Minolta Kodak i4600 User Guide - Page 44
and moves freely after you install it., Close the scanner cover and the printer access cover.
 |
View all Konica Minolta Kodak i4600 manuals
Add to My Manuals
Save this manual to your list of manuals |
Page 44 highlights
the tabs on the upper housing with the slots on the lower housing. 10. Press the upper and lower housings together until they snap into place. 11. Insert the pin on the left side of the feed module with the rod (1); align the upper tab with the slot (2); align the pin on the right side of the feed module with the rod (3) and turn the green feed module release knob (4) to reengage the feed module. Verify that the feed module is securely in place and moves freely after you install it. 12. Close the scanner cover and the printer access cover. 13. Reinstall the output tray. A-61651 November 2010 5-13
-
 1
1 -
2
-
3
-
4
-
5
-
6
-
7
-
8
-
9
-
10
-
11
-
12
-
13
-
14
-
15
-
16
-
17
-
18
-
19
-
20
-
21
-
22
-
23
-
24
-
25
-
26
-
27
-
28
-
29
-
30
-
31
-
32
-
33
-
34
-
35
-
36
-
37
-
38
-
 39
39 -
 40
40 -
 41
41 -
 42
42 -
 43
43 -
 44
44 -
 45
45 -
 46
46 -
 47
47 -
 48
48 -
 49
49 -
50
-
51
-
52
-
53
-
54
-
55
-
56
-
57
-
58
-
59
 |
 |

A-61651 November 2010
5-13
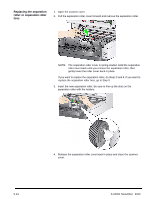
the tabs on the upper housing with the slots on the lower housing.
10. Press the upper and lower housings together until they snap into place.
11. Insert the pin on the left side of the feed module with the rod (1); align the
upper tab with the slot (2); align the pin on the right side of the feed module
with the rod (3) and turn the green feed module release knob (4) to re-
engage the feed module. Verify that the feed module is securely in place
and moves freely after you install it.
12. Close the scanner cover and the printer access cover.
13. Reinstall the output tray.