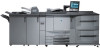
Konica Minolta bizhub PRO C6501/C6501P Creo IC-304 Plus Release Notes version - Page 14
Enable Enhanced User Interface
 |
View all Konica Minolta bizhub PRO C6501/C6501P manuals
Add to My Manuals
Save this manual to your list of manuals |
Page 14 highlights
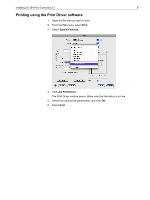
8 IC-304 Print Controller 2.1 Release Notes 3. In the add printer window, perform the following steps: a. In the Address box, type the IP address of your IC-304 print controller. b. In the Queue box, type the name of the IC-304 print controller and the exact name of the virtual printer that you want to use with the Print Driver software-for example, IC-304_Process. c. In the Name box, type a name that you want to assign to the printer-for example, Step & Repeat. d. In the Print Using list, select Other. 4. Go to Library > Printers > PPDS > Contents > Resources > en.lproj, and select either Europe-A4 or US-Letter folders, and then select the PPD file, IC-304V2_1.PPD. 5. Click Open. 6. Click Add. The new printer is added. 7. In the Print & Fax window, double-click the new printer. 8. Click Utility. 9. In the Enable Enhanced User Interface list, make sure that On is selected. 10. In the Server Hostname box, type the IC-304 print controller IP Address. 11. Click Apply. 12. Close the Printer Utility dialog box.
-
 1
1 -
2
-
3
-
4
-
5
-
6
-
7
-
8
-
 9
9 -
 10
10 -
 11
11 -
 12
12 -
 13
13 -
 14
14 -
 15
15 -
 16
16 -
 17
17 -
 18
18 -
 19
19 -
20
-
21
-
22
-
23
-
24
-
25
-
26
-
27
-
28
-
29
-
30
-
31
-
32
-
33
-
34
-
35
-
36
-
37
-
38
 |
 |
