Konica Minolta bizhub PRO C6501/C6501P Creo IC-304 Plus Release Notes version - Page 26
Creating an Imposition Template
 |
View all Konica Minolta bizhub PRO C6501/C6501P manuals
Add to My Manuals
Save this manual to your list of manuals |
Page 26 highlights
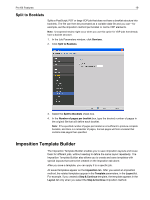
20 IC-304 Print Controller 2.1 Release Notes Some templates appear under more than one imposition method. Method selected on Imposition tab Template layout type in the Layout list Step & Repeat Step & Repeat, Cut & Stack Step & Continue Step & Continue Saddle Stitch Saddle Stitch, Perfect Bound Perfect Bound Saddle Stitch, Perfect Bound Creating an Imposition Template In the IC-304 print controller, you can use the Imposition Templates Builder to create templates for similar types of jobs that have the following imposition settings in common: • Imposition method • Columns and rows • Simplex/duplex • Binding For example, if you want to create an imposition template for A4-sized brochures printed on A3 paper, you could create a template, called "A4Brochure", and select the following settings: • Imposition method: Saddle Stitch • Columns: 1 • Rows: 2 • Type: Duplex (selected by default) • Binding: Left You would define all the other imposition settings-for example, Trim size, Bleed size, Gutter size, and Output sheet size-under Layout, on the Sizes tab. 1. From the Tools menu, select Imposition Templates Builder. 2. From the Method list, select an imposition method. 3. Click New. 4. Type the name of the new template, and press ENTER. 5. In the Layout area, type the number of columns and number of rows that you need. The imposition method that you select determines the number of columns and rows that you can enter. For Saddle Stitch and Perfect Bound, you can place up to 64 pages on one sheet (8 × 8). For Step & Repeat and Step & Continue, you can place up to 625 pages on one sheet (25 × 25). 6. Under Type, select Simplex or Duplex.
-
 1
1 -
2
-
3
-
4
-
5
-
6
-
7
-
8
-
9
-
10
-
11
-
12
-
13
-
14
-
15
-
16
-
17
-
18
-
19
-
20
-
 21
21 -
 22
22 -
 23
23 -
 24
24 -
 25
25 -
 26
26 -
 27
27 -
 28
28 -
 29
29 -
 30
30 -
 31
31 -
32
-
33
-
34
-
35
-
36
-
37
-
38
 |
 |
