Kyocera KM-C1530 Fiery X3e Job Management Guide for Ver 2.0 - Page 117
Modifying the layout manually, Reordering s in Layout mode
 |
View all Kyocera KM-C1530 manuals
Add to My Manuals
Save this manual to your list of manuals |
Page 117 highlights
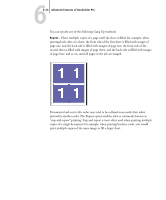
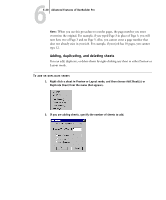
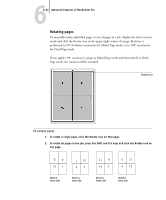
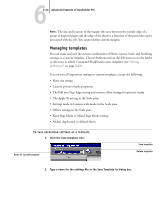
66-19 Modifying the layout manually Modifying the layout manually Whether you apply a predefined layout or specify custom settings, you can manually modify a job's layout in the following ways: • Reorder pages. • Add, duplicate, and delete pages. • Rotate pages. • Set gutter sizes. NOTE: Specify the following settings before making any manual changes to the layout: Orientation, Duplex, Rows, Columns, and Binding. If you specify any of these settings after making manual changes, you will be prompted with a message informing you that the manual changes will be cancelled. Reordering pages in Layout mode When you impose a job, its pages are automatically arranged in a particular order, according to the layout you select. Each page number in Layout mode represents the page from the source document that DocBuilder Pro images in a designated position on the finished sheet. However, to reorder individual pages manually, arrange them in the main window. To assign a different page to a particular location in the layout, use the following procedure. TO REORDER PAGES 1. Verify that Layout mode is selected. 2. Select the location's current page number. You can also press Tab to move to the next slot in the layout, or press Shift + Tab to move to the previous slot in the layout. 3. Type the new page value and press Enter. You can add a blank cover page by typing 0 (zero) for any page number. Page 0 will be printed as a blank page.
-
 1
1 -
2
-
3
-
4
-
5
-
6
-
7
-
8
-
9
-
10
-
11
-
12
-
13
-
14
-
15
-
16
-
17
-
18
-
19
-
20
-
21
-
22
-
23
-
24
-
25
-
26
-
27
-
28
-
29
-
30
-
31
-
32
-
33
-
34
-
35
-
36
-
37
-
38
-
39
-
40
-
41
-
42
-
43
-
44
-
45
-
46
-
47
-
48
-
49
-
50
-
51
-
52
-
53
-
54
-
55
-
56
-
57
-
58
-
59
-
60
-
61
-
62
-
63
-
64
-
65
-
66
-
67
-
68
-
69
-
70
-
71
-
72
-
73
-
74
-
75
-
76
-
77
-
78
-
79
-
80
-
81
-
82
-
83
-
84
-
85
-
86
-
87
-
88
-
89
-
90
-
91
-
92
-
93
-
94
-
95
-
96
-
97
-
98
-
99
-
100
-
101
-
102
-
103
-
104
-
105
-
106
-
107
-
108
-
109
-
110
-
111
-
 112
112 -
 113
113 -
 114
114 -
 115
115 -
 116
116 -
 117
117 -
 118
118 -
 119
119 -
 120
120 -
 121
121 -
 122
122 -
123
-
124
-
125
-
126
-
127
-
128
-
129
-
130
-
131
-
132
-
133
-
134
-
135
-
136
-
137
-
138
-
139
-
140
-
141
-
142
-
143
-
144
-
145
-
146
-
147
-
148
-
149
-
150
-
151
-
152
-
153
-
154
-
155
-
156
-
157
-
158
-
159
-
160
-
161
-
162
-
163
-
164
-
165
-
166
-
167
-
168
-
169
-
170
-
171
-
172
-
173
-
174
-
175
-
176
-
177
-
178
-
179
-
180
-
181
-
182
-
183
-
184
-
185
-
186
-
187
-
188
 |
 |