Kyocera TASKalfa 181 Fax System (R) Installation Instructions - Page 12
Die Schnellhaftfolie anbringen.
 |
View all Kyocera TASKalfa 181 manuals
Add to My Manuals
Save this manual to your list of manuals |
Page 12 highlights
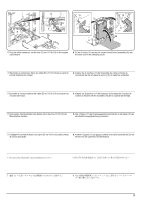
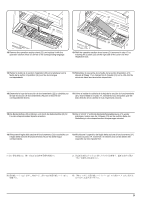
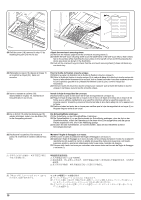
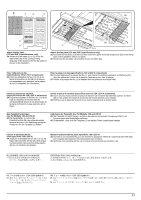
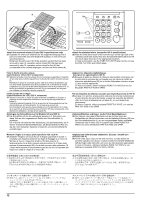
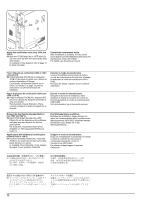
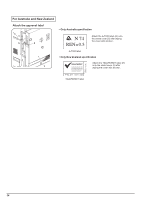
18 24 I 20. Refit the cover (18) removed in step 15 by inserting the pawl (24) into its slot. I Attach the one-touch securing sheet. 21. Remove the release paper from the one-touch securing sheet (I). 22. Adhere the one-touch securing sheet (I) on the base frame of the one-touch key so that it sticks fast to the surface while matching the top surface to the top left corner and firmly pressing the whole area down as shown in the illustration. 23. Push all the one-touch keys to check that the one-touch securing sheet (I) does not block any one-touch key. 20. Réinstallez le capot (18) déposé à l'étape 15 en insérant le cliquet (24) dans son encoche. Fixer la feuille de fixation à touche unique. 21. Retirer le papier de libération de la feuille de fixation à touche unique (I). 22. Coller la feuille de fixation à touche unique (I) du cadre de base de la touche à touche unique de façon qu'elle adhère fermement à la surface, tout en faisant coïncider la surface supérieure avec le coin supérieur gauche et en pressant fermement toute la zone, comme indiqué sur l'illustration. 23. Enfoncer toutes les touches à touche unique pour s'assurer que la feuille de fixation à touche unique (I) ne bloque aucune touche à touche unique. 20. Volver a instalar la cubierta (18), desmontada en el paso 15, insertando el trinquete (24) en su ranura. Instale la hoja de seguridad de un toque. 21. Desmonte el papel de liberación de la hoja de seguridad de un toque (I). 22. Pegue la hoja de seguridad de un toque (I) en el marco de base de la tecla de un toque de tal forma que se adhiera rápidamente a la superficie mientras alinea la superficie superior a la esquina superior izquierda y presiona firmemente toda el área hacia abajo tal como aparece en la figura. 23. Presione todas las teclas de un toque para verificar que la hoja de seguridad de un toque (I) no bloquea ninguna tecla de un toque. 20. Die in Schritt 15 entfernte Abdeckung (18) wieder anbringen, indem man die Klaue (24) in die Aussparung einsetzt. Die Schnellhaftfolie anbringen. 21. Die Schutzfolie von der Schnellhaftfolie (I) abziehen. 22. Die Schnellhaftfolie (I) so am Basisrahmen der Schnelltaste anbringen, dass sie fest an der Oberfläche haftet, wobei die Oberseite auf die obere linke Ecke ausgerichtet und die ganze Fläche angedrückt wird, wie in der Abbildung gezeigt. 23. Drücken Sie alle Schnelltasten, um sicherzustellen, dass die Schnellhaftfolie (I) keine Schnelltaste blockiert. 20. Ricollocare il coperchio (18) rimosso al passo 15, inserendo il nottolino (24) nel suo foro. Montare il foglio di fissaggio a un tocco. 21. Rimuovere la carta di protezione dal foglio di fissaggio a un tocco (I). 22. Applicare il foglio di fissaggio a un tocco (I) sulla cornice di base del tasto in modo che si attacchi rapidamente alla superficie mentre si adatta alla superficie della parte superiore e all'angolo superiore sinistro e premendo stabilmente tutta l'area come mostrato nel disegno. 23. Premere tutti i tasti a un tocco per controllare che nessun tasto sia bloccato dal foglio di fissaggio a un tocco (I). 20.手順 15 18 24 21 I 22 (I 23 I 10
-
 1
1 -
2
-
3
-
4
-
5
-
6
-
 7
7 -
 8
8 -
 9
9 -
 10
10 -
 11
11 -
 12
12 -
 13
13 -
 14
14 -
 15
15 -
 16
16 -
 17
17 -
18
-
19
-
20
 |
 |
