LG LFX25960ST Owner's Manual - Page 38
Connect The Tubing To The, Refrigerator, Turn The Water On At The, Shutoff Valve, Plug In - compressor
 |
View all LG LFX25960ST manuals
Add to My Manuals
Save this manual to your list of manuals |
Page 38 highlights
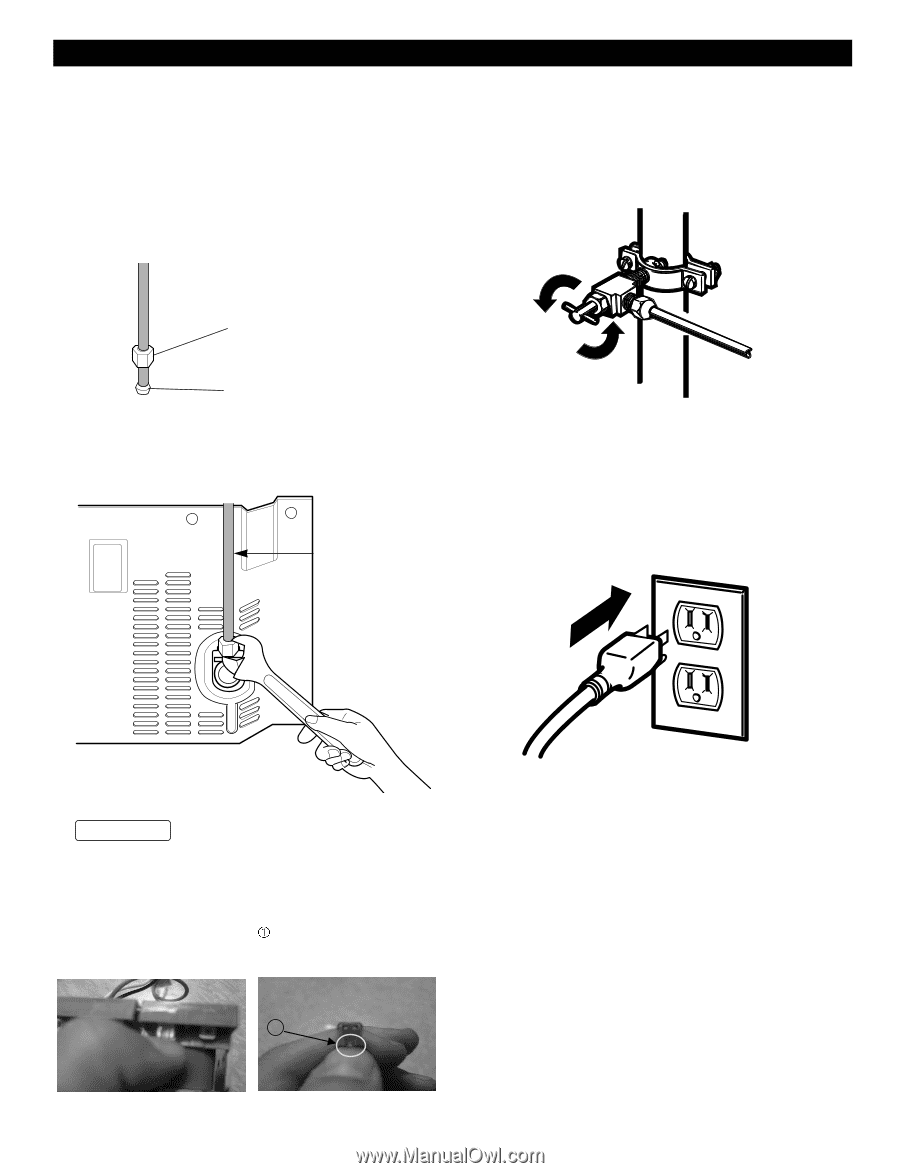
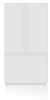
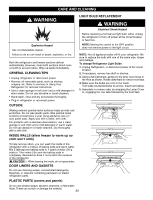
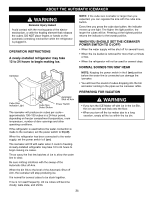
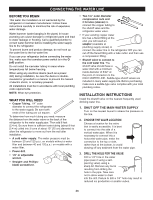
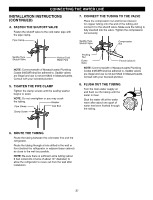
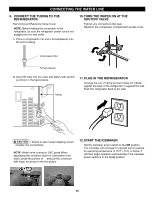
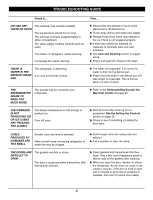
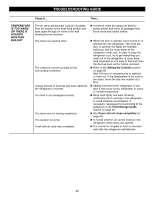
CONNECTING THE WATER LINE 9. CONNECT THE TUBING TO THE REFRIGERATOR Removing and Replacing Valve Cover NOTE: Before making the connection to the refrigerator, be sure the refrigerator power cord is not plugged into the wall outlet. 1. Place a compression nut and a ferrule(sleeve) onto the end of tubing. 10. TURN THE WATER ON AT THE SHUTOFF VALVE Tighten any connections that leak. Reattach the compressor compartment access cover. Compression Nut Ferrule (sleeve) 2. Insert the tube into the valve and fasten with wrench as shown in the figure below. Tubing 11. PLUG IN THE REFRIGERATOR Arrange the coil of tubing so that it does not vibrate against the back of the refrigerator or against the wall. Push the refrigerator back to the wall. w CAUTION : Check to see if water dripping occurs at water line connections. NOTE: Water valve connector SVC guide When separating the connector which is connected in the Valve, press the portion of and pull the connector with finger as shown in the the picture 12. START THE ICEMAKER Set the icemaker power switch to the ON position. The icemaker will not begin to operate until it reaches its operating temperature of 15°F (-9°C) or below. It will then begin operation automatically if the icemaker power switch is in the I (on) position. 1 38
-
 1
1 -
2
-
3
-
4
-
5
-
6
-
7
-
8
-
9
-
10
-
11
-
12
-
13
-
14
-
15
-
16
-
17
-
18
-
19
-
20
-
21
-
22
-
23
-
24
-
25
-
26
-
27
-
28
-
29
-
30
-
31
-
32
-
 33
33 -
 34
34 -
 35
35 -
 36
36 -
 37
37 -
 38
38 -
 39
39 -
 40
40 -
 41
41 -
 42
42 -
 43
43 -
44
-
45
-
46
-
47
-
48
-
49
-
50
-
51
-
52
-
53
-
54
-
55
-
56
-
57
-
58
-
59
-
60
-
61
-
62
-
63
-
64
-
65
-
66
-
67
-
68
-
69
-
70
-
71
-
72
-
73
-
74
-
75
-
76
-
77
-
78
-
79
-
80
-
81
-
82
-
83
-
84
-
85
-
86
-
87
-
88
-
89
-
90
-
91
-
92
-
93
-
94
-
95
-
96
-
97
-
98
-
99
-
100
-
101
-
102
-
103
-
104
-
105
-
106
-
107
-
108
-
109
-
110
-
111
-
112
-
113
-
114
-
115
-
116
-
117
-
118
-
119
-
120
-
121
-
122
-
123
-
124
-
125
-
126
-
127
-
128
 |
 |