LG LMU240HE Service Manual - Page 37
Evacuation
 |
View all LG LMU240HE manuals
Add to My Manuals
Save this manual to your list of manuals |
Page 37 highlights
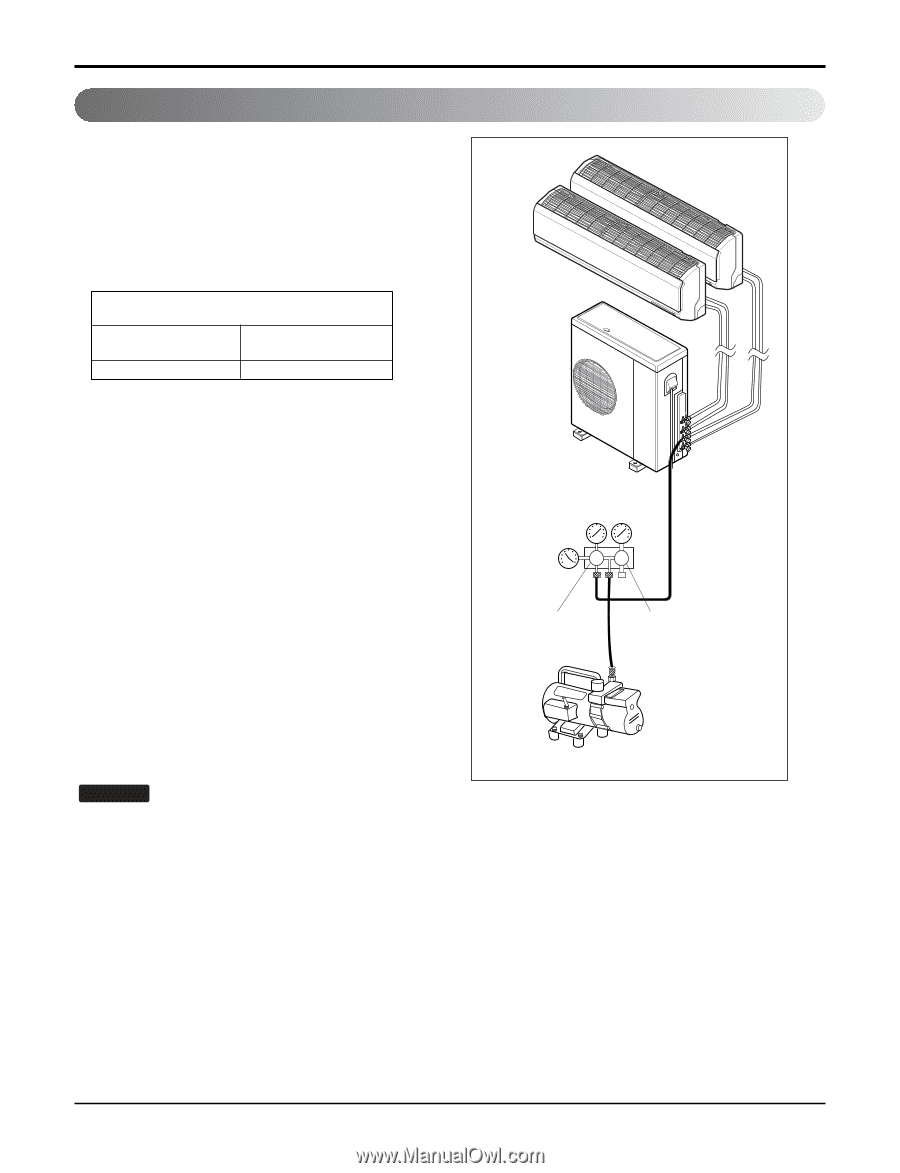
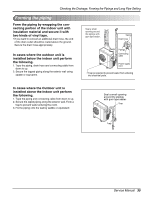
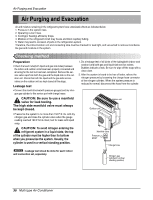
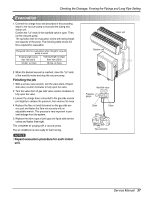
Checking the Drainage, Forming the Pipings and Long Pipe Setting Evacuation 1. Connect the charge hose end described in the preceding steps to the vacuum pump to evacuate the tubing and indoor unit. Confirm the "Lo" knob of the manifold valve is open. Then, run the vacuum pump. The operation time for evacuation varies with tubing length and capacity of the pump. The following table shows the time required for evacuation. Required time for evacuation when 30 gal/h vacuum pump is used If tubing length is less than 10m (33 ft) If tubing length is longer than 10m (33 ft) 10 min. or more 15 min. or more Indoor unit Outdoor unit 2. When the desired vacuum is reached, close the "Lo" knob of the manifold valve and stop the vacuum pump. Finishing the job 1. With a service valve wrench, turn the valve stem of liquid side valve counter-clockwise to fully open the valve. 2. Turn the valve stem of gas side valve counter-clockwise to fully open the valve. 3. Loosen the charge hose connected to the gas side service port slightly to release the pressure, then remove the hose. 4. Replace the flare nut and its bonnet on the gas side service port and fasten the flare nut securely with an adjustable wrench. This process is very important to prevent leakage from the system. 5. Replace the valve caps at both gas and liquid side service valves and fasten them tight. This completes air purging with a vacuum pump. The air conditioner is now ready for test running. NOTICE : Repeat evacuation procedure for each indoor unit. Manifold valve Pressure gauge Lo Hi Open Close Vacuum pump Service Manual 37
-
 1
1 -
2
-
3
-
4
-
5
-
6
-
7
-
8
-
9
-
10
-
11
-
12
-
13
-
14
-
15
-
16
-
17
-
18
-
19
-
20
-
21
-
22
-
23
-
24
-
25
-
26
-
27
-
28
-
29
-
30
-
31
-
 32
32 -
 33
33 -
 34
34 -
 35
35 -
 36
36 -
 37
37 -
 38
38 -
 39
39 -
 40
40 -
 41
41 -
 42
42 -
43
-
44
-
45
-
46
-
47
-
48
-
49
-
50
-
51
-
52
-
53
-
54
-
55
-
56
-
57
-
58
-
59
-
60
-
61
-
62
-
63
-
64
-
65
-
66
-
67
-
68
-
69
-
70
-
71
-
72
-
73
-
74
-
75
-
76
-
77
-
78
-
79
-
80
-
81
-
82
-
83
-
84
-
85
-
86
 |
 |