LG LSC121PMA Service Manual - Page 20
Installation Gu
 |
View all LG LSC121PMA manuals
Add to My Manuals
Save this manual to your list of manuals |
Page 20 highlights
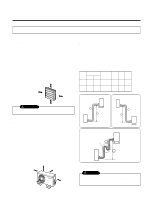
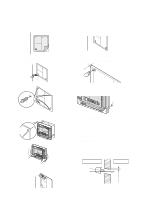
4) Sticking the installation guide map and fixing Indoor unit 1. Put an Installation Guide Map on the desired surface. INSTALLATION GUIDE MAP 7. Drill the piercing part for connecting pipe as diameter 50mm(1.97"). (In case of piercing rear surface) 2. Make a hole with diameter of 6mm(0.24") and depth of 30-35mm(1.18"~1.38") when piercing a screw point. INSTAIIATION GUIDE MAP 3. Drive the fore plastic anchors into drilled points. INSTALLATION GUIDE MAP Plastic anchors Refer to No. 5 on this page when making a hole in the wall. 8. First, Drive the two points of the upper parts by screws. (Leave 10mm(0.39") for hanging product) 10mm(0.39") INSTALLATION GU 9. Drive the lower parts after facing the hole of product with plastic anchors, and fix completely the upper screws. Plastic anchors 4. Hang the hole of product at the upper screws. (In this time, Remove the map) (Falling attention) INSTALLATION GUIDE MAP In case of nothing wrong in the matter, connect the pipe and the wire. (Installation manual reference) Hanger hole (Rear side of product) 5. Check the fixed product with light power. 5) Preparing work for installation 1. Drill a hole in the wall s Drill the piping hole with a Ø50mm(1.97") hole core drill. Drill the piping hole at either the right or the left with the hole slightly slanted to the outdoor side. 6. Look at suited horizon by horizontal meter on the horizontal setting line, and Fix lightly the map by adhesive tape. Horizontality INSTALLATION GUIDE MAP Indoor WALL Outdoor 5-7mm (0.2~0.3") -20-
-
 1
1 -
2
-
3
-
4
-
5
-
6
-
7
-
8
-
9
-
10
-
11
-
12
-
13
-
14
-
 15
15 -
 16
16 -
 17
17 -
 18
18 -
 19
19 -
 20
20 -
 21
21 -
 22
22 -
 23
23 -
 24
24 -
 25
25 -
26
-
27
-
28
-
29
-
30
-
31
-
32
-
33
-
34
-
35
-
36
-
37
-
38
-
39
-
40
-
41
-
42
-
43
-
44
-
45
-
46
-
47
-
48
-
49
-
50
-
51
-
52
-
53
-
54
-
55
-
56
-
57
-
58
-
59
-
60
-
61
-
62
-
63
 |
 |
