Lenovo IdeaPad S410p Touch User Guide - IdeaPad S410p, S410p Touch, S510p, S51
Lenovo IdeaPad S410p Touch Manual
 |
View all Lenovo IdeaPad S410p Touch manuals
Add to My Manuals
Save this manual to your list of manuals |
Lenovo IdeaPad S410p Touch manual content summary:
- Lenovo IdeaPad S410p Touch | User Guide - IdeaPad S410p, S410p Touch, S510p, S51 - Page 1
Lenovo IdeaPad User Guide Read the safety notices and important tips in the included manuals before using your computer. - Lenovo IdeaPad S410p Touch | User Guide - IdeaPad S410p, S410p Touch, S510p, S51 - Page 2
user guide. • The illustrations used in this manual are for Lenovo IdeaPad S510p unless otherwise stated. • The illustrations in this manual may differ from the actual product. Please refer to the actual product. Regulatory Notice • For details, refer to Guides & Manuals at http://support.lenovo - Lenovo IdeaPad S410p Touch | User Guide - IdeaPad S410p, S410p Touch, S510p, S51 - Page 3
User Guide Instructions and technical information in this manual are applicable to the following Lenovo notebook computers unless otherwise stated. Model name Lenovo IdeaPad S410p Lenovo IdeaPad S410p Touch Lenovo IdeaPad S510p Lenovo IdeaPad S510p Touch MT 20296 80BK 20297 80BM 20298 80BN 20299 - Lenovo IdeaPad S410p Touch | User Guide - IdeaPad S410p, S410p Touch, S510p, S51 - Page 4
- Lenovo IdeaPad S410p Touch | User Guide - IdeaPad S410p, S410p Touch, S510p, S51 - Page 5
network 18 Help and support ...19 Chapter 3. Lenovo OneKey Recovery system 20 Chapter 4. Troubleshooting 22 Frequently asked questions 22 Troubleshooting ...25 Appendix A. Replacing components 29 Replacing the hard disk drive 29 Replacing a memory module 32 Replacing the wireless LAN card - Lenovo IdeaPad S410p Touch | User Guide - IdeaPad S410p, S410p Touch, S510p, S51 - Page 6
- Lenovo IdeaPad S410p Touch | User Guide - IdeaPad S410p, S410p Touch, S510p, S51 - Page 7
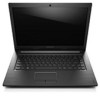
Chapter 1. Getting to know your computer Top view S410p/S410p Touch ca c b d e f g 1 - Lenovo IdeaPad S410p Touch | User Guide - IdeaPad S410p, S410p Touch, S510p, S51 - Page 8
Chapter 1. Getting to know your computer S510p/S510p Touch cac b d e f g Note: The dashed areas indicate parts that are invisible from outside. Attention: • Do not open the display panel beyond 130 degrees. When closing the display panel, be careful not to leave - Lenovo IdeaPad S410p Touch | User Guide - IdeaPad S410p, S410p Touch, S510p, S51 - Page 9
narration, or audio recording. Provides brilliant visual output. e Power button f Touchpad g Touchpad buttons Press this button to turn on the computer. The touchpad functions as a conventional mouse. To move the cursor on the screen, slide your fingertip over the pad in the direction in which you - Lenovo IdeaPad S410p Touch | User Guide - IdeaPad S410p, S410p Touch, S510p, S51 - Page 10
level. : Closes the currently active window. : Refreshes the desktop or the currently active window. Enables/disables the : touchpad and the touchpad buttons. : Turns on/off the backlight of the display. : Projects to a connected display. : Decreases display brightness. : Increases - Lenovo IdeaPad S410p Touch | User Guide - IdeaPad S410p, S410p Touch, S510p, S51 - Page 11
Chapter 1. Getting to know your computer Left-side view S410p/S410p Touch ab c S510p/S510p Touch 4 56 7 ab c 56 7 a Novo button When the computer is off, press this button to start the Lenovo OneKey Recovery system or the BIOS setup utility, or to enter the boot menu. Note: For - Lenovo IdeaPad S410p Touch | User Guide - IdeaPad S410p, S410p Touch, S510p, S51 - Page 12
Chapter 1. Getting to know your computer d VGA port Connects to external display devices. e RJ-45 port Connects the computer to an Ethernet network. f HDMI port g USB 3.0 ports Connects to devices with HDMI input such as a TV or a display. Connect to USB devices. Note: For details, see " - Lenovo IdeaPad S410p Touch | User Guide - IdeaPad S410p, S410p Touch, S510p, S51 - Page 13
port on your computer, Windows automatically installs a driver for that device. After the driver is installed, you can disconnect and reconnect the Hardware and Eject Media icon in the notification area of the Windows desktop screen to remove the device before disconnecting. Notes: • If your USB - Lenovo IdeaPad S410p Touch | User Guide - IdeaPad S410p, S410p Touch, S510p, S51 - Page 14
To insert a network cable, do the following: 1 Hold one connector of the network cable to press the RJ-45 cover down gently a. 2 Insert the connector into the RJ-45 port b. a b Software configuration Consult your Internet Service Provider (ISP) for details on how to configure your computer. 8 - Lenovo IdeaPad S410p Touch | User Guide - IdeaPad S410p, S410p Touch, S510p, S51 - Page 15
conventional microphones. • The recording function may not be supported if third-party headphones or headsets are connected, due to different industry standards. b USB 2.0 port c Optical drive (on select models) Connects to USB devices. For details, see "Connecting USB devices" on page 7. Reads - Lenovo IdeaPad S410p Touch | User Guide - IdeaPad S410p, S410p Touch, S510p, S51 - Page 16
5% and 20% charge. Fast blinking amber There is a problem with the battery or the battery connection. Slow blinking amber The battery is being charged. When the battery charge reaches 20%, the blinking color changes to white. Slow blinking white The battery has between 20% and 80% charge and is - Lenovo IdeaPad S410p Touch | User Guide - IdeaPad S410p, S410p Touch, S510p, S51 - Page 17
Secure Digital (SD) card • MultiMediaCard (MMC) Attention: • Insert only one card in the slot at a time. • This card reader does not support SDIO devices (e.g., SDIO Bluetooth, etc.). Inserting a memory card Slide a memory card in until it clicks into place. Note: If a dummy card is shipped with the - Lenovo IdeaPad S410p Touch | User Guide - IdeaPad S410p, S410p Touch, S510p, S51 - Page 18
Chapter 1. Getting to know your computer Bottom view a b c 2 2 4 e e a Battery latch manual b Battery pack c Battery latch spring loaded d Ventilation slots e Speakers Keeps the battery pack secured in place. Keeps the battery pack secured in place. Allow air to enter the computer for - Lenovo IdeaPad S410p Touch | User Guide - IdeaPad S410p, S410p Touch, S510p, S51 - Page 19
• Configuring the Internet connection • Registering the operating system • Creating a user account Operating system interfaces Windows 8 comes with two main user interfaces: the Start screen and the Windows desktop. To switch from the Start screen to the Windows desktop, do one of the following - Lenovo IdeaPad S410p Touch | User Guide - IdeaPad S410p, S410p Touch, S510p, S51 - Page 20
Chapter 2. Starting to use Windows 8 Charms and the charms bar Charms are navigation buttons that let you access basic tasks quickly. Charms include: Search, Share, Start, Devices, and Settings. The charms bar is the menu that contains the charms. To display the charms bar, do one of the following - Lenovo IdeaPad S410p Touch | User Guide - IdeaPad S410p, S410p Touch, S510p, S51 - Page 21
the app you are in. Start charm The Start charm is a fast way to go to the Start screen. Devices charm The Devices charm allows you to connect or send files to connected external devices, including digital cameras, get to the Control Panel through the Settings charm when on the Desktop screen. 15 - Lenovo IdeaPad S410p Touch | User Guide - IdeaPad S410p, S410p Touch, S510p, S51 - Page 22
Chapter 2. Starting to use Windows 8 Putting the computer to sleep or shutting it down ---------- When you have finished working with your computer, you can put it to sleep or shut it down. Putting your computer to sleep If you will be away from your - Lenovo IdeaPad S410p Touch | User Guide - IdeaPad S410p, S410p Touch, S510p, S51 - Page 23
Chapter 2. Starting to use Windows 8 Shutting down the computer If you are not going to use your computer for a long time, shut it down. To shut down your computer: 1 Open the charms bar, then select Settings . 1 2 Select Power Shut down. 2 17 - Lenovo IdeaPad S410p Touch | User Guide - IdeaPad S410p, S410p Touch, S510p, S51 - Page 24
. Note: Some networks require a network security key or passphrase for connection. To connect to one of those networks, ask the network administrator or the Internet service provider (ISP) for the security key or passphrase. 18 - Lenovo IdeaPad S410p Touch | User Guide - IdeaPad S410p, S410p Touch, S510p, S51 - Page 25
If you have questions about using the Windows operating system, refer to Windows Help and Support. To access Windows Help and Support, do one of the following: • Open the charms bar and select Settings; select Help on the Settings menu. • Press the Windows key + F1. Note: If - Lenovo IdeaPad S410p Touch | User Guide - IdeaPad S410p, S410p Touch, S510p, S51 - Page 26
status or to a previously created back-up point. To restore the system partition: 1 Press the Novo button to start the Lenovo OneKey Recovery system. 2 Click System Recovery. The computer will restart to the recovery environment. 3 Follow the on-screen instructions to restore the system partition to - Lenovo IdeaPad S410p Touch | User Guide - IdeaPad S410p, S410p Touch, S510p, S51 - Page 27
Chapter 3. Lenovo OneKey Recovery system If Windows cannot be started, follow the steps below to start the Lenovo OneKey Recovery system: 1 Shut down the computer. 2 Press the Novo button. From the Novo button menu, select System recovery and press Enter. 21 - Lenovo IdeaPad S410p Touch | User Guide - IdeaPad S410p, S410p Touch, S510p, S51 - Page 28
Troubleshooting Frequently asked questions This section lists frequently asked questions by category. Finding information What safety precautions should I follow when using my computer? The Lenovo Safety and General Information Guide Lenovo consumer support Web site. Where can I find drivers for - Lenovo IdeaPad S410p Touch | User Guide - IdeaPad S410p, S410p Touch, S510p, S51 - Page 29
Troubleshooting Lenovo OneKey Recovery system Where are the recovery discs? Your computer did not come with recovery discs. Use the Lenovo OneKey Recovery system if you need to restore the system to its factory status. What can I do if the back Support. To change the boot mode, start the BIOS - Lenovo IdeaPad S410p Touch | User Guide - IdeaPad S410p, S410p Touch, S510p, S51 - Page 30
, you must change the boot mode to Legacy Support. The legacy Windows operating system cannot be installed if you don't change the boot mode. Getting help How can I contact the customer support center? See "Chapter 3. Getting help and service" of the Lenovo Safety and General Information Guide. 24 - Lenovo IdeaPad S410p Touch | User Guide - IdeaPad S410p, S410p Touch, S510p, S51 - Page 31
for the LCD screen has been turned off. - If the problem persists, follow the solution in the next problem "The screen is unreadable or distorted." • Make sure that: - The display device driver is installed correctly. - The screen resolution and color quality are correctly set. - The monitor type is - Lenovo IdeaPad S410p Touch | User Guide - IdeaPad S410p, S410p Touch, S510p, S51 - Page 32
password. You must take your computer to a Lenovo authorized servicer or a marketing representative to have the system board replaced. Proof of purchase is required, and a fee will be charged for parts and service. The critical low-battery error message appears, and the computer immediately turns - Lenovo IdeaPad S410p Touch | User Guide - IdeaPad S410p, S410p Touch, S510p, S51 - Page 33
empty. -orYour computer operates after the battery status indicator shows empty. • Reset the battery gauge using Lenovo Energy Management. If the problem persists, replace with a new battery pack. The computer does not • The surge protector in the battery might be active. operate with a fully - Lenovo IdeaPad S410p Touch | User Guide - IdeaPad S410p, S410p Touch, S510p, S51 - Page 34
Chapter 4. Troubleshooting Other problems Your computer does not respond. I need to start the computer from a connected device, but the device does not appear on the boot device list. The connected external device does not work. • To turn off your computer, press and hold the power button for 4 - Lenovo IdeaPad S410p Touch | User Guide - IdeaPad S410p, S410p Touch, S510p, S51 - Page 35
Attention: • Replace the hard disk drive only if you upgrade it or have it repaired. The connectors and any physical shock. • Do not apply pressure to the cover of the drive. • Do not touch the connector. The hard disk drive is very sensitive. battery pack. 4 Remove the main compartment cover. 29 - Lenovo IdeaPad S410p Touch | User Guide - IdeaPad S410p, S410p Touch, S510p, S51 - Page 36
Appendix A. Replacing components a. Remove the screws that secure the compartment cover a. b.Remove the compartment cover b . 1 1 2 5 Remove the frame fixing screws c. Slide the hard disk drive in the direction shown by arrow d. 3 3 4 30 - Lenovo IdeaPad S410p Touch | User Guide - IdeaPad S410p, S410p Touch, S510p, S51 - Page 37
Appendix A. Replacing components 6 Take out the hard disk drive secured in a metal frame e . place. 0 Reinstall the frame fixing screws. A Reinstall the compartment cover, and then reinstall the screws to secure the cover. B Reinstall the battery pack. C Turn the computer over again. Connect the AC - Lenovo IdeaPad S410p Touch | User Guide - IdeaPad S410p, S410p Touch, S510p, S51 - Page 38
to five minutes to let the computer cool. 2 Close the computer display and turn the computer over. 3 Remove the battery pack. 4 Remove the main compartment cover. 5 Locate the memory module that needs replacement. Press out on the latches on both edges of the socket at the same time, and then remove - Lenovo IdeaPad S410p Touch | User Guide - IdeaPad S410p, S410p Touch, S510p, S51 - Page 39
Appendix A. Replacing components 6 Align the notch on the contact edge of the new Attention: • Do not touch the contact edge of the memory module to avoid any damage. 2 1 2 7 Reinstall the compartment cover, and then reinstall the screws to secure the cover. 8 Reinstall the battery pack. 9 Turn the - Lenovo IdeaPad S410p Touch | User Guide - IdeaPad S410p, S410p Touch, S510p, S51 - Page 40
Appendix A. Replacing components Replacing the wireless module To replace the wireless module, do the Close the computer display and turn the computer over. 3 Remove the battery pack. 4 Remove the main compartment cover. 5 Disconnect the antenna cables by picking up the connectors with your - Lenovo IdeaPad S410p Touch | User Guide - IdeaPad S410p, S410p Touch, S510p, S51 - Page 41
A. Replacing components 8 Reconnect the antenna cables. Ensure that the black cable is connected to the connector on the module marked as "Main" and the white cable marked as "AUX". 9 Reinstall the compartment cover, and then reinstall the screws to secure the cover. 0 Reinstall the battery pack - Lenovo IdeaPad S410p Touch | User Guide - IdeaPad S410p, S410p Touch, S510p, S51 - Page 42
Appendix A. Replacing components Removing the optical drive To remove the optical drive, do the following: 1 Remove the main compartment cover. 2 Remove the screw a shown in the illustration. 1 3 Gently pull the optical drive out b . 2 36 - Lenovo IdeaPad S410p Touch | User Guide - IdeaPad S410p, S410p Touch, S510p, S51 - Page 43
provides a list of CRUs (Customer Replaceable Units) for your computer and informs you of where to find replacement instructions. AC power adapter Power cord for AC power adapter Battery pack Hard disk drive Memory module Wireless module Optical drive Setup Poster O O O User Guide O O O O 37 - Lenovo IdeaPad S410p Touch | User Guide - IdeaPad S410p, S410p Touch, S510p, S51 - Page 44
registered trademarks of Lenovo in the United States, other countries, or both. Lenovo IdeaPad OneKey Microsoft and Windows are trademarks of Microsoft Corporation in the United States, other countries, or both. Other company, products, or service names may be trademarks or service marks of others - Lenovo IdeaPad S410p Touch | User Guide - IdeaPad S410p, S410p Touch, S510p, S51 - Page 45
en-US Rev. AA00
-
 1
1 -
 2
2 -
 3
3 -
 4
4 -
 5
5 -
 6
6 -
 7
7 -
8
-
9
-
10
-
11
-
12
-
13
-
14
-
15
-
16
-
17
-
18
-
19
-
20
-
21
-
22
-
23
-
24
-
25
-
26
-
27
-
28
-
29
-
30
-
31
-
32
-
33
-
34
-
35
-
36
-
37
-
38
-
39
-
40
-
41
-
42
-
43
-
44
-
45
 |
 |

Read the safety notices and important tips in the
included manuals before using your computer.
Lenovo IdeaPad
User Guide