Lenovo ThinkPad L540 (English) Power Manager Deployment Guide - Page 61
Sample power plan deployment, The Server Manager window opens.
 |
View all Lenovo ThinkPad L540 manuals
Add to My Manuals
Save this manual to your list of manuals |
Page 61 highlights
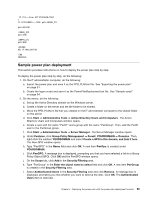
IF .%%2.==.Error. SET CTLERROR=TRUE ) IF .%CTLERROR%.==.TRUE. goto ERROR_CTL goto DELEND :ERROR_IMP goto END :ERRPR_CTL goto END :DELEND DEL /F %ResultFile% :END ENDLOCAL Sample power plan deployment This section provides instructions on how to deploy the power plan step by step. To deploy the power plan step by step, do the following: 1. On the IT administrator computer, do the following: a. Export the power plan and save it as the PPD_PLAN.ini file. See "Exporting the power plan" on page 51. b. Create the logon script and save it as the PowerPlanDeployment.bat file. See "Sample script" on page 54. 2. On the server, do the following: a. Set up the Active Directory domain on the Windows server. b. Create a folder on the server and set the folder to be shared. c. Move the PPD_PLAN.ini file that you created on the IT administrator computer to the shared folder on the server. d. Click Start ➙ Administrative Tools ➙ Active Directory Users and Computers. The Active Directory Users and Computers window opens. e. Create a user with the name "Pwr01" and a group with the name "PwrGroup". Then, add the Pwr01 user to the PwrGroup group. f. Click Start ➙ Administrative Tools ➙ Server Manager. The Server Manager window opens. g. Under Features, click Group Policy Management ➙ Forest: YOURDOMAIN ➙ Domains. Then, right-click the subitem YOURDOMAIN and select Create a GPO in this domain, and Link it here. The New GPO window opens. h. Type "PwrGPO" in the Name field and click OK. A new item PwrGpo is created under YOURDOMAIN. i. Click PwrGPO. A message box is displayed, prompting you that you have selected a link to a Group Policy Object (GPO). Click OK and the PwrGPO window opens. j. On the Scope tab, click Add in the Security Filtering area. k. Type "PwrGroup" in the Enter the object name to select field and click OK. A new item PwrGroup is created in the Security Filtering area. l. Select Authenticated Users in the Security Filtering area and click Remove. A message box is displayed, prompting you that whether you want to remove the item. Click OK. The Authenticated Users item is removed. Chapter 4. Deploying the power plan with the power plan deployment function 55
-
 1
1 -
2
-
3
-
4
-
5
-
6
-
7
-
8
-
9
-
10
-
11
-
12
-
13
-
14
-
15
-
16
-
17
-
18
-
19
-
20
-
21
-
22
-
23
-
24
-
25
-
26
-
27
-
28
-
29
-
30
-
31
-
32
-
33
-
34
-
35
-
36
-
37
-
38
-
39
-
40
-
41
-
42
-
43
-
44
-
45
-
46
-
47
-
48
-
49
-
50
-
51
-
52
-
53
-
54
-
55
-
 56
56 -
 57
57 -
 58
58 -
 59
59 -
 60
60 -
 61
61 -
 62
62 -
 63
63 -
 64
64 -
 65
65 -
 66
66 -
67
-
68
 |
 |