Lexmark 1200 Setup Guide - Page 42
Attaching the rear output bin, Remove the bin from the packing materials.
 |
UPC - 734646167000
View all Lexmark 1200 manuals
Add to My Manuals
Save this manual to your list of manuals |
Page 42 highlights
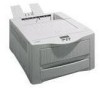
Attaching the rear output bin Posts If you plan to load transparencies, envelopes, labels, or card stock in the multipurpose feeder, you may want to attach the rear output bin to the back of the printer. This creates a straight paper path for the media and prevents curling. If you attach the rear output bin, you must remove it to access the printer system board or connect cables to the back of the printer. To install the rear output bin: 1 Remove the bin from the packing materials. 2 Locate the two posts at the back of the printer. 3 Align the arrow on the bin with the arrow above the right post. 36 Load paper
-
 1
1 -
2
-
3
-
4
-
5
-
6
-
7
-
8
-
9
-
10
-
11
-
12
-
13
-
14
-
15
-
16
-
17
-
18
-
19
-
20
-
21
-
22
-
23
-
24
-
25
-
26
-
27
-
28
-
29
-
30
-
31
-
32
-
33
-
34
-
35
-
36
-
 37
37 -
 38
38 -
 39
39 -
 40
40 -
 41
41 -
 42
42 -
 43
43 -
 44
44 -
 45
45 -
 46
46 -
 47
47 -
48
-
49
-
50
-
51
-
52
-
53
-
54
-
55
-
56
-
57
-
58
-
59
-
60
-
61
-
62
-
63
-
64
-
65
-
66
-
67
-
68
-
69
-
70
-
71
-
72
-
73
-
74
-
75
-
76
-
77
-
78
 |
 |

36
Load paper
Attaching the
rear output bin
If you plan to load transparencies, envelopes, labels, or
card stock in the multipurpose feeder, you may want to
attach the rear output bin to the back of the printer. This
creates a straight paper path for the media and prevents
curling.
If you attach the rear output bin, you must remove it to
access the printer system board or connect cables to the
back of the printer.
To install the rear output bin:
1
Remove the bin from the packing materials.
2
Locate the two posts at the back of the printer.
3
Align the arrow on the bin with the arrow above
the right post.
Posts