Lexmark 1200 Setup Guide - Page 62
until you see, Continue to press
 |
UPC - 734646167000
View all Lexmark 1200 manuals
Add to My Manuals
Save this manual to your list of manuals |
Page 62 highlights
e Press Menu> or
-
 1
1 -
2
-
3
-
4
-
5
-
6
-
7
-
8
-
9
-
10
-
11
-
12
-
13
-
14
-
15
-
16
-
17
-
18
-
19
-
20
-
21
-
22
-
23
-
24
-
25
-
26
-
27
-
28
-
29
-
30
-
31
-
32
-
33
-
34
-
35
-
36
-
37
-
38
-
39
-
40
-
41
-
42
-
43
-
44
-
45
-
46
-
47
-
48
-
49
-
50
-
51
-
52
-
53
-
54
-
55
-
56
-
 57
57 -
 58
58 -
 59
59 -
 60
60 -
 61
61 -
 62
62 -
 63
63 -
 64
64 -
 65
65 -
 66
66 -
 67
67 -
68
-
69
-
70
-
71
-
72
-
73
-
74
-
75
-
76
-
77
-
78
 |
 |

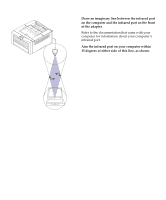
56
Attach cables
e
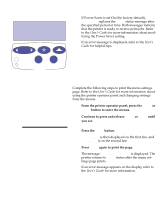
Press
Menu>
or
<Menu
until the serial port you
want to set up as a fax port appears on the sec-
ond line of the display.
For example, if you installed a tri-port adapter in
connector 2,
look for
Ser Option 2
.
f
Press
Select
.
The printer resets. You are now ready to receive
faxes.
Refer to the printer
User’s Guide
for information about
changing the fax communication settings, such as baud
and parity.
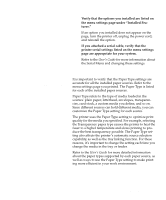
Note:
Do not attempt to con-
figure the serial port for multiple
uses with an A-B switch.
To disable the fax modem and restore the printer serial
port to normal use:
1
From the printer operator panel:
a
Press the
Menu>
or
<Menu
button to enter the
menus.
b
Continue to press
Menu>
or
<Menu
until you see
FAX MENU
.
c
Press the
Select
button.
Fax Port
appears on the second line of the display.
d
Press
Select
again.
e
Press
Menu>
or
<Menu
until
Disabled
appears on
the second line of the display.
f
Press
Select
.
The printer resets.
2
Turn the modem power off.
3
Turn the printer power off.
4
Disconnect the modem cable from the printer
serial port.
5
Turn the printer power on.