Lexmark 1200 Setup Guide - Page 57
cable connectors., Gently tighten the screws to secure the adapter.
 |
UPC - 734646167000
View all Lexmark 1200 manuals
Add to My Manuals
Save this manual to your list of manuals |
Page 57 highlights
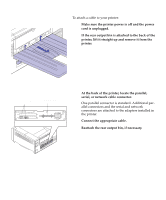
6 Align the adapter connector with the connector on the system board. 7 Push the adapter firmly into the system board con- nector until it is completely seated. The two connectors should fit snugly together. 8 Insert the two screws saved from the metal plate (or the extra screws shipped with the adapter) into the holes on either end of the opening for the cable connectors. 9 Gently tighten the screws to secure the adapter. 10 Repeat steps 3-9 to install a second adapter in connector 2. 11 Continue with "Reinstalling the system board" on page 52. Install memory and network options 51
-
 1
1 -
2
-
3
-
4
-
5
-
6
-
7
-
8
-
9
-
10
-
11
-
12
-
13
-
14
-
15
-
16
-
17
-
18
-
19
-
20
-
21
-
22
-
23
-
24
-
25
-
26
-
27
-
28
-
29
-
30
-
31
-
32
-
33
-
34
-
35
-
36
-
37
-
38
-
39
-
40
-
41
-
42
-
43
-
44
-
45
-
46
-
47
-
48
-
49
-
50
-
51
-
 52
52 -
 53
53 -
 54
54 -
 55
55 -
 56
56 -
 57
57 -
 58
58 -
 59
59 -
 60
60 -
 61
61 -
 62
62 -
63
-
64
-
65
-
66
-
67
-
68
-
69
-
70
-
71
-
72
-
73
-
74
-
75
-
76
-
77
-
78
 |
 |

51
Install memory and network options
6
Align the adapter connector with the connector on
the system board.
7
Push the adapter firmly into the system board con-
nector until it is completely seated.
The two connectors should fit snugly together.
8
Insert the two screws saved from the metal plate
(or the extra screws shipped with the adapter) into
the holes on either end of the opening for the
cable connectors.
9
Gently tighten the screws to secure the adapter.
10
Repeat steps 3–9 to install a second adapter in
connector 2.
11
Continue with “Reinstalling the system board” on
page 52.