Lexmark 1200 Setup Guide - Page 60
At the back of the printer, locate the parallel, printer, lift it straight up and remove it from
 |
UPC - 734646167000
View all Lexmark 1200 manuals
Add to My Manuals
Save this manual to your list of manuals |
Page 60 highlights
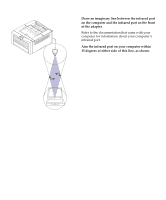
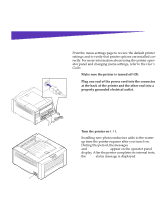
To attach a cable to your printer: 1 Make sure the printer power is off and the power cord is unplugged. 2 If the rear output bin is attached to the back of the printer, lift it straight up and remove it from the printer. Optional parallel, serial, or network connectors Standard parallel connector 3 At the back of the printer, locate the parallel, serial, or network cable connector. One parallel connector is standard. Additional parallel connectors and the serial and network connectors are attached to the adapters installed in the printer. 4 Connect the appropriate cable. 5 Reattach the rear output bin, if necessary. 54 Attach cables
-
 1
1 -
2
-
3
-
4
-
5
-
6
-
7
-
8
-
9
-
10
-
11
-
12
-
13
-
14
-
15
-
16
-
17
-
18
-
19
-
20
-
21
-
22
-
23
-
24
-
25
-
26
-
27
-
28
-
29
-
30
-
31
-
32
-
33
-
34
-
35
-
36
-
37
-
38
-
39
-
40
-
41
-
42
-
43
-
44
-
45
-
46
-
47
-
48
-
49
-
50
-
51
-
52
-
53
-
54
-
 55
55 -
 56
56 -
 57
57 -
 58
58 -
 59
59 -
 60
60 -
 61
61 -
 62
62 -
 63
63 -
 64
64 -
 65
65 -
66
-
67
-
68
-
69
-
70
-
71
-
72
-
73
-
74
-
75
-
76
-
77
-
78
 |
 |

54
Attach cables
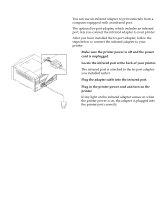
To attach a cable to your printer:
1
Make sure the printer power is off and the power
cord is unplugged.
2
If the rear output bin is attached to the back of the
printer, lift it straight up and remove it from the
printer.
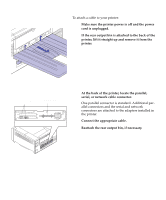
3
At the back of the printer, locate the parallel,
serial, or network cable connector.
One parallel connector is standard. Additional par-
allel connectors and the serial and network
connectors are attached to the adapters installed in
the printer.
4
Connect the appropriate cable.
5
Reattach the rear output bin, if necessary.
Optional parallel,
serial, or network
connectors
Standard parallel
connector