Lexmark 1200 Setup Guide - Page 56
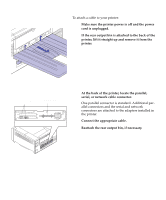
Remove the two screws on either end of the, plate covering the opening for the cable connec
 |
UPC - 734646167000
View all Lexmark 1200 manuals
Add to My Manuals
Save this manual to your list of manuals |
Page 56 highlights
Metal plate e If you are not installing another adapter in the connector, cover the opening, preferably with one of the metal plates designed for that purpose. Covering the opening ensures proper airflow around the system board. If you do not have a metal plate, contact your service representative and request a blank cover for the controller cage. 3 Before installing an adapter, remove the metal plate covering the opening for the cable connectors. a Remove the two screws on either end of the metal plate. Save the screws. You'll use them to secure the adapter to the system board. b Remove the plate. Save the metal plate so you can reinstall it if you remove the adapter. 4 Unpack the adapter. Save the packing materials. 5 Angle the adapter, as shown, so the cable connec- tors on the adapter fit through the opening in the faceplate. 50 Install memory and network options
-
 1
1 -
2
-
3
-
4
-
5
-
6
-
7
-
8
-
9
-
10
-
11
-
12
-
13
-
14
-
15
-
16
-
17
-
18
-
19
-
20
-
21
-
22
-
23
-
24
-
25
-
26
-
27
-
28
-
29
-
30
-
31
-
32
-
33
-
34
-
35
-
36
-
37
-
38
-
39
-
40
-
41
-
42
-
43
-
44
-
45
-
46
-
47
-
48
-
49
-
50
-
 51
51 -
 52
52 -
 53
53 -
 54
54 -
 55
55 -
 56
56 -
 57
57 -
 58
58 -
 59
59 -
 60
60 -
 61
61 -
62
-
63
-
64
-
65
-
66
-
67
-
68
-
69
-
70
-
71
-
72
-
73
-
74
-
75
-
76
-
77
-
78
 |
 |
