Lexmark 1200 Setup Guide - Page 58
Reinstalling the system board, the printer.
 |
UPC - 734646167000
View all Lexmark 1200 manuals
Add to My Manuals
Save this manual to your list of manuals |
Page 58 highlights
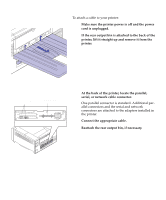
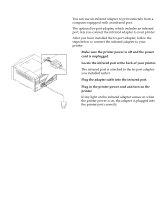
Reinstalling the system board After you have installed all options on the system board, complete the following steps to reinstall the system board: 1 Align the system board with the printer opening, as shown. 2 Rest the system board on the lip at the front of the opening. Security tab 3 Carefully slide the system board all the way into the printer. The security tab on the right side of the printer should fit through the slot in the faceplate. You can attach a padlock to the security tab to prevent access to the system board. 4 Firmly press the faceplate in the area indicated by the arrow. This ensures the connector on the back of the system board inserts completely into the connector at the back of the printer opening. 5 Securely tighten the six thumbscrews on the sys- tem board faceplate. 6 If necessary, reattach the rear output bin. If you have trouble installing the bin, make sure the screws on the system board faceplate are completely inserted. 52 Install memory and network options
-
 1
1 -
2
-
3
-
4
-
5
-
6
-
7
-
8
-
9
-
10
-
11
-
12
-
13
-
14
-
15
-
16
-
17
-
18
-
19
-
20
-
21
-
22
-
23
-
24
-
25
-
26
-
27
-
28
-
29
-
30
-
31
-
32
-
33
-
34
-
35
-
36
-
37
-
38
-
39
-
40
-
41
-
42
-
43
-
44
-
45
-
46
-
47
-
48
-
49
-
50
-
51
-
52
-
 53
53 -
 54
54 -
 55
55 -
 56
56 -
 57
57 -
 58
58 -
 59
59 -
 60
60 -
 61
61 -
 62
62 -
 63
63 -
64
-
65
-
66
-
67
-
68
-
69
-
70
-
71
-
72
-
73
-
74
-
75
-
76
-
77
-
78
 |
 |
