Lexmark 25C0010 Scan Destination and Alert Message Setup Guide - Page 7
Sample e-mails, Scan to e-mail, Notification e-mail
 |
UPC - 734646054492
View all Lexmark 25C0010 manuals
Add to My Manuals
Save this manual to your list of manuals |
Page 7 highlights
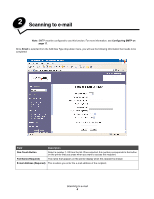
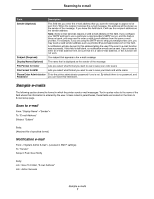
Scanning to e-mail Field Description Sender (Optional) This field lets you enter the e-mail address that you want the message to appear to be sent from. When the recipient receives the e-mail message, this address will be shown as the sender of the message. If you leave this field blank, it will use the recipient address as the sender address. Note: Some e-mail services require a valid e-mail address in this field. If you configure your SMTP settings to use a particular e-mail provider's SMTP server, and the feature does not work, you may need to enter a valid e-mail address from the same e-mail provider. For example, if you are using the SMTP server smtp.youremailprovider.com, you may need a valid sender address such as [email protected] in this field. A notification will also be sent to this address telling the user if the scan to e-mail function was successful. If this field is left blank, no notification e-mail can be sent. If you choose to enter an e-mail address here, be sure that it is a valid e-mail address, or this function will not work. Subject (Required): The subject that appears in the e-mail message Display Name (Optional) The name that is displayed as the sender of the message File Format for Color Lets you select what format you want to use to save your color scans File Format for B/W Lets you select what format you want to use to save your black and white scans Please Enter Administrator Enter the printer administrator password if one is set. By default there is no password, and Password you can leave this field blank. Sample e-mails The following section shows the format in which the printer sends e-mail messages. Text in quotes refers to the name of the field where this information is entered by the user. Unless noted in parentheses, these fields are located on the Scan to E-mail setup page. Scan to e-mail From: "Display Name" To: "E-mail Address" Subject: "Subject" Body: [Attached file of specified format] Notification e-mail From: (Located in SMTP settings) To: "Sender" Subject: Push Scan Notify Body: Job : Scan To E-Mail, "E-mail Address" Job : Action Success Sample e-mails 7
-
 1
1 -
 2
2 -
 3
3 -
 4
4 -
 5
5 -
 6
6 -
 7
7 -
 8
8 -
 9
9 -
 10
10 -
 11
11 -
 12
12 -
13
-
14
-
15
-
16
-
17
-
18
 |
 |
