Lexmark 30G0109 User Manual - Page 79
Printing information s, Printing a font sample list, Printing a directory list
 |
View all Lexmark 30G0109 manuals
Add to My Manuals
Save this manual to your list of manuals |
Page 79 highlights
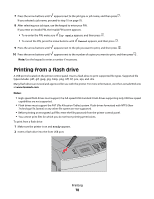
Notes: • If you insert the flash drive when the printer requires attention, such as when a jam has occurred, then the printer ignores it. • If you insert the flash drive while the printer is printing other jobs, then Printer Busy appears. After the other jobs are processed, you may need to view the held jobs list to print documents from the flash drive. 3 Press the down arrow button until appears next to the document you want to print, and then press . Note: Folders found on the flash drive appear as folders. File names are appended by the extension type (for example, .jpg). 4 Press to print one copy, or enter the number of copies using the keypad, and then press to initiate the print job. Note: Do not remove the flash drive from the printer until the document has finished printing. If you leave the flash drive in the printer after leaving the initial USB menu screen, you can still print .pdf files from the flash drive as held jobs. Printing information pages Printing a font sample list To print samples of the fonts currently available for your printer: 1 Make sure the printer is on and Ready appears. 2 From the printer control panel, press . 3 Press the arrow buttons until Reports appears, and then press . 4 Press the arrow buttons until Print Fonts appears, and then press . 5 Press the arrow buttons until appears next to PCL Fonts, PostScript Fonts, or PPDS Fonts, and then press . Printing a directory list A directory list shows the resources stored in flash memory or on the hard disk. 1 Make sure the printer is on and Ready appears. 2 From the printer control panel, press . 3 Press the arrow buttons until Reports appears, and then press . 4 Press the arrow buttons until Print Directory appears, and then press . Printing 79
-
 1
1 -
2
-
3
-
4
-
5
-
6
-
7
-
8
-
9
-
10
-
11
-
12
-
13
-
14
-
15
-
16
-
17
-
18
-
19
-
20
-
21
-
22
-
23
-
24
-
25
-
26
-
27
-
28
-
29
-
30
-
31
-
32
-
33
-
34
-
35
-
36
-
37
-
38
-
39
-
40
-
41
-
42
-
43
-
44
-
45
-
46
-
47
-
48
-
49
-
50
-
51
-
52
-
53
-
54
-
55
-
56
-
57
-
58
-
59
-
60
-
61
-
62
-
63
-
64
-
65
-
66
-
67
-
68
-
69
-
70
-
71
-
72
-
73
-
 74
74 -
 75
75 -
 76
76 -
 77
77 -
 78
78 -
 79
79 -
 80
80 -
 81
81 -
 82
82 -
 83
83 -
 84
84 -
85
-
86
-
87
-
88
-
89
-
90
-
91
-
92
-
93
-
94
-
95
-
96
-
97
-
98
-
99
-
100
-
101
-
102
-
103
-
104
-
105
-
106
-
107
-
108
-
109
-
110
-
111
-
112
-
113
-
114
-
115
-
116
-
117
-
118
-
119
-
120
-
121
-
122
-
123
-
124
-
125
-
126
-
127
-
128
-
129
-
130
-
131
-
132
-
133
-
134
-
135
-
136
-
137
-
138
-
139
-
140
-
141
-
142
-
143
-
144
-
145
-
146
-
147
-
148
-
149
-
150
-
151
-
152
-
153
-
154
-
155
-
156
-
157
-
158
-
159
-
160
-
161
-
162
-
163
-
164
-
165
-
166
-
167
-
168
-
169
-
170
-
171
-
172
-
173
-
174
-
175
-
176
-
177
-
178
-
179
-
180
-
181
-
182
-
183
-
184
-
185
-
186
-
187
-
188
-
189
-
190
-
191
-
192
-
193
-
194
-
195
-
196
-
197
-
198
-
199
-
200
-
201
-
202
-
203
-
204
-
205
-
206
-
207
-
208
-
209
-
210
-
211
-
212
-
213
-
214
-
215
-
216
-
217
-
218
 |
 |
