Lexmark 4227 Lexmark 4227 Plus User's Guide - Page 108
Clearing Paper Jams
 |
UPC - 734646117104
View all Lexmark 4227 manuals
Add to My Manuals
Save this manual to your list of manuals |
Page 108 highlights
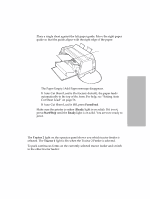
Solving Printer Problems To run a printer test: 1 Turn the printer On. 2 Press Menu. 3 Press Item ↓ until Print Settings appears. 4 Press Start. The menu settings print. If the menu settings do not print, contact your point of purchase or see the printer registration card for the number appropriate for your country. Clearing Paper Jams Use the following procedures to remove paper jams from your printer. When jams occur, the Check light is on and the 002 Paper Jam message appears on the display. If this happens, follow these steps to clear the jam: 1 Open the top cover and tear off the forms at the tear bar and front bottom openings of the printer. 2 Open the front cover and open the left and right forms tractor doors and remove the forms from both tractors. • If the jam occurred below the printhead, go to step 4. • If the jam occurred above the printhead, go to step 5. 3 Remove the remaining forms by pulling them slowly toward you. Go to step 6. 4 Remove the remaining forms by pulling them slowly toward the back of the printer. If the forms are blocked by the ribbon, remove the ribbon cartridge before attempting to remove the forms. For instructions on removing and loading the ribbon cartridge, see "Removing the Ribbon Cartridge" on page 114 or "Installing the Ribbon Cartridge" on page 3. 5 Make sure all paper is removed from inside the printer, then close the top cover. 102 Chapter 6: Solving Printer Problems
-
 1
1 -
2
-
3
-
4
-
5
-
6
-
7
-
8
-
9
-
10
-
11
-
12
-
13
-
14
-
15
-
16
-
17
-
18
-
19
-
20
-
21
-
22
-
23
-
24
-
25
-
26
-
27
-
28
-
29
-
30
-
31
-
32
-
33
-
34
-
35
-
36
-
37
-
38
-
39
-
40
-
41
-
42
-
43
-
44
-
45
-
46
-
47
-
48
-
49
-
50
-
51
-
52
-
53
-
54
-
55
-
56
-
57
-
58
-
59
-
60
-
61
-
62
-
63
-
64
-
65
-
66
-
67
-
68
-
69
-
70
-
71
-
72
-
73
-
74
-
75
-
76
-
77
-
78
-
79
-
80
-
81
-
82
-
83
-
84
-
85
-
86
-
87
-
88
-
89
-
90
-
91
-
92
-
93
-
94
-
95
-
96
-
97
-
98
-
99
-
100
-
101
-
102
-
 103
103 -
 104
104 -
 105
105 -
 106
106 -
 107
107 -
 108
108 -
 109
109 -
 110
110 -
 111
111 -
 112
112 -
 113
113 -
114
-
115
-
116
-
117
-
118
-
119
-
120
-
121
-
122
-
123
-
124
-
125
-
126
-
127
-
128
-
129
-
130
-
131
-
132
-
133
-
134
-
135
-
136
-
137
-
138
 |
 |
