Lexmark 4227 Lexmark 4227 Plus User's Guide - Page 94
Make sure
 |
UPC - 734646117104
View all Lexmark 4227 manuals
Add to My Manuals
Save this manual to your list of manuals |
Page 94 highlights
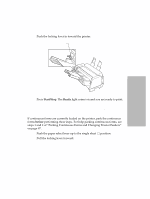
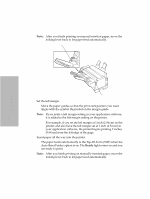
Printer Options 9 Remove the system board cover from the back of the printer. Lift the cover while prying at the bottom center. 10 On the system board cover, twist the knockout plug to remove it. 11 Replace the system board cover. 12 Plug the Tractor 2 Feeder cable into the tractor connector on the back of the printer. Make sure the (v) symbol on the Tractor 2 Feeder cable faces up. Align the (v) symbol on the cable with the (w) symbol on the 88 Chapter 5: Printer Options
-
 1
1 -
2
-
3
-
4
-
5
-
6
-
7
-
8
-
9
-
10
-
11
-
12
-
13
-
14
-
15
-
16
-
17
-
18
-
19
-
20
-
21
-
22
-
23
-
24
-
25
-
26
-
27
-
28
-
29
-
30
-
31
-
32
-
33
-
34
-
35
-
36
-
37
-
38
-
39
-
40
-
41
-
42
-
43
-
44
-
45
-
46
-
47
-
48
-
49
-
50
-
51
-
52
-
53
-
54
-
55
-
56
-
57
-
58
-
59
-
60
-
61
-
62
-
63
-
64
-
65
-
66
-
67
-
68
-
69
-
70
-
71
-
72
-
73
-
74
-
75
-
76
-
77
-
78
-
79
-
80
-
81
-
82
-
83
-
84
-
85
-
86
-
87
-
88
-
 89
89 -
 90
90 -
 91
91 -
 92
92 -
 93
93 -
 94
94 -
 95
95 -
 96
96 -
 97
97 -
 98
98 -
 99
99 -
100
-
101
-
102
-
103
-
104
-
105
-
106
-
107
-
108
-
109
-
110
-
111
-
112
-
113
-
114
-
115
-
116
-
117
-
118
-
119
-
120
-
121
-
122
-
123
-
124
-
125
-
126
-
127
-
128
-
129
-
130
-
131
-
132
-
133
-
134
-
135
-
136
-
137
-
138
 |
 |

Chapter 5: Printer Options
88
Printer Options
9
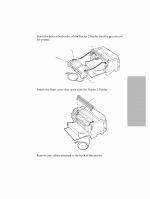
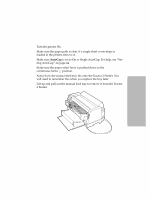
Remove the system board cover from the back of the printer. Lift the
cover while prying at the bottom center.
10
On the system board cover, twist the knockout plug to remove it.
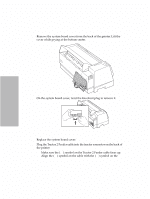
11
Replace the system board cover.
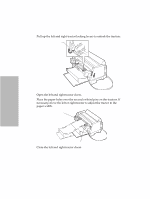
12
Plug the Tractor 2 Feeder cable into the tractor connector on the back of
the printer.
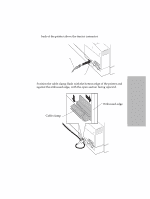
Make sure the (
▲
) symbol on the Tractor 2 Feeder cable faces up.
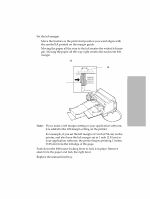
Align the (
▲
) symbol on the cable with the (
▼
) symbol on the