Lexmark C544DTN User's Guide - Page 21
the printer driver to make them available for print jobs. For more information
 |
UPC - 734646072472
View all Lexmark C544DTN manuals
Add to My Manuals
Save this manual to your list of manuals |
Page 21 highlights
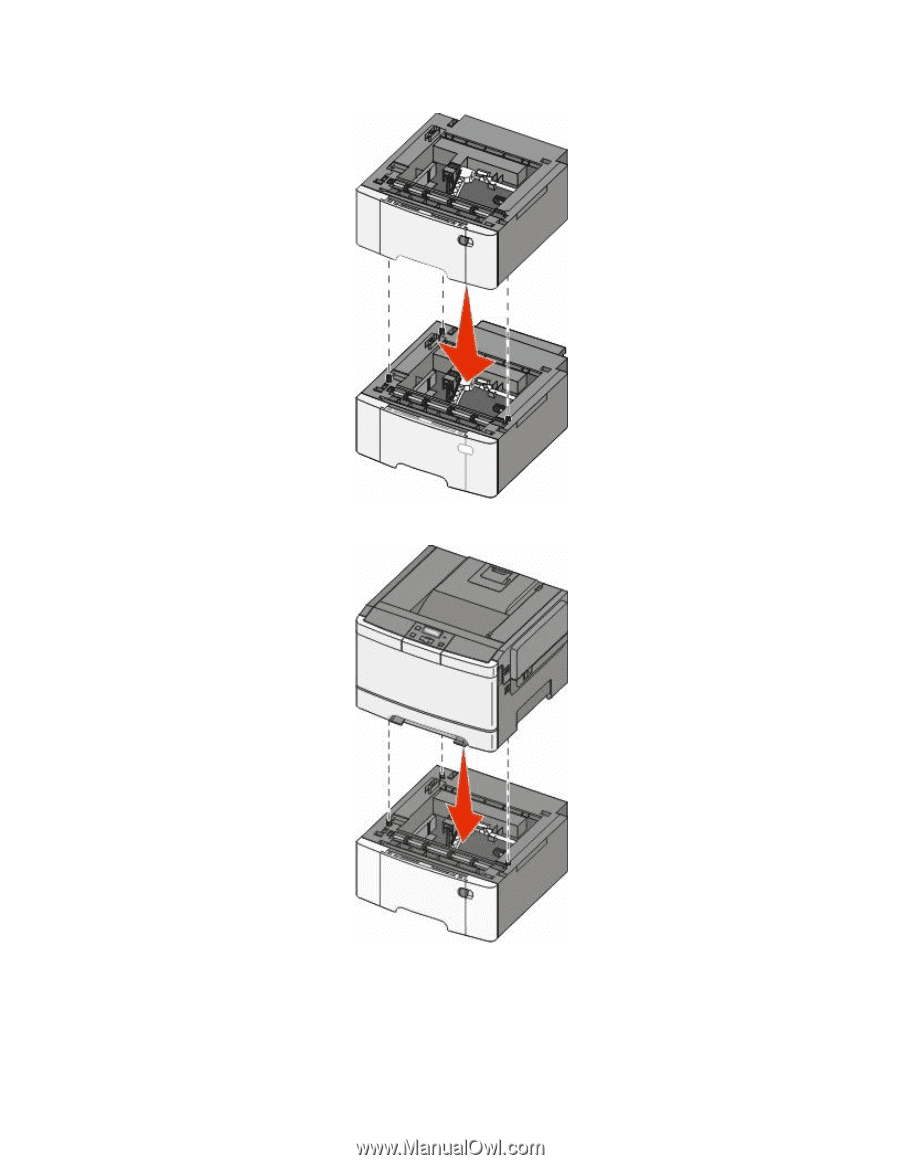
3 Align a 650-sheet duo drawer with the optional 550-sheet tray, and then lower it into place. 4 Align the printer with the 650-sheet duo drawer, and then lower the printer into place. 5 Install the dust covers. Note: Once the printer software and any options are installed, it may be necessary to manually add the options in the printer driver to make them available for print jobs. For more information, see "Updating available options in the printer driver" on page 24. Additional printer setup 21
-
 1
1 -
2
-
3
-
4
-
5
-
6
-
7
-
8
-
9
-
10
-
11
-
12
-
13
-
14
-
15
-
 16
16 -
 17
17 -
 18
18 -
 19
19 -
 20
20 -
 21
21 -
 22
22 -
 23
23 -
 24
24 -
 25
25 -
 26
26 -
27
-
28
-
29
-
30
-
31
-
32
-
33
-
34
-
35
-
36
-
37
-
38
-
39
-
40
-
41
-
42
-
43
-
44
-
45
-
46
-
47
-
48
-
49
-
50
-
51
-
52
-
53
-
54
-
55
-
56
-
57
-
58
-
59
-
60
-
61
-
62
-
63
-
64
-
65
-
66
-
67
-
68
-
69
-
70
-
71
-
72
-
73
-
74
-
75
-
76
-
77
-
78
-
79
-
80
-
81
-
82
-
83
-
84
-
85
-
86
-
87
-
88
-
89
-
90
-
91
-
92
-
93
-
94
-
95
-
96
-
97
-
98
-
99
-
100
-
101
-
102
-
103
-
104
-
105
-
106
-
107
-
108
-
109
-
110
-
111
-
112
-
113
-
114
-
115
-
116
-
117
-
118
-
119
-
120
-
121
-
122
-
123
-
124
-
125
-
126
-
127
-
128
-
129
-
130
-
131
-
132
-
133
-
134
-
135
-
136
-
137
-
138
-
139
-
140
-
141
-
142
-
143
-
144
-
145
-
146
-
147
-
148
-
149
-
150
-
151
-
152
-
153
-
154
-
155
-
156
-
157
-
158
-
159
-
160
-
161
-
162
-
163
-
164
-
165
-
166
-
167
-
168
-
169
-
170
-
171
 |
 |
3
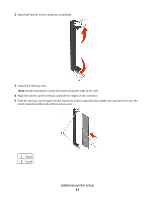
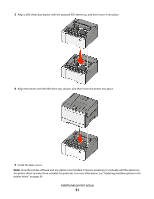
Align a 650-sheet duo drawer with the optional 550-sheet tray, and then lower it into place.
4
Align the printer with the 650-sheet duo drawer, and then lower the printer into place.
5
Install the dust covers.
Note:
Once the printer software and any options are installed, it may be necessary to manually add the options in
the printer driver to make them available for print jobs. For more information, see “Updating available options in the
printer driver” on page 24.
Additional printer setup
21