Lexmark Interpret S402 Quick Reference - Page 18
Scanning to a flash drive or memory card, Scanning directly to e-mail using the printer software,
 |
View all Lexmark Interpret S402 manuals
Add to My Manuals
Save this manual to your list of manuals |
Page 18 highlights
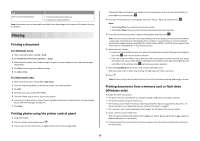
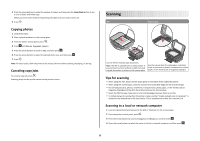
The local or network computer is the destination that will receive the scan. Wait until the printer has finished downloading a list of the scan applications available on the selected computer. Notes: • If the printer is connected only to a local computer, then the printer will automatically download a list of the scan applications. • You may be prompted to enter a PIN if the computer requires it. Enter the PIN using the keypad. • To assign a computer name and a PIN to the computer, see the Help for the printer software associated with your operating system. 5 Press the arrow buttons to select an application, and then press . 6 Press the arrow buttons to select the resolution quality and the original image size. Press each time you make a selection. 7 Press to start scanning. The scan is complete when the application you selected in step 5 opens on the destination computer, and the scan appears within the application as a new file. Scanning to a flash drive or memory card Before you begin, make sure your flash drive or memory card is not write protected. 1 Load an original document faceup into the ADF or facedown on the scanner glass. 2 From the printer control panel, press . 3 When Scan to appears on the display, insert the flash drive or memory card. 4 Press the arrow buttons to scroll to USB Flash Drive or Memory Card, and then press . 5 Press the arrow buttons to select the resolution quality, the type of output you want to create, and the original image size. Press each time you make a selection. Note: Select the PDF file type if you want to scan multiple pages and save them as one file. 6 Press to start scanning. The scan is complete when a message appears on the printer control panel indicating that the file you scanned has been saved. Scanning directly to e-mail using the printer software For Windows users 1 Load an original document faceup into the ADF or facedown on the scanner glass. 2 Click or Start. 3 Click All Programs or Programs, and then select the printer program folder from the list. 4 Navigate to: Printer Home > select your printer > Email 5 Select Photo, Document, or PDF. Note: You can select Document only if an OCR application is stored on your computer. Scanning starts and the scan progress dialog appears. When the scan is finished, a new e-mail message is created with the scanned document automatically attached. 6 Compose your e-mail message. Note: If your e-mail program does not open automatically, then you can scan the document to the computer and then send it through e-mail as an attachment. For Macintosh users 1 Load an original document faceup into the ADF or facedown on the scanner glass. 2 From the Applications folder in the Finder, or from the Finder desktop, double-click the printer folder. 3 Double-click Scan Center or All-In-One Center. 4 From the "What is being scanned?" area on the main screen, select a document type. 5 From the "How will the scanned image be used?" menu, choose To be viewed on monitor/web page. 6 From the "Send scanned image to" menu, choose an e-mail application. 7 Click Scan. When the scan is finished, a new e-mail message is created with the scanned document automatically attached. 8 Compose your e-mail message. Scanning to a PDF For Windows users 1 Load an original document faceup into the ADF or facedown on the scanner glass. 2 Click or Start. 3 Click All Programs or Programs, and then select the printer program folder from the list. 4 Navigate to: Printer Home > select your printer > PDF Scanning starts and the scan progress dialog appears. 18
-
 1
1 -
2
-
3
-
4
-
5
-
6
-
7
-
8
-
9
-
10
-
11
-
12
-
 13
13 -
 14
14 -
 15
15 -
 16
16 -
 17
17 -
 18
18 -
 19
19 -
 20
20 -
 21
21 -
 22
22 -
 23
23
 |
 |