Lexmark Interpret S402 Quick Reference - Page 19
Troubleshooting
 |
View all Lexmark Interpret S402 manuals
Add to My Manuals
Save this manual to your list of manuals |
Page 19 highlights
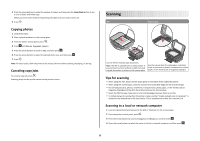
5 Save the document as a PDF. For Macintosh users 1 Load an original document faceup into the ADF or facedown on the scanner glass. 2 From the Applications folder in the Finder, or from the Finder desktop, double-click the printer folder. 3 Double-click Scan Center or All-In-One Center. 4 From the "What is being scanned?" area on the main screen, select a document type. 5 Customize the settings as needed. 6 Click Scan. 7 Save the document as a PDF. Canceling scan jobs Press on the printer control panel, or click Cancel on the computer screen. Troubleshooting Before you troubleshoot Use this checklist to solve most printer problems: • Make sure the power cord is plugged into the printer and into a properly grounded electrical outlet. • Make sure the printer is not plugged into any surge protectors, uninterrupted power supplies, or extension cords. • Make sure the printer is turned on. • Make sure the printer is securely connected to the host computer, print server, or other network access point. • Check the printer for error messages, and resolve any errors. • Check for paper jam messages, and clear any jams. • Check the ink cartridges, and install new cartridges if necessary. • Use the Service Center to locate and solve the problem (Windows only). • Turn the printer off, wait about 10 seconds, and then turn the printer back on. Using the Service Center to solve printer problems The Service Center provides step-by-step troubleshooting help and contains links to printer maintenance tasks and customer support. To open the Service Center, use one of these methods: Method 1 If it appears on an error message dialog, click the For additional assistance, use the Service Center link. Method 2 1 Click or Start. 2 Click All Programs or Programs, and then select the printer program folder from the list. 3 Select Printer Home. 4 From the Support tab, select Service Center. If Troubleshooting does not solve your problem Visit our Web site at http://support.lexmark.com to find the following: • Knowledgebase articles with the latest information and troubleshooting for your printer • Live online technical support • Contact numbers for telephone technical support Setup troubleshooting • "Incorrect language appears on the display" on page 19 • "Printhead errors" on page 20 • "Software did not install" on page 21 • "Print job does not print or is missing pages" on page 21 • "Printer is printing blank pages" on page 22 • "Printer is busy or does not respond" on page 22 • "Cannot delete documents from the print queue" on page 22 • "Cannot print through USB" on page 22 Incorrect language appears on the display If the "Before you troubleshoot" checklist does not solve the problem, then try one or more of the following: CHANGE THE LANGUAGE USING THE PRINTER MENUS 1 From the printer control panel, press . 2 Press the arrow buttons to scroll to Defaults, and then press . 3 Press the arrow buttons to scroll to Set Defaults, and then press . 4 Press the arrow buttons to scroll to Use Factory, and then press . 19
-
 1
1 -
2
-
3
-
4
-
5
-
6
-
7
-
8
-
9
-
10
-
11
-
12
-
13
-
 14
14 -
 15
15 -
 16
16 -
 17
17 -
 18
18 -
 19
19 -
 20
20 -
 21
21 -
 22
22 -
 23
23
 |
 |