Lexmark MX711 Quick Reference
Lexmark MX711 Manual
 |
View all Lexmark MX711 manuals
Add to My Manuals
Save this manual to your list of manuals |
Lexmark MX711 manual content summary:
- Lexmark MX711 | Quick Reference - Page 1
Reset the default settings of a function, such as Reset button copying, faxing, or scanning. 7 Cancel button Cancel all printer activity. 8 Indicator light Check the status of the printer. Use the 9 USB port To Connect a flash drive to the printer. Note: Only the front USB port supports flash - Lexmark MX711 | Quick Reference - Page 2
Note: Make sure your printer is connected to a network or to a print server. You can find the printer IP address: • From the top left corner of the printer home screen. • From the TCP/IP section in the Network/Ports menu. • By printing a network setup page or menu settings page, and then finding the - Lexmark MX711 | Quick Reference - Page 3
multiple destinations. For more information, see "Setting up Multi Send" on page 4. Create shortcuts directly on the printer home screen. For more information, see "Using MyShortcut" on page 4. 3 Use Scan to E‑mail Scan to Computer Scan to FTP Scan to Network To Scan a document, and then send it - Lexmark MX711 | Quick Reference - Page 4
printer home screen. The IP address appears as four sets of numbers separated by periods, such as 123.123.123.123. 2 Click Settings > Apps > Apps Management > Card Copy. 3 Change the default scanning options, if necessary. • Default tray-Select the default tray to be used for printing scan images - Lexmark MX711 | Quick Reference - Page 5
address in the address field. Note: View the printer IP address on the printer home screen. The IP address appears as four sets of numbers separated by periods, such as 123.123.123.123. 2 Click Settings > Apps > Apps Management > Scan to Network. 3 Specify the destinations, and then customize the - Lexmark MX711 | Quick Reference - Page 6
> Universal Setup > Units of Measure > select a unit of measure 2 Touch Portrait Width or Portrait Height. 3 Select the width or height, and then touch Submit. Loading the 250‑ or 550‑sheet tray CAUTION-POTENTIAL INJURY: To reduce the risk of equipment instability, load each tray separately. Keep - Lexmark MX711 | Quick Reference - Page 7
for the size of the paper you are loading. 1 2 3 One‑sided printing ABC Two‑sided (duplex) printing ABC • Do not slide the paper into the tray. Load paper as shown in the illustration. Notes: • Lock the length guide for all paper sizes. • Use the paper size indicators on the bottom of the - Lexmark MX711 | Quick Reference - Page 8
then lock the length guide. 8 From the printer control panel, set the paper size and paper type in the Paper menu to match the paper loaded in the tray. Note: Set the correct paper size and type to avoid paper jams and print quality problems. Loading the 2100‑sheet tray CAUTION-POTENTIAL INJURY: To - Lexmark MX711 | Quick Reference - Page 9
to the position for A5 until it clicks into place. 1 2 d Insert the A5 length guide into its designated slot. c Remove the A5 length guide from its holder. Note: Press the A5 length guide until it clicks into place. Loading A4‑, letter‑, legal‑, oficio‑, and folio‑size paper a Pull up and slide - Lexmark MX711 | Quick Reference - Page 10
to step d. d Squeeze, and then slide the length guide to the correct position for the paper size you are fold or crease the paper. Straighten the edges on a level surface. c Put the A5 length guide in its holder. 4 Load the paper stack with the printable side facedown for one‑sided printing. - Lexmark MX711 | Quick Reference - Page 11
paper stack down while inserting the tray. 6 From the printer control panel, set the paper size and paper type in the Paper menu to match the paper loaded in the tray. Note: Set the correct paper size and type to avoid paper jams and print quality problems. Loading the multipurpose feeder 1 Pull - Lexmark MX711 | Quick Reference - Page 12
multipurpose feeder, lies flat, and is not bent or wrinkled. One‑sided (simplex) printing Two‑sided (duplex) printing Note: Use the paper size indicators on the bottom of the tray to help position the guides. 4 Prepare the paper or specialty media for loading. • Flex the sheets back and forth to - Lexmark MX711 | Quick Reference - Page 13
can also change the paper size and type settings using the printer control panel. For more information, see "Setting the paper size and type" on page 5. Warning-Potential Damage: Paper loaded in the tray should match the paper type name assigned in the printer. The temperature of the fuser varies - Lexmark MX711 | Quick Reference - Page 14
navigate to: > Settings > Print Settings > Quality Menu > Toner Darkness 2 Adjust the setting, and then touch Submit. Printing from a flash drive Printing from a flash drive Notes: • Before printing an encrypted PDF file, you will be prompted to type the file password from the printer control panel - Lexmark MX711 | Quick Reference - Page 15
or any other file system are not supported. Recommended flash drives File type Many flash drives are tested and approved for use with Documents: the printer. For more information, contact the place where you purchased the printer. • .pdf • .xps Images: • .dcx • .gif • .jpeg or .jpg • .bmp - Lexmark MX711 | Quick Reference - Page 16
tray, then adjust the paper guides. Note: To avoid a cropped image, make sure the size of the original document and the size of the copy paper are the same. 3 From the printer the Web page correctly. 2 Click Settings. 3 From the Other Settings column, click Manage Shortcuts > E-mail Shortcut Setup. 4 - Lexmark MX711 | Quick Reference - Page 17
on the printer home screen. • You can use the shortcut when e‑mailing another document using the same settings. Canceling an e-mail • When using the ADF, touch Cancel Job while Scanning appears. • When using the scanner glass, touch Cancel Job while Scanning appears, or while Scan the Next Page - Lexmark MX711 | Quick Reference - Page 18
on the printer home screen. The IP address appears as four sets of numbers separated by periods, such as 123.123.123.123. • If you are using a proxy server, then temporarily disable it to load the Web page correctly. 2 Click Settings > Manage Shortcuts > Fax Shortcut Setup. Note: A password may be - Lexmark MX711 | Quick Reference - Page 19
in the location or launched in the program you specified. Setting up Scan to Computer Notes: • This feature is supported only in Windows Vista or later. • Make sure that your computer and printer are connected to the same network. 1 Open the printers folder. In Windows 8 From the Search charm, type - Lexmark MX711 | Quick Reference - Page 20
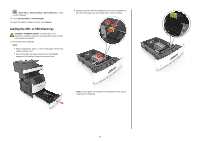
after 30 seconds of inactivity. 5 Adjust the scan settings, and then touch Scan It. Clearing jams Avoiding jams Load paper properly • Make sure paper lies flat in the tray. Correct loading of paper Incorrect loading of paper • Do not remove a tray while the printer is printing. • Do not load - Lexmark MX711 | Quick Reference - Page 21
7 Standard bin 8 Automatic document feeder (ADF) Printer control panel message What to do [x]‑page jam, lift front cover to remove cartridge. [200- 201] Open the front cover and the multipurpose feeder, then remove the toner cartridge and the imaging unit, and then remove the jammed paper - Lexmark MX711 | Quick Reference - Page 22
jammed paper may be covered with toner, which can stain garments and skin. 7 Install the imaging unit. Note: Use the arrows on the side of the printer as a guide. 22 Notes: • Align the arrows on the guides of the toner cartridge with the arrows in the printer. • Make sure the cartridge is fully - Lexmark MX711 | Quick Reference - Page 23
9 Close the multipurpose feeder door and the front cover. 1 Pull down the rear door. [x]‑page jam, open upper and lower rear door. [231-234] CAUTION-HOT SURFACE: The inside of the printer might be hot. To reduce the risk of injury from a hot component, allow the surface to cool before touching. 1 - Lexmark MX711 | Quick Reference - Page 24
pull it out. Note: Make sure all paper fragments are removed. 2 From the printer control panel, touch Done to clear the message and continue printing. [x]‑page jam, remove tray 1 to clear duplex. [235-239] 1 Pull out the tray completely. Note: Lift the tray slightly, and then pull it out. 2 3 1 24 - Lexmark MX711 | Quick Reference - Page 25
then gently pull it out. Note: Make sure all paper fragments are removed. 3 Insert the tray. 4 From the printer control panel, touch Done to clear the message and continue printing. [x]‑page jam, clear manual feeder. [250] 1 From the multipurpose feeder, firmly grasp the jammed paper on each side - Lexmark MX711 | Quick Reference - Page 26
multipurpose feeder. 5 From the printer control panel, touch Done to clear the message and continue printing. [x]‑page jam, open automatic feeder top all original documents from the ADF tray. Note: The message is cleared when the pages are removed from the ADF tray. 3 Firmly grasp the jammed paper - Lexmark MX711 | Quick Reference - Page 27
removed. 2 1 7 Close the bottom ADF door. 8 Straighten the edges of the original documents, then load the documents into the ADF, and then adjust the paper guide. 9 From the printer control panel, touch Done to clear the message and continue printing. 27
-
 1
1 -
 2
2 -
 3
3 -
 4
4 -
 5
5 -
 6
6 -
 7
7 -
8
-
9
-
10
-
11
-
12
-
13
-
14
-
15
-
16
-
17
-
18
-
19
-
20
-
21
-
22
-
23
-
24
-
25
-
26
-
27
 |
 |

Quick Reference
Learning about the printer
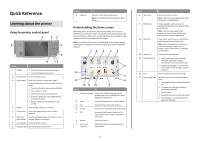
Using the printer control panel
1
@ ! .
2
A B C
3
D E F
4
G H I
5
J K L
6
M N O
7
P Q R S
8
T U V
9
W X Y Z
*
0
#
C
8
7
6
1
2
3
4
5
9
Use the
To
1
Display
•
View the printer status and messages.
•
Set up and operate the printer.
2
Home button
Go to the home screen.
3
Sleep button
Enable Sleep mode or Hibernate mode.
Do the following to wake the printer from Sleep
mode:
•
Touch the screen or press any hard button.
•
Open a door or cover.
•
Send a print job from the computer.
•
Perform a power
‑
on reset (POR) with the
main power switch.
•
Attach a device to the USB port on the
printer.
4
Keypad
Enter numbers, letters, or symbols.
5
Start button
Start a job, depending on which mode is
selected.
6
Clear All /
Reset button
Reset the default settings of a function, such as
copying, faxing, or scanning.
7
Cancel button
Cancel all printer activity.
8
Indicator light
Check the status of the printer.
Use the
To
9
USB port
Connect a flash drive to the printer.
Note:
Only the front USB port supports flash
drives.
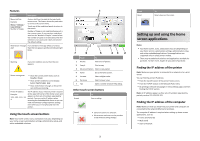
Understanding the home screen
When the printer is turned on, the display shows a basic screen,
referred to as the home screen. Touch the home screen buttons and
icons to initiate an action such as copying, faxing, or scanning; to open
the menu screen; or to respond to messages.
Note:
Your home screen may vary depending on your home screen
customization settings, administrative setup, and active embedded
solutions.
6
1
12
11
10
7
8
2
3
4
5
9
13
14
Touch
To
1
Change Language
Launch the Change Language pop
‑
up
window that lets you change the primary
language of the printer.
2
Copy
Access the Copy menus and make copies.
3
Fax
Access the Fax menus and send fax.
4
E-mail
Access the E-mail menus and send e
‑
mails.
5
FTP
Access the File Transfer Protocol (FTP)
menus and scan documents directly to an
FTP server.
6
Arrows
Scroll up or down.
7
Forms and
Favorites
Quickly find and print frequently used
online forms.
Touch
To
8
Menu icon
Access the printer menus.
Note:
The menus are available only when
the printer is in Ready state.
9
Bookmarks
Create, organize, and save a set of
bookmarks (URL) into a tree view of folders
and file links.
Note:
The tree view supports only
bookmarks created from this function,
and not from any other application.
10
USB Drive
View, select, print, scan, or e
‑
mail photos
and documents from a flash drive.
Note:
This icon appears only when you
return to the home screen while a
memory card or flash drive is connected
to the printer.
11
Held Jobs
Display all current held jobs.
12
Status/Supplies
•
Show a warning or error message
whenever the printer requires
intervention to continue processing.
•
Access the messages screen for more
information on the message, and how
to clear it.
13
Tips
Open a context-sensitive Help dialog.
14
Search held jobs
Search for one or more of the following
items:
•
User name for held or confidential print
jobs
•
Job names for held jobs, excluding
confidential print jobs
•
Profile names
•
Bookmark container or print job names
•
USB container or print job names for
supported file types
1