Lexmark MX711 Quick Reference - Page 7
Notes
 |
View all Lexmark MX711 manuals
Add to My Manuals
Save this manual to your list of manuals |
Page 7 highlights
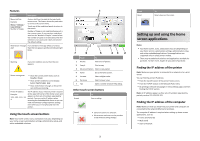
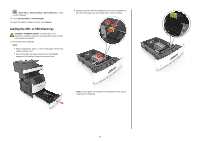
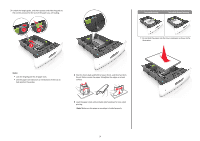
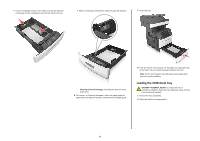
3 Unlock the length guide, and then squeeze and slide the guide to the correct position for the size of the paper you are loading. 1 2 3 One‑sided printing ABC Two‑sided (duplex) printing ABC • Do not slide the paper into the tray. Load paper as shown in the illustration. Notes: • Lock the length guide for all paper sizes. • Use the paper size indicators on the bottom of the tray to help position the guides. 4 Flex the sheets back and forth to loosen them, and then fan them. Do not fold or crease the paper. Straighten the edges on a level surface. 5 Load the paper stack with printable side facedown for one‑sided printing. Note: Make sure the paper or envelope is loaded properly. 7
-
 1
1 -
 2
2 -
 3
3 -
 4
4 -
 5
5 -
 6
6 -
 7
7 -
 8
8 -
 9
9 -
 10
10 -
 11
11 -
 12
12 -
13
-
14
-
15
-
16
-
17
-
18
-
19
-
20
-
21
-
22
-
23
-
24
-
25
-
26
-
27
 |
 |

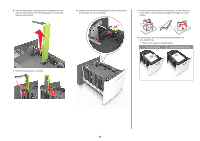
3
Unlock the length guide, and then squeeze and slide the guide to
the correct position for the size of the paper you are loading.
3
1
2
Notes:
•
Lock the length guide for all paper sizes.
•
Use the paper size indicators on the bottom of the tray to
help position the guides.
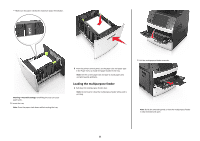
4
Flex the sheets back and forth to loosen them, and then fan them.
Do not fold or crease the paper. Straighten the edges on a level
surface.
5
Load the paper stack with printable side facedown for one
‑
sided
printing.
Note:
Make sure the paper or envelope is loaded properly.
One
‑
sided printing
Two
‑
sided (duplex) printing
ABC
ABC
•
Do not slide the paper into the tray. Load paper as shown in the
illustration.
7