Lexmark MX711 User's Guide - Page 241
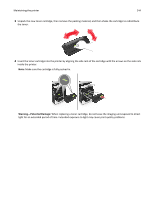
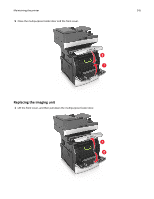
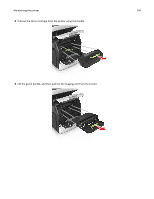
Ordering an imaging unit, Ordering a maintenance kit, Warning-Potential Damage, Notes
 |
View all Lexmark MX711 manuals
Add to My Manuals
Save this manual to your list of manuals |
Page 241 highlights
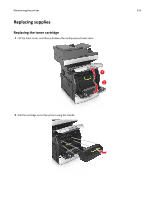
Maintaining the printer 241 Item Return Program cartridge Extra High Yield Toner Cartridge 624X* Africa, Middle East, Central Eastern Europe (non‑EU), and Commonwealth of Independent States (CIS) Toner Cartridge 625 High Yield Toner Cartridge 625H Extra High Yield Toner Cartridge 625X* * This toner cartridge is supported only in the MX711 printer model. For more information on countries located in each region, visit www.lexmark.com/regions. Item Worldwide High Yield Toner Cartridge Extra High Yield Toner Cartridge 1 This toner cartridge is supported only in the MX710 printer model. 2 This toner cartridge is supported only in the MX711 printer model. Regular cartridge 620HA1 620XA2 Ordering an imaging unit Extremely low print coverage for extended periods of time may cause imaging unit parts to fail prior to exhaustion of toner. For more information on replacing the imaging unit, see the instruction sheet that came with the supply. Part name Lexmark Return Program Regular Imaging unit 520Z 520ZA Ordering a maintenance kit To identify the supported fuser type, view the label on the fuser. Do either of the following: • Remove the toner cartridge and imaging unit. The two-digit fuser type code (such as 00 or 01) can be seen on the front of the fuser. Warning-Potential Damage: Do not expose the imaging unit to direct light for more than 10 minutes. Extended exposure to light may cause print quality problems. • Pull down the printer rear door. The two-digit fuser type code (such as 00 or 01) can be seen on the rear of the fuser. Notes: • Using certain types of paper may require more frequent replacement of the maintenance kit. • The separator roller, fuser, pick rollers, and transfer roller are all included in the maintenance kit and can be individually ordered and replaced if necessary. • For more information on replacing the parts included in the maintenance kit, see the instruction sheet that came with each part.
-
 1
1 -
2
-
3
-
4
-
5
-
6
-
7
-
8
-
9
-
10
-
11
-
12
-
13
-
14
-
15
-
16
-
17
-
18
-
19
-
20
-
21
-
22
-
23
-
24
-
25
-
26
-
27
-
28
-
29
-
30
-
31
-
32
-
33
-
34
-
35
-
36
-
37
-
38
-
39
-
40
-
41
-
42
-
43
-
44
-
45
-
46
-
47
-
48
-
49
-
50
-
51
-
52
-
53
-
54
-
55
-
56
-
57
-
58
-
59
-
60
-
61
-
62
-
63
-
64
-
65
-
66
-
67
-
68
-
69
-
70
-
71
-
72
-
73
-
74
-
75
-
76
-
77
-
78
-
79
-
80
-
81
-
82
-
83
-
84
-
85
-
86
-
87
-
88
-
89
-
90
-
91
-
92
-
93
-
94
-
95
-
96
-
97
-
98
-
99
-
100
-
101
-
102
-
103
-
104
-
105
-
106
-
107
-
108
-
109
-
110
-
111
-
112
-
113
-
114
-
115
-
116
-
117
-
118
-
119
-
120
-
121
-
122
-
123
-
124
-
125
-
126
-
127
-
128
-
129
-
130
-
131
-
132
-
133
-
134
-
135
-
136
-
137
-
138
-
139
-
140
-
141
-
142
-
143
-
144
-
145
-
146
-
147
-
148
-
149
-
150
-
151
-
152
-
153
-
154
-
155
-
156
-
157
-
158
-
159
-
160
-
161
-
162
-
163
-
164
-
165
-
166
-
167
-
168
-
169
-
170
-
171
-
172
-
173
-
174
-
175
-
176
-
177
-
178
-
179
-
180
-
181
-
182
-
183
-
184
-
185
-
186
-
187
-
188
-
189
-
190
-
191
-
192
-
193
-
194
-
195
-
196
-
197
-
198
-
199
-
200
-
201
-
202
-
203
-
204
-
205
-
206
-
207
-
208
-
209
-
210
-
211
-
212
-
213
-
214
-
215
-
216
-
217
-
218
-
219
-
220
-
221
-
222
-
223
-
224
-
225
-
226
-
227
-
228
-
229
-
230
-
231
-
232
-
233
-
234
-
235
-
 236
236 -
 237
237 -
 238
238 -
 239
239 -
 240
240 -
 241
241 -
 242
242 -
 243
243 -
 244
244 -
 245
245 -
 246
246 -
247
-
248
-
249
-
250
-
251
-
252
-
253
-
254
-
255
-
256
-
257
-
258
-
259
-
260
-
261
-
262
-
263
-
264
-
265
-
266
-
267
-
268
-
269
-
270
-
271
-
272
-
273
-
274
-
275
-
276
-
277
-
278
-
279
-
280
-
281
-
282
-
283
-
284
-
285
-
286
-
287
-
288
-
289
-
290
-
291
-
292
-
293
-
294
-
295
-
296
-
297
-
298
-
299
-
300
-
301
-
302
-
303
-
304
-
305
-
306
-
307
-
308
-
309
-
310
-
311
-
312
-
313
-
314
-
315
-
316
-
317
-
318
-
319
-
320
-
321
-
322
-
323
-
324
-
325
-
326
-
327
-
328
-
329
-
330
-
331
-
332
-
333
-
334
-
335
-
336
-
337
-
338
-
339
-
340
-
341
-
342
-
343
-
344
-
345
-
346
-
347
-
348
-
349
-
350
-
351
-
352
-
353
-
354
-
355
-
356
-
357
-
358
-
359
-
360
-
361
-
362
-
363
-
364
 |
 |
