Lexmark Monochrome Laser Administrator's Guide (1.4 MB) - Page 113
Paper Jam, Remove Cartridge, Jam Recovery, Open Rear Door, Check Duplex, 24x Paper Jam, Check Tray x
 |
View all Lexmark Monochrome Laser manuals
Add to My Manuals
Save this manual to your list of manuals |
Page 113 highlights
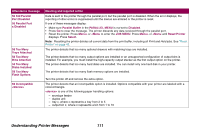
Attendance message 200 Paper Jam Remove Cartridge 201 Paper Jam Remove Cartridge 202 Paper Jam Open Rear Door 230 Paper Jam Check Duplex 24x Paper Jam Check Tray x Meaning and required action The printer detects a paper jam under the print cartridge. Open the upper front door, remove the cartridge, and gently remove the jammed print material. Reinstall the print cartridge and close the upper front door. Refer to the User's Guide for more details. Press Go to clear the message and continue printing. A new copy of the page prints if Jam Recovery is set to On or Auto. However, the Auto setting does not guarantee the page will print. The printer detects a paper jam under the print cartridge and further back in the printer. Open the upper front door, remove the print cartridge, and gently remove the jammed print material. Reinstall the cartridge and close the upper front door. Refer to the User's Guide for more details. Press Go to clear the message and continue printing. A new copy of the page prints if Jam Recovery is set to On or Auto. However, the Auto setting does not guarantee the page will print. The printer detects a paper jam behind the printer rear door. Open the rear door and gently remove the jammed print material. Close the rear door. Refer to the User's Guide for more details. Press Go to clear the message and continue printing. A new copy of the page prints if Jam Recovery is set to On or Auto. However, the Auto setting does not guarantee the page will print. The printer detects a paper jam in the duplex unit. Remove the duplex front access cover. If the print material is visible, gently remove it and replace the duplex front access cover. Otherwise, open the duplex rear door, remove the print material, and close the duplex rear door. Occasionally, print material may jam as it enters the duplex unit. Open the printer rear door, remove the jammed print material, and close the printer rear door. Refer to the User's Guide for more details. Press Go to clear the message and continue printing. A new copy of the page prints if Jam Recovery is set to On or Auto. However, the Auto setting does not guarantee the page will print. The printer detects a paper jam in tray x, where x represents a tray from 1 to 5. Open tray x and remove the print material. If the paper tray is difficult to remove, remove the trays above and below it to access the jammed print material. Refer to the User's Guide for more details. Press Go to clear the message and continue printing. A new copy of the page prints if Jam Recovery is set to On or Auto. However, the Auto setting does not guarantee the page will print. Understanding Printer Messages 113
-
 1
1 -
2
-
3
-
4
-
5
-
6
-
7
-
8
-
9
-
10
-
11
-
12
-
13
-
14
-
15
-
16
-
17
-
18
-
19
-
20
-
21
-
22
-
23
-
24
-
25
-
26
-
27
-
28
-
29
-
30
-
31
-
32
-
33
-
34
-
35
-
36
-
37
-
38
-
39
-
40
-
41
-
42
-
43
-
44
-
45
-
46
-
47
-
48
-
49
-
50
-
51
-
52
-
53
-
54
-
55
-
56
-
57
-
58
-
59
-
60
-
61
-
62
-
63
-
64
-
65
-
66
-
67
-
68
-
69
-
70
-
71
-
72
-
73
-
74
-
75
-
76
-
77
-
78
-
79
-
80
-
81
-
82
-
83
-
84
-
85
-
86
-
87
-
88
-
89
-
90
-
91
-
92
-
93
-
94
-
95
-
96
-
97
-
98
-
99
-
100
-
101
-
102
-
103
-
104
-
105
-
106
-
107
-
 108
108 -
 109
109 -
 110
110 -
 111
111 -
 112
112 -
 113
113 -
 114
114 -
 115
115 -
 116
116 -
 117
117 -
 118
118 -
119
-
120
-
121
-
122
-
123
-
124
-
125
-
126
-
127
-
128
-
129
-
130
-
131
-
132
-
133
-
134
-
135
-
136
-
137
-
138
-
139
-
140
-
141
-
142
-
143
-
144
-
145
-
146
-
147
-
148
-
149
-
150
-
151
-
152
-
153
-
154
-
155
-
156
-
157
-
158
-
159
-
160
-
161
-
162
-
163
-
164
-
165
-
166
-
167
-
168
-
169
-
170
-
171
-
172
-
173
-
174
 |
 |
