Marantz DV9500 DV9500 User Manual - Page 10
Connecting Up - setup
 |
View all Marantz DV9500 manuals
Add to My Manuals
Save this manual to your list of manuals |
Page 10 highlights
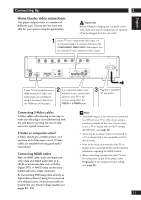
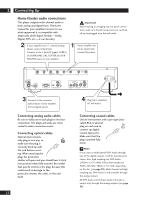
2 Connecting Up Easy setup This easy setup is the minimum set of connections you need to start watching DVD-Video discs. Both sound and picture are fed directly to your TV using the supplied Audio/Video cables. For other possible connections, see pages 11-12. 2 Connect to a pair of stereo audio inputs on your TV using the supplied Audio/ Video cable. Important Before making or changing any rear panel connections, make sure that all components are switched off and unplugged from the wall outlet. 1 Connect to a composite video input on your TV using the supplied Audio/ Video cable. SURR.R SURR.L FRONT 1 SUB WOOFER CENTER R L AUDIO OUT FRONT 2 R L COAX. OPT. DIGITAL OUT HDMI OUT RS-232C EXT. INT. IN OUT REMOTE CONTROL COMPONENT S2 Y CB /PB CR /PR VIDEO OUT VIDEO 1 2 AC IN RS-232C terminal Control terminal for use by custom installers. EXT. INT. Connecting audio/video cables Be sure to insert each plug fully for the best connection. The plugs and jacks are color-coded to make connection easier. Connecting system control cables By connecting this DVD player to another Marantz audio component using a supplied System control cable, you can remotely operate the components as a single system. • When connecting to component with a remote sensor, be sure to connect the REMOTE CONTROL IN jack of this DVD player to the REMOTE CONTROL OUT jack of the component with the remote sensor. • When connecting to component which is not equipped with a remote sensor, be sure to connect the component to the REMOTE CONTROL OUT jack of this DVD player. 3 Plug into a standard AC wall outlet. Note • When connecting to a standard TV, select 4:3 L - Box or 4:3 Pan Scan in the TV Aspect setting (see page 45). • Connect the video output of the player directly to your TV. Because the player is designed to support an Analog Protection System copy card, there are cases when proper playback will be not be possible if the player is connected to the TV through a VCR and images are recorded and played on the VCR. • The player's video output and S2 output will not be progressive. • Remote switch When using this DVD player independently, set this switch to INT. (INTERNAL). When using this DVD player in a system with a Marantz receiver equipped with a remote sensor, set the switch to EXT. (EXTERNAL). 10
-
 1
1 -
2
-
3
-
4
-
 5
5 -
 6
6 -
 7
7 -
 8
8 -
 9
9 -
 10
10 -
 11
11 -
 12
12 -
 13
13 -
 14
14 -
 15
15 -
16
-
17
-
18
-
19
-
20
-
21
-
22
-
23
-
24
-
25
-
26
-
27
-
28
-
29
-
30
-
31
-
32
-
33
-
34
-
35
-
36
-
37
-
38
-
39
-
40
-
41
-
42
-
43
-
44
-
45
-
46
-
47
-
48
-
49
-
50
-
51
-
52
-
53
-
54
-
55
-
56
-
57
-
58
-
59
-
60
-
61
-
62
 |
 |
