Marantz NR1501 NR1501 User Manual - English - Page 16
Basic Operation
 |
View all Marantz NR1501 manuals
Add to My Manuals
Save this manual to your list of manuals |
Page 16 highlights
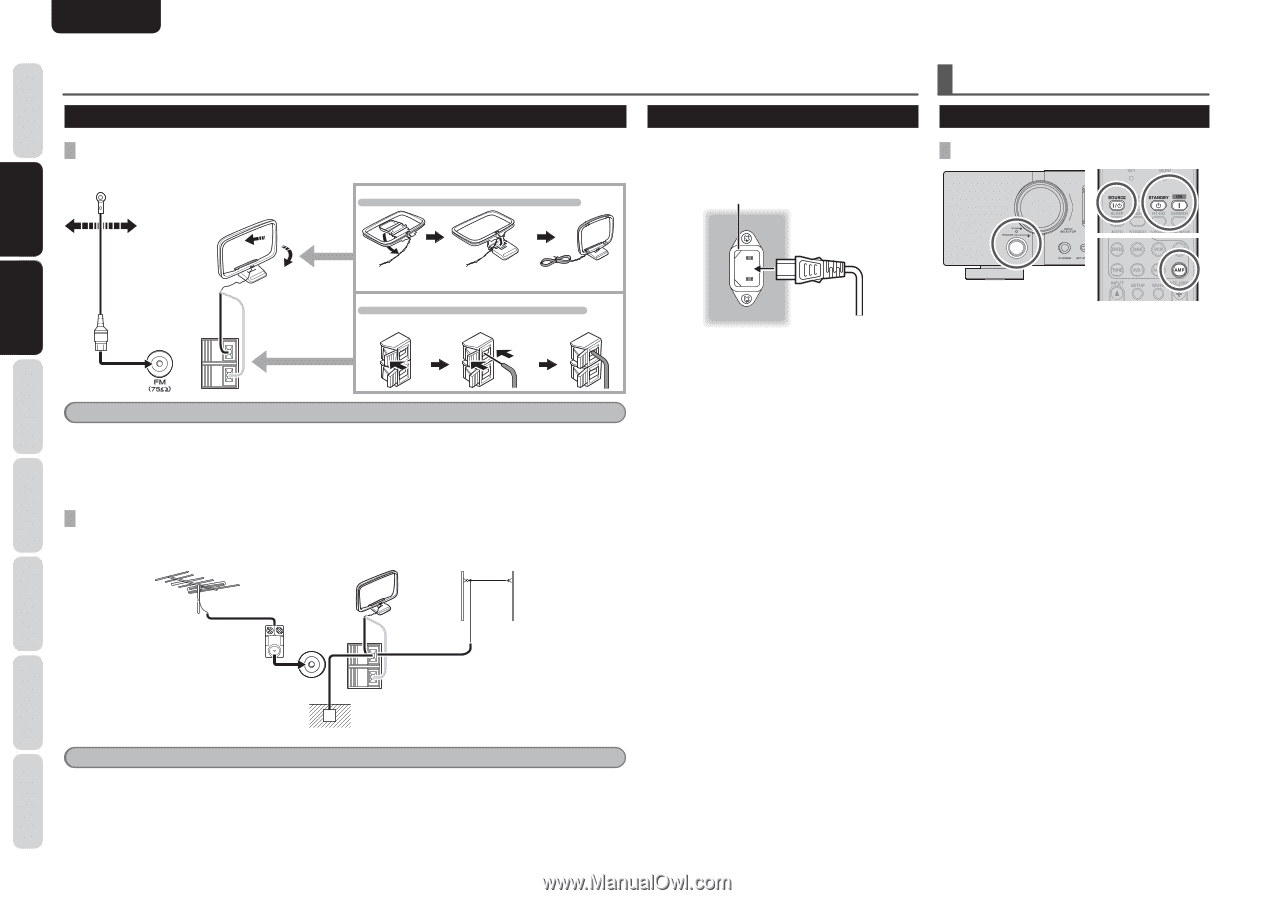
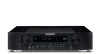
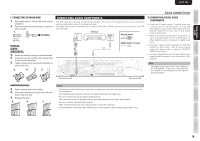
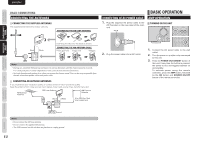
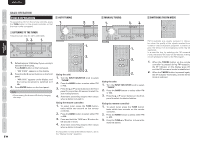
NAMES AND FUNCTIONS CONNECTIONS ENGLISH BASIC CONNECTIONS CONNECTING THE ANTENNAS CONNECTING THE SUPPLIED ANTENNAS The supplied antennas are for indoor use only. ASSEMBLING THE AM LOOP ANTENNA CONNECTING OF AC POWER CABLE 1. Plug the supplied AC power cable to the AC IN socket on the rear panel of the main unit. AC IN BASIC OPERATION AMP OPERATION TURNING ON THE UNIT BASIC BASIC OPERATION ADVANCED CONNECTIONS SETUP ADVANCED OPERATION Black GND AM White Insertting the tabs into the base as shown. CONNECTING THE AM ANTENNA CABLE Press and hold Insert wire Release 2. Plug the power cable into an AC outlet. Notes • During use, extend the FM antenna and move it in various directions until the clearest sound is received. Fix it with push pins or similar implements in that cause the least amount of distortion. • Set in the direction and position it to where you receive the clearest sound. Put it as far away as possible from the unit, televisions,speaker cables and power cable. CONNECTING AN OUTDOOR ANTENNAS If you experience poor reception quality, an outdoor antenna may improve the quality. Keep the antenna from noise sources (neon signes, busy roads, power lines, transformers, etc) FM External Antenna AM Loop Antenna AM External Antenna Black GND White 16 to 32ft (5 to 10m) Vinyl-coated wire AM FM (75Ω) Ground Notes • Do not remove the AM loop antenna. • Do not connect the supplied FM antenna. • The GND terminal on this unit does not function as a safety ground. 1. Connect the AC power cable to the wall outlet. 2. Turn the power on to other units connected to this unit. 3. Press the POWER ON/STANDBY button of this unit. Every time the button is pressed, the power to this unit toggles between on and standby. To activate power using the remote controller, press the AMP button, followed by the ON button and SOURCE ON/OFF button of the remote controller. 12 TROUBLESHOOTING OTHERS
-
 1
1 -
2
-
3
-
4
-
5
-
6
-
7
-
8
-
9
-
10
-
 11
11 -
 12
12 -
 13
13 -
 14
14 -
 15
15 -
 16
16 -
 17
17 -
 18
18 -
 19
19 -
 20
20 -
 21
21 -
22
-
23
-
24
-
25
-
26
-
27
-
28
-
29
-
30
-
31
-
32
-
33
-
34
-
35
-
36
-
37
-
38
-
39
-
40
-
41
-
42
-
43
-
44
-
45
-
46
-
47
-
48
-
49
-
50
 |
 |