Marantz SR7001 User Manual - Page 51
Speaker A/b, 1 Ch Input, Aux2 Input, Lip.sync
 |
View all Marantz SR7001 manuals
Add to My Manuals
Save this manual to your list of manuals |
Page 51 highlights
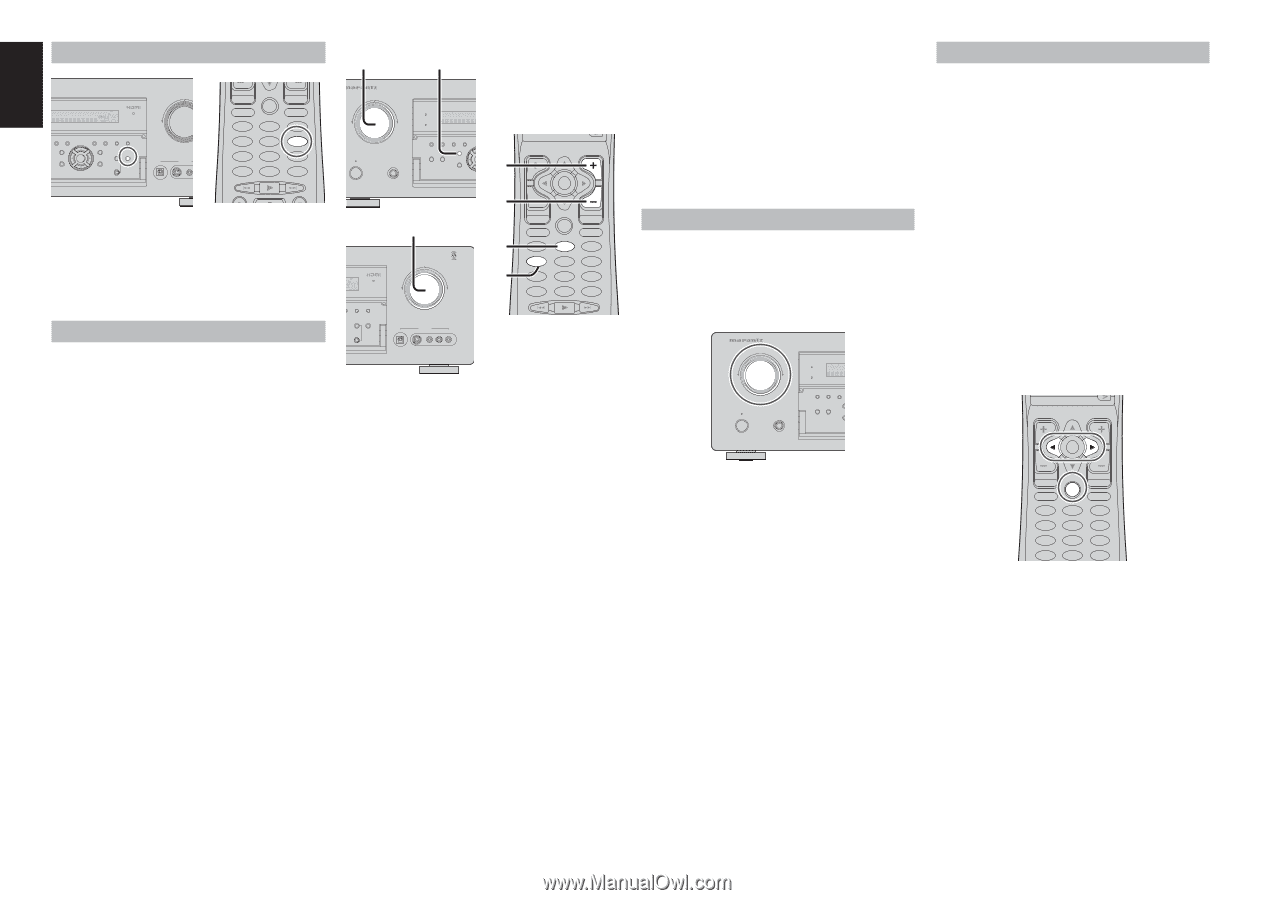
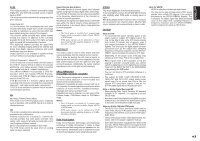
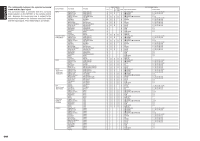
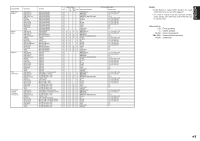
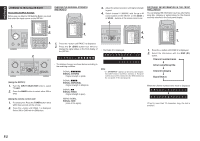
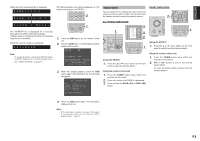
ENGLISH SPEAKER A/B ULTI AUTO TUNED AUTO SURR DIRECT ST SPKR A B V-OFF PEAK ATT DISC 6.1 MT X 6.1 NIGHT EQ ANALOG DIGITAL AAC PCM SURROUND DIGITAL LCR LFE SL S SR MULTI MULTI SPEAKER BAND T-MODE MEMORY CLEAR 7.1CH INPUT MENU ENTER DISPLAY EXIT MultEQ SPEAKERS A/B MIC VOLUME DOWN DIGITAL AUX 1 INPUT S-VIDEO VIDEO PREV MENU TEST 1 7.1CH 4 DISP 7 CLEAR LIP.SYNC GUIDE CH.SEL 2 ATT 5 OSD 8 THX 0 MUTE EXIT SURR 3 SPK-AB 6 SLEEP 9 MEMO SR7001 has speaker system - A and speaker system- B for front L/R channels. You can select these systems by pressing SPEAKERS A/B button on the front panel or SPKAB on the remote. 7.1 CH INPUT The SR7001 is equipped for future expansion through the use of Multi channel Super Audio CD multichannel player or DVD-Audio player. When this is selected, the input signals connected to the L(front left), R (front right), CENTER, SL (surround left), SR (surround right) and SBL (surround back left) and SBR (surround back right) channels of the 7.1 CH. In jacks are output directly to the front (left and right), center, surround (left and right) and surround back speaker systems as well as the pre-out jacks without passing through the surround circuitry. In addition, the signal input to the SW (subwoofer) jack is output to the PRE OUT SW (subwoofer) jack. When 7.1 CH. INPUT is selected, the last video input used remains routed to the Monitor Outputs. This permits simultaneous viewing with video sources 1. 2. AV SURROUND RECEIVER SR8001 INPUT SELECTOR PURE DIRECT DSD DISP MULTI AUTO TUNED SLEEP AUTO SURR DIRECT ST SPKR A DISC 6.1 STANDBY POWER ON/STANDBY PHONES SURROUND MODE AUTO MULTI MULTI SPEAKER 7.1CH INPUT PURE DIRECT THX E MENU 4. 4. SURROUND DIGITAL LCR M LFE SL S SR ODE MEMORY CLEAR MultEQ SPEAKERS A/B MIC VOLUME READY DOWN UP DIGITAL AUX 1 INPUT S-VIDEO VIDEO L AUDIO R 4. 3. 2. CH VOL OK PREV MENU TEST 1 7.1CH 4 DISP 7 CLEAR LIP.SYNC GUIDE CH.SEL 2 ATT 5 OSD 8 THX 0 MUTE EXIT SURR 3 SPK-AB 6 SLEEP 9 MEMO 1. Select a desired Video source to decide the routed video signal to the Monitor Outputs. 2. Press the 7.1 CH INPUT button on the front panel or press 7.1 CH on the remote to switch the 7.1 channel input. 3. If it is necessary to adjust the output level of each channel, press the CH.SEL button on the remote. Adjust the speaker output levels so that you can hear the same sound level from each speaker at the listening position. For the front left, front right, center, surround left, surround right and surround back speakers, the output levels can be adjusted between -12 to +12 dB. The subwoofer can be adjusted between -18 and +12 dB. These adjustments result will be stored to 7.1 CH. INPUT memory. 4. Adjust the main volume with the MAINVOLUME knob or the VOL buttons on the remote. To cancel the 7.1 CH. INPUT setting, press the 7.1 CH INPUT button on the front panel or press 7.1 CH on the remote. Notes: • When the 7.1 CH. Input is in use, you may not select a surround mode, as the external decoder determines processing. • In addition, there is no signal at the record outputs when the 7.1 CH. Input is in use. AUX2 INPUT If you don't need to connect 7.1 Ch. input terminals with multi channel decoder, L(front left) and R (front right) inputs terminals are available as AUX2 input. In this case, You can connect additional audio source to AUX2 as other audio input terminals. AV SURROUND RECEIVER SR8001 INPUT SELECTOR PURE DIRECT DSD DISP MULTI AUTO SLEEP AUTO SURR STANDBY POWER ON/STANDBY PHONES SURROUND MODE AUTO MULTI PURE DIRECT THX 7.1CH I MEN LIP.SYNC Depending on the image device (TV, monitor, projector, etc.) connected to the SR7001, a time lag can occur between image signal processing and audio signal processing. Though minor, this time lag can interfere with movie and music enjoyment. The LIP.SYNC feature delays the audio signal with respect to the image signal output from the SR7001 to correct the time lag between the sound and image. It can be operated with the "LIP.SYNC" and 1 and 2 cursor buttons of the remote controller. Set the remote controller to the AMP mode before operating the LIP.SYNC feature. The initial setting is OFF (0 ms).The time lag can be adjusted in 10 ms steps up to 200 ms. Watch the picture on the image device (i.e., TV, monitor, projector, etc.) as you adjust the time lag. Note: • The LIP.SYSNC feature turns OFF (0 ms) in the SOURCE/PURE DIRECT mode. When the SOURCE/PURE DIRECT mode is deactivated, the set value of the LIP.SYSNC feature is automatically restored. CH VOL OK PREV MENU TEST 1 7.1CH 4 DISP 7 CLEAR LIP.SYNC GUIDE CH.SEL 2 ATT 5 OSD 8 THX 0 MUTE EXIT SURR 3 SPK-AB 6 SLEEP 9 MEMO 48
-
 1
1 -
2
-
3
-
4
-
5
-
6
-
7
-
8
-
9
-
10
-
11
-
12
-
13
-
14
-
15
-
16
-
17
-
18
-
19
-
20
-
21
-
22
-
23
-
24
-
25
-
26
-
27
-
28
-
29
-
30
-
31
-
32
-
33
-
34
-
35
-
36
-
37
-
38
-
39
-
40
-
41
-
42
-
43
-
44
-
45
-
 46
46 -
 47
47 -
 48
48 -
 49
49 -
 50
50 -
 51
51 -
 52
52 -
 53
53 -
 54
54 -
 55
55 -
 56
56 -
57
-
58
-
59
-
60
-
61
-
62
-
63
-
64
-
65
-
66
-
67
-
68
-
69
-
70
-
71
-
72
-
73
-
74
-
75
-
76
-
77
-
78
-
79
 |
 |