Marantz SR7300OSE User Guide
Marantz SR7300OSE Manual
 |
View all Marantz SR7300OSE manuals
Add to My Manuals
Save this manual to your list of manuals |
Marantz SR7300OSE manual content summary:
- Marantz SR7300OSE | User Guide - Page 1
R Model SR7300 / SR7300OSE User Guide AV Surround Receiver - Marantz SR7300OSE | User Guide - Page 2
intended to alert the user to the presence of important operating and maintenance (servicing) instructions in the literature receiving antenna. - Increase the separation between the equipment and receiver. - Connect the equipment into an outlet on a circuit different from that to which the receiver - Marantz SR7300OSE | User Guide - Page 3
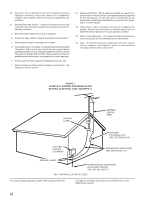
. See Instruction Manual for replacement or resetting of protective device. If replacement of the plug is required, be sure the service technician has provides information with regard to proper grounding of the mast and supporting structure, grounding of the lead-in wire to an antenna discharge - Marantz SR7300OSE | User Guide - Page 4
normally by following the operating instructions. Adjust only those controls that are covered by the operating instructions as an improper adjustment of Safety Check - Upon completion of any service or repairs to this product, ask the service technician to perform safety checks to determine that - Marantz SR7300OSE | User Guide - Page 5
2 DESCRIPTION 2 FEATURES 4 ACCESSORIES 4 FRONT PANEL 5 FL DISPLAY 7 REAR PANEL 8 REMOTE CONTROLLER RC7300SR ......... 10 NAMES AND CONTROLLER OPERATION ..... 39 CONTROLLING MARANTZ COMPONENTS 39 LEARN MODE 41 MACRO MODE 42 TROUBLESHOOTING 46 TECHNICAL SPECIFICATIONS 48 DIMENSION 48 1 - Marantz SR7300OSE | User Guide - Page 6
Marantz SR7300 Surround receiver. This remarkable component has been engineered to provide you with many years of home theater enjoyment. Please take a few minutes to read this manual , band-limited surround it can be disappointing to users accustomed to discrete multichannel. Neo 6 offers several - Marantz SR7300OSE | User Guide - Page 7
Pro Logic II decoders, soundtracks will be able to be encoded specifically to take full advantage of Pro Logic II playback, including separate conventional surround-encoded video material. CS-II provides composite stereo rear channels to greatly improve separation and image positioning - adding a - Marantz SR7300OSE | User Guide - Page 8
be used for system operation as well. The new generation of Marantz Receivers are stylish and completely symmetrical. On the front panel of the SR7300, buttons are kept to a minimum. Source selectors Controller RC7300SR S AA-size batteries X 2 AM Loop Antenna FM Antenna Registration Card User Guide - Marantz SR7300OSE | User Guide - Page 9
ENGLISH FRONT PANEL qw @1 !5 !6 !7 !8 !9 e r t y u i o !0 !1 !2 SELECTOR AV SURROUND RECEIVER SR7300 VOLUME SELECT STANDBY switch is pressed once, the unit turns ON and display appears on the display panel. When pressed again, the unit turns OFF and the STANDBY indicator lights. When the - Marantz SR7300OSE | User Guide - Page 10
mode will automatically change to STEREO. • The surround mode returns to the previous setting as soon as the plug is removed from the jack. @1 INFRARED receiving sensor window This window receives infrared signals for the remote control unit. 6 - Marantz SR7300OSE | User Guide - Page 11
TUNED : This indicator illuminates when a station is being received with sufficient signal strength to provide acceptable listening quality. a digital source, some of these indicators will light to display the specific type of signal in use. ¡6 ENCODED CHANNEL STATUS indicators These indicators - Marantz SR7300OSE | User Guide - Page 12
ENGLISH REAR PANEL zx c v bn m, ANTENNA FM (75Ω) VIDEO TV GND AM DVD VCR1 IN OUT COMPONENT in the future to update the operating software of the SR7300 so that it will be able to support new digital audio formats and the like as they are introduced. b MONITOR OUT This is a monitor - Marantz SR7300OSE | User Guide - Page 13
drive capability. ⁄4 MULTI ROOM REMOTE IN/OUT terminals IN: Connect to multi-room remote control device, available from your Marantz dealer. OUT: Connect to the Marantz component equipped with remote control (RC-5) terminals in Multi zone (Multi room). ⁄5 REMOTE CONT. IN/OUT terminals Connect to - Marantz SR7300OSE | User Guide - Page 14
. c / (open/close) button Used to open or close the door. Note: • This button is unavailable for SR7300. v Source POWER ON/OFF button Used to turn specific sources (such as DVD players, etc.) ON and OFF independently from the rest of the system. b EQ button Used to turn on or off HT - Marantz SR7300OSE | User Guide - Page 15
⁄9 Input selector buttons/ FUNCTION SELECTOR buttons (AUDIO/VIDEO INPUT) Used to switch the remote controller to the command sets for specific sources (amplifier, receiver, etc.), thereby allowing a single remote controller to control up to 11 different components. To use these buttons to switch the - Marantz SR7300OSE | User Guide - Page 16
ENGLISH LCD (Liquid Crystal Display) Information about currently selected functions and modes is displayed on the LCD. a b c def REMOTE CONTROL RANGE The distance between the transmitter of the remote control unit and the IR SENSOR of the SR7300 should be less than about 5 meters. If the - Marantz SR7300OSE | User Guide - Page 17
ENGLISH GENERAL INFORMATION OF RC7300SR TO SR7300 To control the SR7300 by your RC7300SR, you have to select the device AMP or TUNER by function selector button. Please refer as below for the details in AMP and TUNER mode. AMP MODE TUNER MODE POWER ON/OFF Turns the SR7300 on and off POWER ON - Marantz SR7300OSE | User Guide - Page 18
ENGLISH CONNECTIONS SPEAKER PLACEMENT The ideal surround speaker system for this unit is 7-speaker systems, using front left and right speakers, a center speaker, surround left and right speakers, a surround back and a subwoofer. For best results we recommend that all front speakers be of the same - Marantz SR7300OSE | User Guide - Page 19
. Tighten the knob by turning clockwise and then insert the banana plug. Caution: • Be sure to use speakers with the specified impedance shown on the rear panel of this unit. • To prevent damage to circuitry, do not let the bare speaker wires touch each other and do not let them touch any - Marantz SR7300OSE | User Guide - Page 20
output with coaxial jack and one with optical jack on the rear panel. These jacks can be connected to CD recorder, MD deck. 16 • Setup the digital audio format of DVD player, or other digital source component. Refer to the instructions for each component to be connected to digital input jacks - Marantz SR7300OSE | User Guide - Page 21
VIDEO , COMPONENT JACKS There are 3 types of video jacks on the rear panel. VIDEO jack The video signal for the VIDEO jacks is the conventional of your DVD player, or other digital source component. Refer to the instructions of the each component connected to the digital input jacks. • There is - Marantz SR7300OSE | User Guide - Page 22
SBR SBL SBR C PRE OUT SW C 7.1CH IN SW You can control other Marantz products through this unit with the remote MODEL NO. SR7300 controller by coAC nIN necting NO. each unit. The signal transmitted from the remote controller is received by the remote sensor on this unit then the signal is sent - Marantz SR7300OSE | User Guide - Page 23
Connecting the supplied AM loop antenna The supplied AM loop antenna is for indoor use only. Set it in the direction and position where you receive the clearest sound. Put it as far away as possible from the unit, televisions, speaker cables, and power cords. If you experience poor reception quality - Marantz SR7300OSE | User Guide - Page 24
1A MAX 120W 1A MAX AC OUTLET 120V 60HZ R L SURROUND SURROUND BACK LR MULTIROOM MULTIROOM LEFT SPEAKER MULTIROOM RIGHT SPEAKER RL L R RC IN FRONT IR RECEIVER MAIN AMP (For MULTIROOM) RC OUT VIDEO IN MONITOR 20 - Marantz SR7300OSE | User Guide - Page 25
in remote. Notes: • To view the on-screen displays, make certain you have made a connection from the Monitor Out jack (VIDEO or S-VIDEO ) on the rear panel to the composite, S-Video input of your TV or projector. (see 17 page) 1. Select the AMP mode in remote control unit. 2. Press SETUP button on - Marantz SR7300OSE | User Guide - Page 26
ENGLISH 1 INPUT SETUP (ASSIGNABLE DIGITAL INPUT) Six digital inputs can be assigned as the desired source. Use this menu to select the digital input jack to be assigned to the input source. 1. Select "INPUT SETUP" in SETUP MAIN MENU with or cursor button, and press the OK button. 1 I NPUT SETUP CD - Marantz SR7300OSE | User Guide - Page 27
and LD's available to guide you through proper home theater configuration. If you are unsure, have your Marantz dealer perform the installation speaker so that it is the same level for all speaker. If you select "MANUAL", adjust the output level of each speaker as follow. 1. When you move cursor - Marantz SR7300OSE | User Guide - Page 28
ENGLISH Notes: • Speakers that you selected "None" for in the Speaker Size menu will not appear. • The setting of Surr.Back L and Surr.Back R appears if set for two surround back speakers in the Speaker Size menu. • The setting of Surr.Back appears if set for one surround back speaker in the - Marantz SR7300OSE | User Guide - Page 29
the Dimension level between 0 and 6 level in 1 level interval with or cursor button. Adjust the soundfield either towards the front or towards the rear. This can be useful to help achieve a more suitable balance from all the speakers with certain recordings. CENTER WIDTH: Set the Center width level - Marantz SR7300OSE | User Guide - Page 30
ENGLISH 8 7.1 CH INPUT LEVEL This sub-menu is to adjust the speaker levels for 7.1-channel input sources. Here you will adjust the volume for each channel so that they are all heard by the listener at the same level. 8 7 . 1 CH I NPUT LEVEL F RONT L C EN T ER F RONT R SURR . R SURR . B R SURR . B - Marantz SR7300OSE | User Guide - Page 31
the input source at the SR7300. E.G. : DVD SURROUND AV SURROUND RECEIVER SR7300 SELECT STANDBY POWER ON/STANDBY ENTER PHONES CLEAR MEMORY Adjust the volume to a comfortable level using the VOLUME control knob on the front panel or VOL / buttons on the remote. To increase the volume, turn the - Marantz SR7300OSE | User Guide - Page 32
S-VIDEO AUX1 INPUT VIDEO L AUDIO R To temporarily silence all speaker outputs such as when interrupted by a phone call, press the MUTE button on the front panel or MUTE button on the remote. This will interrupt the output to all speakers and the head-phone jack, but it will not affect any - Marantz SR7300OSE | User Guide - Page 33
to be played. The available surround modes may be restricted depending on the input signal and speaker setup. AUTO When this mode is selected, the receiver determines whether the digital input signal is Dolby Digital, Dolby Digital Surround EX, DTS, DTS-ES, DTS 96/24 or PCM-audio. Surround EX & DTS - Marantz SR7300OSE | User Guide - Page 34
signal * Connected DVD-player, laser-disc player or CD-player needs to support DTS-digital output. You may not be able to play some DTS source is not output from the DVD player. For details, refer to the player's operation manual. NOTE for HDCD signal (OSE version only) * HDCD is effective only at - Marantz SR7300OSE | User Guide - Page 35
ENGLISH The relation between the selected surround mode and the input signal The surround mode is selected with the surround mode selector on SR7300 or the remote control unit. However, the sound you hear is subject to the relationship between the selected surround mode and input signal. That - Marantz SR7300OSE | User Guide - Page 36
turn ON. • S-Video terminal does not support "TV AUTO ON/OFF" function. ATTENUATION you should press the ATT button on the front panel or on the remote. "ATT" indicator will light the output signal of MULTI ROOM OUT. SURROUND AV SURROUND RECEIVER SR7300 CLEAR DISP MULTI AUTO TUNED SLEEP AUTO SURR - Marantz SR7300OSE | User Guide - Page 37
AUX2 CD-R TAPE CD TUNER DO 1. DIG HT-EQ SURROUND AV SURROUND RECEIVER SR7300 CLEAR DISP MULTI AUTO TUNED SLEEP AUTO SURR DIRECT ST V . You can select these systems by pressing SPEAKERS A/B button on the front panel or SPKR A/B on the remote 1. Press the AUX1 input source button to - Marantz SR7300OSE | User Guide - Page 38
To cancel the 7.1 Ch. INPUT setting, press the 7.1 CH-IN button on the front panel or press 7.1/6.1 IN on the remote. Notes: • When the 7.1 Ch. Input is source to AUX2 as other audio input terminals. SURROUND AV SURROUND RECEIVER SR7300 SELECT STANDBY POWER ON/STANDBY ENTER PHONES CLEAR MEMORY - Marantz SR7300OSE | User Guide - Page 39
the desired station, use to the "Manual tuning" operation. MANUAL TUNING 3. 2. 1. VOLUME 2. R front panel or press T.MODE button on the remote. "AUTO" indicators turn off ,FM stereo broadcasts are received in 3. 2) 1. 3.1) SURROUND AV SURROUND RECEIVER SR7300 VOLUME SELECT STANDBY POWER - Marantz SR7300OSE | User Guide - Page 40
memory at anytime, press the CLEAR button. MANUAL PRESET MEMORY 2. 4. 3. SURROUND AV SURROUND RECEIVER SR7300 CLEAR MEMORY TUNING 3. F/P M the display for 5 seconds. While blinking, press the CLEAR button on the front panel or press CL button on the remote. 4. "xx CLEAR" appears on the - Marantz SR7300OSE | User Guide - Page 41
operation. 4. 5. 6. 4. 2. 5. 6. 5. SURROUND AV SURROUND RECEIVER SR7300 VOLUME SELECT STANDBY POWER ON/STANDBY ENTER PHONES CLEAR MEMORY described in "Recalling" a preset station. 2. Press the MEMORY button on the front panel or press MEMO button on the remote for more than 3 seconds. 3. The - Marantz SR7300OSE | User Guide - Page 42
receiver available from your Marantz dealer are necessary. The operations possible with the multi room function are explained briefly below. For details, refer to the instruction manual SURROUND AV SURROUND RECEIVER SR7300 OUT is analog outputs. This is not support to digital signals input. • If - Marantz SR7300OSE | User Guide - Page 43
in LCD. 2. Press the desired operation buttons to play the selected component. • For details, refer to the components's user guide. • It may not be possible to operate some models. CONTROLLING A MARANTZ DVD PLAYER (DVD MODE) POWER ON/OFF Turns the DVD player on and off POWER ON Turns the DVD - Marantz SR7300OSE | User Guide - Page 44
Programs MENU/OSD Switches the display information 4 / ¢ Skips forward or previous track 5 / 6 Searches forward or backward 0 Record ; Pause 9 Stop 2 Play CONTROLLING A MARANTZ TAPE DECK (TAPE MODE) POWER ON/OFF Turns the tape deck on and off POWER ON Turns the tape deck on POWER - Marantz SR7300OSE | User Guide - Page 45
for a DVD player. LEARNING PROCEDURE 1. Place the remote controller so that its infrared signal transmitter is facing the infrared signal receiver on the Marantz remote controller at a distance of about 5 centimeters. 5 cm ERASING LEARNING CODE Erasing the code by buttons 1. Press and hold down - Marantz SR7300OSE | User Guide - Page 46
ENGLISH Erasing the all functions 1. Press and hold down the T.MODE and MEMO buttons until LEARN is displayed in the display. 2. Press and hold down the CL button and press POWER ON and POWER OFF button. • A-CLR and LEARN are blinking. 3. Press OK button to continue erasing. • A-CLR is displayed - Marantz SR7300OSE | User Guide - Page 47
. Accordingly, within a single macro, it is not possible to switch between multiple function operations. (This is to prevent the switching of the receiver function operation.) Within a macro, the second time a function operation is used, it will only be used on the remote controller itself and - Marantz SR7300OSE | User Guide - Page 48
ENGLISH EXAMPLES OF MACRO PROGRAMS Example 1 Change the input source for the amplifier to CD and play the 3rd track on a CD in the CD player. 1. Press and hold the T.MODE and MENU button until the MACRO is displayed on the LCD. • LEARN and MACRO is displayed blinking. Example 2 Turn the main - Marantz SR7300OSE | User Guide - Page 49
ENGLISH CLEARING MACRO PROGRAMS The following procedure is used to erase macros you have programmed into the remote controller's memory. 1. Press and hold the T.MODE and MENU button until the MACRO is displayed on the LCD. • LEARN and MACRO is displayed blinking. ADJUSTING THE INTERVAL TIME OF - Marantz SR7300OSE | User Guide - Page 50
TROUBLESHOOTING In case of trouble, check the following before calling for service: 1. Are the connections made properly ? 2. Are you operating the unit properly following user's guide connection, select digital input, then play. A specific channel does not Nothing recorded on source. produce - Marantz SR7300OSE | User Guide - Page 51
minutes, reconnect the plug to the AC line supply - re-attempt to operate the equipment HOW TO RESET THE UNIT SURROUND AV SURROUND RECEIVER SR7300 VOLUME SELECT STANDBY POWER ON/STANDBY ENTER PHONES CLEAR MEMORY TUNING F/P MODE SPEAKRS A/B 7.1CH INPUT A/D S-DIRECT MULTIROOM TV DVD - Marantz SR7300OSE | User Guide - Page 52
Output (20 Hz - 20 kHz/THD=0.08%, SR7300OSE) Front L&R 8 ohms 110 W / Ch Center Specifications subject to change without prior notice. 1 in. 25 mm 16-7/16 ins. 418 mm 18-1/4 ins. 463 mm 13/16 ins. 20 mm 5-3/4 ins. 146 mm 6-3/8 ins. 162.3 mm 17-5/16 ins. (440 mm) SURROUND AV SURROUND RECEIVER - Marantz SR7300OSE | User Guide - Page 53
Sp. z.o.o. Al.Jerozolimskie 195b, 02 222 Warszawa, Poland PORTUGAL Corel2 Comércio de Electrónica Lda., Av. Luís Bívar, No 85 A, 1050 Lisboa, Portugal PROFESSIONAL EUROPE Marantz U.K. Ltd. Kingsbridge House, Padbury Oaks, 575-583 Bath Road, Longford, Middlesex UB7 0EH, U.K. PROFESSIONAL
-
 1
1 -
 2
2 -
 3
3 -
 4
4 -
 5
5 -
 6
6 -
 7
7 -
8
-
9
-
10
-
11
-
12
-
13
-
14
-
15
-
16
-
17
-
18
-
19
-
20
-
21
-
22
-
23
-
24
-
25
-
26
-
27
-
28
-
29
-
30
-
31
-
32
-
33
-
34
-
35
-
36
-
37
-
38
-
39
-
40
-
41
-
42
-
43
-
44
-
45
-
46
-
47
-
48
-
49
-
50
-
51
-
52
-
53
 |
 |

Model SR7300 / SR7300OSE User Guide
AV Surround Receiver
R