McAfee AVDCDE-AA-AA User Guide - Page 269
Scanning cc:Mail, Using the ScreenScan utility
 |
View all McAfee AVDCDE-AA-AA manuals
Add to My Manuals
Save this manual to your list of manuals |
Page 269 highlights
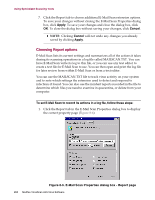
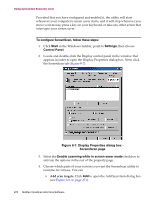
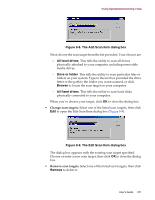
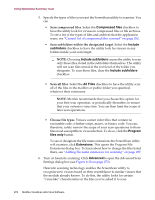
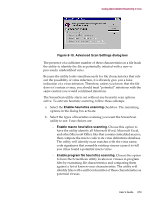
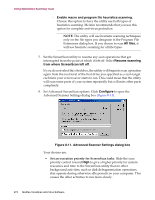
Using Specialized Scanning Tools Scanning cc:Mail VirusScan software includes native support for Microsoft Exchange and Outlook clients, and for Lotus cc:Mail v6.0, v7.0, and v8.0. The cc:Mail clients use a proprietary e-mail system that the E-Mail Scan extension does not support directly. Instead, VirusScan software includes a specialized cc:Mail extensions that plugs into VShield software, logs on to your cc:Mail system, then operates unobtrusively in the background, polling your cc:Mail Inbox to check for new mail. When new mail arrives, the cc:Mail scanner examines it for any infected attachments before your client software downloads it to your computer. The only real interaction you will have with cc:Mail Scan is when you choose which corporate e-mail system you want the VShield scanner to examine for viruses. To learn how to specify cc:Mail as your corporate e-mail system, see "Choosing Detection options" on page 116. If you have not yet logged in to your cc:Mail server, the cc:Mail scanner might also ask you to enter your user name and password into a login screen so that it can get access to your cc:Mail server and scan your Inbox. Enter your cc:Mail user name and password, just as if you were logging directly into cc:Mail, then click OK to continue. Next, start your cc:Mail client application, then set the interval for the client to poll your cc:Mail server to a period longer than five minutes. This gives VShield software a chance to examine your mail before your client software retrieves it. The cc:Mail component logs off from your e-mail server when you quit your client software. Using the ScreenScan utility The ScreenScan utility scans your system in the background as your screen saver runs. With it, you can turn otherwise idle computer time to productive use by allowing your machine to check itself for virus infections. ScreenScan will not take any action against viruses it detects, but it will record the results of its scan operations in a log file that you can review at your leisure. Š NOTE: To use ScreenScan, you must choose the Custom installation option during Setup-the Setup utility does not install this component by default. See "Installation steps" on page 37 for details. Once installed, ScreenScan displays a property page in the Windows Display Properties dialog box. Here you can choose the detection and report options that you want ScreenScan to use. User's Guide 269
-
 1
1 -
2
-
3
-
4
-
5
-
6
-
7
-
8
-
9
-
10
-
11
-
12
-
13
-
14
-
15
-
16
-
17
-
18
-
19
-
20
-
21
-
22
-
23
-
24
-
25
-
26
-
27
-
28
-
29
-
30
-
31
-
32
-
33
-
34
-
35
-
36
-
37
-
38
-
39
-
40
-
41
-
42
-
43
-
44
-
45
-
46
-
47
-
48
-
49
-
50
-
51
-
52
-
53
-
54
-
55
-
56
-
57
-
58
-
59
-
60
-
61
-
62
-
63
-
64
-
65
-
66
-
67
-
68
-
69
-
70
-
71
-
72
-
73
-
74
-
75
-
76
-
77
-
78
-
79
-
80
-
81
-
82
-
83
-
84
-
85
-
86
-
87
-
88
-
89
-
90
-
91
-
92
-
93
-
94
-
95
-
96
-
97
-
98
-
99
-
100
-
101
-
102
-
103
-
104
-
105
-
106
-
107
-
108
-
109
-
110
-
111
-
112
-
113
-
114
-
115
-
116
-
117
-
118
-
119
-
120
-
121
-
122
-
123
-
124
-
125
-
126
-
127
-
128
-
129
-
130
-
131
-
132
-
133
-
134
-
135
-
136
-
137
-
138
-
139
-
140
-
141
-
142
-
143
-
144
-
145
-
146
-
147
-
148
-
149
-
150
-
151
-
152
-
153
-
154
-
155
-
156
-
157
-
158
-
159
-
160
-
161
-
162
-
163
-
164
-
165
-
166
-
167
-
168
-
169
-
170
-
171
-
172
-
173
-
174
-
175
-
176
-
177
-
178
-
179
-
180
-
181
-
182
-
183
-
184
-
185
-
186
-
187
-
188
-
189
-
190
-
191
-
192
-
193
-
194
-
195
-
196
-
197
-
198
-
199
-
200
-
201
-
202
-
203
-
204
-
205
-
206
-
207
-
208
-
209
-
210
-
211
-
212
-
213
-
214
-
215
-
216
-
217
-
218
-
219
-
220
-
221
-
222
-
223
-
224
-
225
-
226
-
227
-
228
-
229
-
230
-
231
-
232
-
233
-
234
-
235
-
236
-
237
-
238
-
239
-
240
-
241
-
242
-
243
-
244
-
245
-
246
-
247
-
248
-
249
-
250
-
251
-
252
-
253
-
254
-
255
-
256
-
257
-
258
-
259
-
260
-
261
-
262
-
263
-
 264
264 -
 265
265 -
 266
266 -
 267
267 -
 268
268 -
 269
269 -
 270
270 -
 271
271 -
 272
272 -
 273
273 -
 274
274 -
275
-
276
-
277
-
278
-
279
-
280
-
281
-
282
-
283
-
284
-
285
-
286
-
287
-
288
-
289
-
290
-
291
-
292
-
293
-
294
-
295
-
296
-
297
-
298
-
299
-
300
-
301
-
302
-
303
-
304
-
305
-
306
-
307
-
308
-
309
-
310
-
311
-
312
-
313
-
314
-
315
-
316
-
317
-
318
-
319
-
320
-
321
-
322
-
323
-
324
-
325
-
326
-
327
-
328
-
329
-
330
-
331
-
332
-
333
-
334
-
335
-
336
-
337
-
338
-
339
-
340
-
341
-
342
-
343
-
344
 |
 |