Nikon COOLPIX S8100 S8100 User's Manual - Page 164
Connecting the Camera to a Printer, If the PictBridge Startup Screen Is Not Displayed
 |
View all Nikon COOLPIX S8100 manuals
Add to My Manuals
Save this manual to your list of manuals |
Page 164 highlights
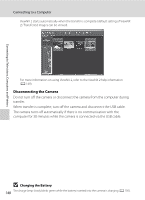
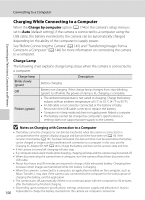
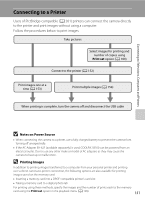
Connecting to Televisions, Computers and Printers Connecting to a Printer Connecting the Camera to a Printer 1 Turn off the camera. 2 Turn on the printer. Check printer settings. 3 Connect the camera to the printer using the supplied USB cable. Be sure that connectors are properly oriented. Do not attempt to insert connectors at an angle, and do not use force when connecting or disconnecting the USB cable. 4 The camera is automatically turned on. When properly connected, the PictBridge startup screen (1) will be displayed in the camera monitor, followed by the Print selection screen (2). 1 2 Print selection 15/11 2010 NO. 32 32 B If the PictBridge Startup Screen Is Not Displayed Turn the camera off and disconnect the USB cable. Set the Charge by computer option (A 174) 152 in the camera's setup menu to Off and reconnect the cable.
-
 1
1 -
2
-
3
-
4
-
5
-
6
-
7
-
8
-
9
-
10
-
11
-
12
-
13
-
14
-
15
-
16
-
17
-
18
-
19
-
20
-
21
-
22
-
23
-
24
-
25
-
26
-
27
-
28
-
29
-
30
-
31
-
32
-
33
-
34
-
35
-
36
-
37
-
38
-
39
-
40
-
41
-
42
-
43
-
44
-
45
-
46
-
47
-
48
-
49
-
50
-
51
-
52
-
53
-
54
-
55
-
56
-
57
-
58
-
59
-
60
-
61
-
62
-
63
-
64
-
65
-
66
-
67
-
68
-
69
-
70
-
71
-
72
-
73
-
74
-
75
-
76
-
77
-
78
-
79
-
80
-
81
-
82
-
83
-
84
-
85
-
86
-
87
-
88
-
89
-
90
-
91
-
92
-
93
-
94
-
95
-
96
-
97
-
98
-
99
-
100
-
101
-
102
-
103
-
104
-
105
-
106
-
107
-
108
-
109
-
110
-
111
-
112
-
113
-
114
-
115
-
116
-
117
-
118
-
119
-
120
-
121
-
122
-
123
-
124
-
125
-
126
-
127
-
128
-
129
-
130
-
131
-
132
-
133
-
134
-
135
-
136
-
137
-
138
-
139
-
140
-
141
-
142
-
143
-
144
-
145
-
146
-
147
-
148
-
149
-
150
-
151
-
152
-
153
-
154
-
155
-
156
-
157
-
158
-
 159
159 -
 160
160 -
 161
161 -
 162
162 -
 163
163 -
 164
164 -
 165
165 -
 166
166 -
 167
167 -
 168
168 -
 169
169 -
170
-
171
-
172
-
173
-
174
-
175
-
176
-
177
-
178
-
179
-
180
-
181
-
182
-
183
-
184
-
185
-
186
-
187
-
188
-
189
-
190
-
191
-
192
-
193
-
194
-
195
-
196
-
197
-
198
-
199
-
200
-
201
-
202
-
203
-
204
-
205
-
206
-
207
-
208
-
209
-
210
-
211
-
212
-
213
-
214
-
215
-
216
-
217
-
218
-
219
-
220
 |
 |
