Nikon COOLPIX S8100 S8100 User's Manual - Page 31
Date Imprint and Changing the Date and Time, KD JM HY IDMY
 |
View all Nikon COOLPIX S8100 manuals
Add to My Manuals
Save this manual to your list of manuals |
Page 31 highlights
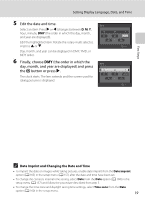
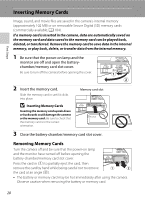
First Steps Setting Display Language, Date, and Time 5 Edit the date and time. Select an item: Press K or J (changes between D, M, Y, hour, minute, DMY (the order in which the day, month, and year are displayed)). Edit the highlighted item: Rotate the rotary multi selector, or press H or I. Day, month, and year can be displayed in DMY, YMD, or MDY order. 6 Finally, choose DMY (the order in which the day, month, and year are displayed) and press the k button or press K. The clock starts. The lens extends and the screen used for taking pictures is displayed. Date D M Y 01 01 2010 00 00 Edit Date D M Y 15 11 2010 15 10 Edit C Date Imprint and Changing the Date and Time • To imprint the date on images while taking pictures, enable date imprint from the Date imprint option (A 165) in the setup menu (A 157) after the date and time have been set. • To change the camera's internal time setting, select Date from the Date option (A 160) in the setup menu (A 157) and follow the procedure described from step 5. • To change the time zone and daylight saving time settings, select Time zone from the Date option (A 160) in the setup menu. 19
-
 1
1 -
2
-
3
-
4
-
5
-
6
-
7
-
8
-
9
-
10
-
11
-
12
-
13
-
14
-
15
-
16
-
17
-
18
-
19
-
20
-
21
-
22
-
23
-
24
-
25
-
 26
26 -
 27
27 -
 28
28 -
 29
29 -
 30
30 -
 31
31 -
 32
32 -
 33
33 -
 34
34 -
 35
35 -
 36
36 -
37
-
38
-
39
-
40
-
41
-
42
-
43
-
44
-
45
-
46
-
47
-
48
-
49
-
50
-
51
-
52
-
53
-
54
-
55
-
56
-
57
-
58
-
59
-
60
-
61
-
62
-
63
-
64
-
65
-
66
-
67
-
68
-
69
-
70
-
71
-
72
-
73
-
74
-
75
-
76
-
77
-
78
-
79
-
80
-
81
-
82
-
83
-
84
-
85
-
86
-
87
-
88
-
89
-
90
-
91
-
92
-
93
-
94
-
95
-
96
-
97
-
98
-
99
-
100
-
101
-
102
-
103
-
104
-
105
-
106
-
107
-
108
-
109
-
110
-
111
-
112
-
113
-
114
-
115
-
116
-
117
-
118
-
119
-
120
-
121
-
122
-
123
-
124
-
125
-
126
-
127
-
128
-
129
-
130
-
131
-
132
-
133
-
134
-
135
-
136
-
137
-
138
-
139
-
140
-
141
-
142
-
143
-
144
-
145
-
146
-
147
-
148
-
149
-
150
-
151
-
152
-
153
-
154
-
155
-
156
-
157
-
158
-
159
-
160
-
161
-
162
-
163
-
164
-
165
-
166
-
167
-
168
-
169
-
170
-
171
-
172
-
173
-
174
-
175
-
176
-
177
-
178
-
179
-
180
-
181
-
182
-
183
-
184
-
185
-
186
-
187
-
188
-
189
-
190
-
191
-
192
-
193
-
194
-
195
-
196
-
197
-
198
-
199
-
200
-
201
-
202
-
203
-
204
-
205
-
206
-
207
-
208
-
209
-
210
-
211
-
212
-
213
-
214
-
215
-
216
-
217
-
218
-
219
-
220
 |
 |
