Nikon COOLPIX S8100 S8100 User's Manual - Page 70
Choosing a Scene and Shooting (Scene Mode Types and Characteristics)
 |
View all Nikon COOLPIX S8100 manuals
Add to My Manuals
Save this manual to your list of manuals |
Page 70 highlights
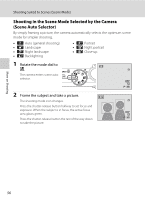
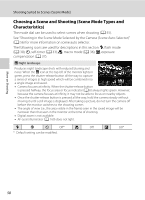
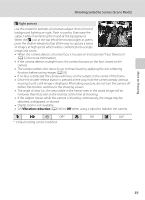
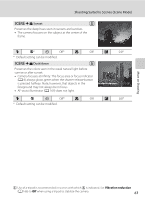
More on Shooting Shooting Suited to Scenes (Scene Mode) Choosing a Scene and Shooting (Scene Mode Types and Characteristics) The mode dial can be used to select scenes when shooting (A 55). See "Shooting in the Scene Mode Selected by the Camera (Scene Auto Selector)" (A 56) for more information on scene auto selector. The following icons are used for descriptions in this section: m, flash mode (A 30); n, self-timer (A 33); p, macro mode (A 36); o, exposure compensation (A 37). j Night landscape Produces night landscape shots with reduced blurring and noise. When the j icon at the top left of the monitor lights in green, press the shutter-release button all the way to capture a series of images at high speed which will be combined into a single image and saved. • Camera focuses at infinity. When the shutter-release button is pressed halfway, the focus area or focus indicator (A 6) always lights green. However, because the camera focuses at infinity, it may not be able to focus on nearby objects. • Once the shutter-release button is pressed all the way, hold the camera steady without moving it until a still image is displayed. After taking a picture, do not turn the camera off before the monitor switches to the shooting screen. • The angle of view (i.e., the area visible in the frame) seen in the saved image will be narrower than that seen in the monitor at the time of shooting. • Digital zoom is not available. • AF-assist illuminator (A 169) does not light. m W n Off* p Off o 0.0* * Default setting can be modified. 58
-
 1
1 -
2
-
3
-
4
-
5
-
6
-
7
-
8
-
9
-
10
-
11
-
12
-
13
-
14
-
15
-
16
-
17
-
18
-
19
-
20
-
21
-
22
-
23
-
24
-
25
-
26
-
27
-
28
-
29
-
30
-
31
-
32
-
33
-
34
-
35
-
36
-
37
-
38
-
39
-
40
-
41
-
42
-
43
-
44
-
45
-
46
-
47
-
48
-
49
-
50
-
51
-
52
-
53
-
54
-
55
-
56
-
57
-
58
-
59
-
60
-
61
-
62
-
63
-
64
-
 65
65 -
 66
66 -
 67
67 -
 68
68 -
 69
69 -
 70
70 -
 71
71 -
 72
72 -
 73
73 -
 74
74 -
 75
75 -
76
-
77
-
78
-
79
-
80
-
81
-
82
-
83
-
84
-
85
-
86
-
87
-
88
-
89
-
90
-
91
-
92
-
93
-
94
-
95
-
96
-
97
-
98
-
99
-
100
-
101
-
102
-
103
-
104
-
105
-
106
-
107
-
108
-
109
-
110
-
111
-
112
-
113
-
114
-
115
-
116
-
117
-
118
-
119
-
120
-
121
-
122
-
123
-
124
-
125
-
126
-
127
-
128
-
129
-
130
-
131
-
132
-
133
-
134
-
135
-
136
-
137
-
138
-
139
-
140
-
141
-
142
-
143
-
144
-
145
-
146
-
147
-
148
-
149
-
150
-
151
-
152
-
153
-
154
-
155
-
156
-
157
-
158
-
159
-
160
-
161
-
162
-
163
-
164
-
165
-
166
-
167
-
168
-
169
-
170
-
171
-
172
-
173
-
174
-
175
-
176
-
177
-
178
-
179
-
180
-
181
-
182
-
183
-
184
-
185
-
186
-
187
-
188
-
189
-
190
-
191
-
192
-
193
-
194
-
195
-
196
-
197
-
198
-
199
-
200
-
201
-
202
-
203
-
204
-
205
-
206
-
207
-
208
-
209
-
210
-
211
-
212
-
213
-
214
-
215
-
216
-
217
-
218
-
219
-
220
 |
 |
