Nikon F55 Instruction Manual
Nikon F55 - F55 35mm SLR Camera Manual
 |
UPC - 074101484663
View all Nikon F55 manuals
Add to My Manuals
Save this manual to your list of manuals |
Nikon F55 manual content summary:
- Nikon F55 | Instruction Manual - Page 1
http://www.mynikon.com.pl En INSTRUCTION MANUAL (En) - Nikon F55 | Instruction Manual - Page 2
camera serviced by an authorised dealer or service centre at least once every two years. • Using your camera correctly The Nikon F55/F55D's performance has been optimised for use with Nikon brand accessories. Accessories made by other manufacturers may not meet Nikon's criteria for specifications - Nikon F55 | Instruction Manual - Page 3
84 Usable Lenses with Built-In Speedlight 84-85 About Depth of Field 86 MISCELLANEOUS 87-117 Lens Compatibility 88-90 Usable Optional Speedlights 91-97 Optional Accessories 98-99 Camera Care...100-101 Notes on Batteries 102 Troubleshooting 103-105 Glossary ...106-109 Specifications 110-114 - Nikon F55 | Instruction Manual - Page 4
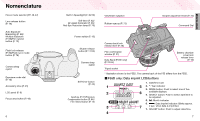
73) Command Dial Camera back lock release lever (P. 20) Film confirmation window (P. 21) Data Back (F55D only) (P. 22/44) Battery chamber cover lock release lever (P. 16) Tripod socket * Illustration shown is the F55D. The camera back of the F55 differs from the F55D. • F55D only: Data imprint - Nikon F55 | Instruction Manual - Page 5
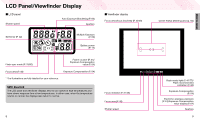
LCD Panel/Viewfinder Display • LCD panel Shutter speed Auto Exposure Bracketing (P. 66) Aperture Self-timer (P. 42) Multiple Exposure (P. 69) Battery power (P. 17) • Viewfinder display Focus area (focus brackets) (P. 30/48) Flash sync mode (P. 78/80) Frame counter (P. 21)/ Exposure - Nikon F55 | Instruction Manual - Page 6
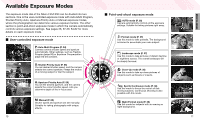
Available Exposure Modes The exposure mode dial of the Nikon F55/F55D can be divided into two sections. One is the user-controlled exposure mode with Auto-Multi Program, Shutter-Priority Auto, Aperture-Priority Auto or Manual exposure modes, where the photographer can determine various exposure - Nikon F55 | Instruction Manual - Page 7
batteries while the camera's power is off (page 16). 5 Hold the camera properly, compose frame and focus by lightly pressing the shutter release button (page 30). START SHOOTING IMMEDIATELY 2 Attach the lens and turn the power switch on (page 18). 3 Open the camera back and install the film - Nikon F55 | Instruction Manual - Page 8
PREPARATION This section introduces the various operations necessary before you start shooting. • Install batteries and check battery power • Mount lens • Load film • Set date and time (F55D only) • About shutter release button 14 15 - Nikon F55 | Instruction Manual - Page 9
film rolls that can be shot with fresh batteries, see page 114. 3 Turn the power switch on and confirm battery power with the N indication. PREPARATION • When replacing batteries may damage the camera. 16 N appears: M appears: M blinks: Sufficient battery power. Batteries are nearing exhaustion. - Nikon F55 | Instruction Manual - Page 10
and the shutter cannot be released (except in Manual exposure mode). See page 90 for a non-CPU lens. 18 With G-type Nikkor lens Position lens in the camera's bayonet mount so that the mounting indexes on lens and camera body are aligned, then twist lens anticlockwise until it locks into place. (Be - Nikon F55 | Instruction Manual - Page 11
automatically advances and the number of available exposures is displayed in the LCD panel. 1 Turn the power switch on, open the camera back by sliding the camera back lock release lever and load film. • Film cartridge can be loaded smoothly if inserted from the bottom. • Make sure to insert the - Nikon F55 | Instruction Manual - Page 12
4 Set Date and Time (F55D only) This camera allows you to imprint Year/Month/Day, Day/Hour to remove the battery. NOTE: Battery requirements for imprinting Imprinting of date/time requires one CR2025 3V lithium battery separate from the batteries required for the camera body. Battery life is approx. - Nikon F55 | Instruction Manual - Page 13
film automatically advances to the next frame. Lightly pressing Fully depressing NOTE: Camera features the settings for most common picture-taking situations using AUTO mode (a) to enable easy operation even for beginners. Shooting modes/functions explained in this section are as follows: Lens - Nikon F55 | Instruction Manual - Page 14
mode Do not rotate the lens focusing ring manually when the focus mode selector camera automatically focuses on the subject determining the data from the other focus areas. When the exposure mode is set to a (AUTO mode, page 28) or to any Vari-Program (page 36) (except f Close-Up mode), the F55/F55D - Nikon F55 | Instruction Manual - Page 15
. Matrix Metering (page 34) The Matrix Meter employed in the F55/F55D uses a five-segment sensor to achieve superior metering results even in instructions and details. Symbol Exposure mode Characteristics/Shooting situations a AUTO P. 28 The easiest exposure mode for general shooting. Camera - Nikon F55 | Instruction Manual - Page 16
body for support. • Stand with one foot forward a half step and keep your upper body still. • Grasp the camera handgrip with your right hand and use your left hand to cradle the camera (or lens). NOTE: Camera shake Camera camera's AF-Assist Illuminator (page 50) is automatically activated to guide - Nikon F55 | Instruction Manual - Page 17
LCD panel. (E appears without blinking when the exposure meter is off.) Make sure the film is completely rewound (E is blinking in the LCD panel), open the camera back away from sunlight and remove the film cartridge. Check points • If any other warning indications appear, see page 103. • For mid - Nikon F55 | Instruction Manual - Page 18
is not uniform. The F55/F55D provides two metering systems: Matrix Metering (page 28) and Centre Partial Metering (page 60). With Matrix Metering, data on scene brightness is detected by the five-segment Matrix sensor. Using G- or D-type Nikkor lenses, the F55/F55D camera performs 3D Matrix Metering - Nikon F55 | Instruction Manual - Page 19
or Night Portrait mode-designed for specific picturetaking situations and photographic images. 1 main subject. • 85mm to 200mm telephoto lenses with large maximum apertures are recommended. • avoid camera shake, use a tripod. Use of self-timer also helps to avoid camera shake. • A wide-angle lens is - Nikon F55 | Instruction Manual - Page 20
does not fire even when the subject is dark or backlit. • 80mm to 300mm telephoto lenses are recommended. • Use of ISO 400 or faster film speed is recommended. • A tripod is recommended when using a telephoto lens to avoid camera shake. h: Night Portrait mode Use this mode for subjects with an - Nikon F55 | Instruction Manual - Page 21
the camera's guide number of 12 (ISO 100, m). When a wide-angle lens of less than 28mm focal length is used in flash photography using the built-in Speedlight, the flash may not reach the peripheral area and may result in a dark picture. • Using CPU Nikkor lenses such as a G- or D-type Nikkor lens - Nikon F55 | Instruction Manual - Page 22
a tripod or place the camera on a stable surface before using the self-timer. • To shoot in an exposure mode other than Manual, cover the eyepiece with the front of the lens when setting the self-timer in autofocus mode. • Self-timer shooting cannot be performed unless the camera's shutter can be - Nikon F55 | Instruction Manual - Page 23
/Time (F55D only) picture. Select -- -- -- (no imprint) to cancel data imprint. Compatible film speeds for data imprinting are ISO32-3200. 2 Compose picture, focus and film. It may be difficult to read against bright colours such as white or reddish hues. 44 FOCUS OPERATION This section features - Nikon F55 | Instruction Manual - Page 24
the F55/F55D (page 88). • When using a lens with the A-M select function, set the switch/ring to M to focus manually. If M/A (autofocus with manual priority) is available with your lens, Manual focus is possible either with the switch/ring set to M or M/A. See the instruction manual of your lens for - Nikon F55 | Instruction Manual - Page 25
, page 47), Single Area Mode is automatically selected. In this mode, you focus manually using the selected focus area. Tip Dynamic AF Mode with Closest-Subject Priority is useful when you want the camera to take automatic control over focus operations, or when shooting a moving subject. Dynamic - Nikon F55 | Instruction Manual - Page 26
turns on in the following situations: Focus mode is autofocus, AF Nikkor lens (except AF-S and AF-I) is used, subject is dark and centre focus -35mm f/3.5-4.5 ED AF 20-35mm f/2.8 IF AF 24-85mm f/2.8-4 IF AF 24-120mm f/3.5-5.6 IF AF Micro 70-180mm f/4.5-5.6 ED • Lenses with autofocus using the camera - Nikon F55 | Instruction Manual - Page 27
when you want to capture a subject that's framed outside of the F55/F55D's three focus areas. Tip Focus lock is best suited for a photograph button and shoot. • After you have locked focus, do not change the camera-to-subject distance. 52 EXPOSURE MODE This section describes how to take pictures - Nikon F55 | Instruction Manual - Page 28
is best suited for snapshots. 1 Set the exposure mode dial to P. NOTE: CPU Nikkor lenses other than G-type Always set the aperture ring of a CPU Nikkor lens (except G-type) to its minimum (largest f-number). When the lens is not set to its minimum aperture setting, ƒEE blinks in the LCD panel and - Nikon F55 | Instruction Manual - Page 29
-Priority Auto Enables you to manually set the desired shutter speed (30-1/2000 sec.); the camera automatically selects the proper aperture CPU Nikkor lenses other than G-type Always set the aperture ring of a CPU Nikkor lens (except G-type) to its minimum (largest f-number). When the lens is not - Nikon F55 | Instruction Manual - Page 30
Enables you to set the desired aperture (lens' minimum to maximum) manually. The camera automatically selects a shutter speed suitable for CPU Nikkor lenses other than G-type Always set the aperture ring of a CPU Nikkor lens (except G-type) to its minimum (largest f-number). When the lens is not - Nikon F55 | Instruction Manual - Page 31
30-1/2000 sec.) and aperture (lens' minimum to maximum) manually. • Non-CPU lenses (page 90) can only be used in Manual exposure mode. Tip With electronic analogue exposure display blinks when the subject brightness is beyond the camera's exposure range. (Electronic analogue exposure display is not - Nikon F55 | Instruction Manual - Page 32
When the exposure mode dial is set to M (Manual), set the shutter speed indication to -- (next after approx. 4 hours with a fresh set of batteries. Note that continuous exposure time is reduced when OPERATION This section features descriptions of operations using this camera's advanced functions. - Nikon F55 | Instruction Manual - Page 33
ISO standard), use the Exposure Compensation function. This can be useful when intentionally achieving underor overexposure to obtain a specific photographic effect. This camera offers compensation of -2 EV to +2 EV in 1/2 steps. • Exposure Compensation can be set in P, S, A and Vari-Program. Tip - Nikon F55 | Instruction Manual - Page 34
) shifting from the automatically set proper exposure (or selected exposure in Manual exposure mode) for three shots each time the shutter is released. EV). • If the end of the film roll is reached during bracketing, the remaining shots can be taken after new film has been loaded. Also, if you turn - Nikon F55 | Instruction Manual - Page 35
dark and subjects do not overlap, no compensation is necessary for each shot. • In some cases, frames may shift slightly in multiple exposure. In particular, film advance becomes unstable at the beginning and near the end of - Nikon F55 | Instruction Manual - Page 36
LCD panel or set the exposure mode to a or Vari-Program. Film is advanced and frame counter counts down when the multiple exposure is cancelled section describes other useful camera functions and information. • Film rewind • Dioptre adjustment/Viewfinder accessories • Available mode combinations - Nikon F55 | Instruction Manual - Page 37
(E appears without blinking when the exposure meter is off.) Make sure E is blinking, open the camera back and remove the film cartridge. Dioptre Adjustment/Viewfinder Accessories The F55/F55D enables near- or far-sighted photographers to adjust the eyepiece dioptre to suit their vision. Viewfinder - Nikon F55 | Instruction Manual - Page 38
Nikkor lens such as a G- or D-type lens is attached. Exposure mode a s d f g h P S A M AF-Assist Illuminator R R - R - R R R R R Flexible Program - - - - - - R - - - Exposure mode Metering system Film advance TTL Flash)/Ready-light • Flash sync mode features • Using built-in Speedlight 75 - Nikon F55 | Instruction Manual - Page 39
/Ready-Light • Built-in Speedlight and TTL Flash modes This camera is equipped with a built-in Speedlight that provides an angle of coverage for a 28mm lens with a guide number of 12 (ISO 100, m). When the subject is the optional Speedlight to A (non-TTL Auto Flash) or M (Manual Flash) mode. 76 77 - Nikon F55 | Instruction Manual - Page 40
Mode Features Five for approx. 1 sec. before the flash fires. Do not move the camera or let the subject move until the shutter is released. (Red-Eye shooting situations where shutter release is your top priority.) • With some lenses, light from the Red-Eye Reduction lamp may not reach the subject's - Nikon F55 | Instruction Manual - Page 41
in Speedlight set to desired flash sync mode when a G- or D-type AF Nikkor lens is attached. 1 In P, S, A or M exposure mode, release the built- is ready to fire, fi appears without blinking in the viewfinder (when the camera's meter is on). • Press the Speedlight down gently until it clicks into - Nikon F55 | Instruction Manual - Page 42
each exposure mode Exposure mode Available shutter speed Available aperture Page a 28 s Automatically set to 1/90 sec. 37 f 38 Automatically set by dividing the guide number by the selected aperture value. Example: When f/2.8 is selected with ISO 100 film using the camera's built-in - Nikon F55 | Instruction Manual - Page 43
AF 28mm f/1.4 2m or longer shooting distance AF-S 28-70mm f/2.8 ED 70mm focal length AF 28-70mm f/3.5-4.5 AF 28-80mm f/3.3-5.6G At 28mm, 1m or longer shooting distance AF 28-80mm f/3.5-5.6 At 28mm, 1.5m or longer shooting distance AF 28-100mm f/3.5-5.6G 35mm or longer focal length; and at - Nikon F55 | Instruction Manual - Page 44
of sharpest focus in front of and behind the subject on which the lens is focused. It varies according to shooting distance, focal length and, above Lens compatibility • Usable optional Speedlights • Optional accessories • Camera care • Notes on batteries • Troubleshooting • Glossary • Specifications - Nikon F55 | Instruction Manual - Page 45
this camera. G- or D-type AF lenses give you access to all available functions. (This camera is not compatible with the Vibration Reduction function of the VR Nikkor lens and autofocus function of the AF-S and AF-I lens.) CPU Nikkor*2 Mode Focus mode Exposure mode Lens/accessories Manual with - Nikon F55 | Instruction Manual - Page 46
and viewfinder; set/confirm aperture using the lens aperture ring. CAUTION: Nikkor lenses/accessories that cannot be attached to the F55/F55D The following non-CPU Nikkor lenses/accessories cannot be attached to the F55/F55D (otherwise camera body or lens may be damaged): • TC-16A Teleconverter - Nikon F55 | Instruction Manual - Page 47
's built-in Speedlight does not reach the subject. See your Speedlight manual for details on operation. • Non-TTL Auto Flash using optional Speedlight 1 Attach the optional Speedlight to the accessory shoe of the camera. Turn the camera power switch on and set the exposure mode dial to A or M. NOTE - Nikon F55 | Instruction Manual - Page 48
the camera's AF-Assist Illuminator automatically turns on to guide film speed of the film in use is an intermediate value of the film speed indicated in the table, the aperture changes accordingly. If the controlled aperture is darker than maximum aperture, maximum aperture of the attached lens - Nikon F55 | Instruction Manual - Page 49
on the camera body in h, Slow Sync Flash is not performed and the shutter speed is automatically set to 1/90 sec. • Use the optional Accessory Shoe Adaptor Nikon Use only Nikon Speedlights. Other units may damage the camera's electrical circuit due to incompatible voltage requirements (not compatible - Nikon F55 | Instruction Manual - Page 50
batteries with a guide number of 36 (SB-28) and 30 (SB-27) (manual flash, 35mm zoom-head position, ISO 100, m, 20°C). Optional external power source SD-7 and SD-8A or Power Bracket SK-6A (SB-28 only) can also be used. Non-TTL Auto Flash is compatible with the SB-28/SB-27. Soft case (CF-62) • Camera - Nikon F55 | Instruction Manual - Page 51
. To remove fingerprints or smudges from the lens' surface, use a soft, clean cotton cloth or lens tissue moistened with ethanol (alcohol) or lens cleaner. • Do not subject the camera or lens to strong vibration or shock Do not drop the camera body and lens or hit them against a hard surface as this - Nikon F55 | Instruction Manual - Page 52
replace batteries with new ones and turn the power on again, then press two „ film rewind buttons simultaneously for more than 1 sec. to start film rewind again. If this warning appears frequently, contact authorised Nikon dealer or service centre. ƒ-- blinks ƒ-- blinks • Non-CPU lens - Nikon F55 | Instruction Manual - Page 53
or this warning appears frequently, contact authorised Nikon dealer or service centre. In certain cases, due to static electricity, the F55/F55D's microcomputer may turn the camera off, even with fresh, properly installed batteries. For the same reason, the film may not advance properly. In each of - Nikon F55 | Instruction Manual - Page 54
. In 35mm-format cameras, lenses with a focal length of approx. 50mm are called normal or standard lenses. Lenses with a focal length less than approx. 35mm are called wideangle lenses, and lenses with a focal length more than approx. 85mm are called telephoto lenses. Lenses which allow the user to - Nikon F55 | Instruction Manual - Page 55
plane. This is the way the F55/F55D operates with the flash sync mode at Normal Sync. Guide number The guide number indicates the power of a flash in relation to ISO film speed. The guide number of the built-in Speedlight of the F55/F55D is 12 (ISO 100, m). Guide numbers are quoted in either metres - Nikon F55 | Instruction Manual - Page 56
Specifications Type of camera Integral-motor autofocus 35mm single-lens reflex with electronically controlled focal-plane Manual Picture format 24 x 36mm (standard 35mm film format) Lens mount Nikon F mount (with AF coupling, AF contacts) Lens Nikkor and Nikon lenses having Nikon F mount - Nikon F55 | Instruction Manual - Page 57
Guide number: 12 (at ISO 100, m); flash coverage: 28mm or longer lens; film speed and M Accessory shoe Standard ISO battery, battery life; approx. three years (depending upon use of data imprint function and other operating conditions) Camera back Hinged back with film confirmation window F55D - Nikon F55 | Instruction Manual - Page 58
. Tripod socket 1/4 (ISO 1222) Dimensions (W x H x D) F55: Approx. 129 x 92 x 65mm F55D: Approx. 129 x 92 x 67.5mm Weight (without batteries) F55: Approx. 350g F55D: Approx. 360g Optional exclusive accessories Soft case CF-62 All specifications apply when fresh batteries are used at normal - Nikon F55 | Instruction Manual - Page 59
108 Front-Curtain Sync........41, 78, 84, 95, 108 G G-type Nikkor lens 18, 88 Guide number 40, 76, 83, 108 L Long Time exposure (Time 57, 62 M Manual exposure mode 10, 29, 34, 60-62, 74, 82, 84, 95 Manual focus 27, 47 Manual focus with electronic rangefinder ... 47 Matrix Balanced Fill-Flash - Nikon F55 | Instruction Manual - Page 60
118 119 - Nikon F55 | Instruction Manual - Page 61
No reproduction in any form of this manual, in whole or in part (except for brief quotation in critical articles or reviews), may be made without written authorisation from NIKON CORPORATION. K NIKON CORPORATION FUJI BLDG., 2-3, MARUNOUCHI 3-CHOME, CHIYODA-KU, TOKYO 100-8331, JAPAN Printed in
-
 1
1 -
 2
2 -
 3
3 -
 4
4 -
 5
5 -
 6
6 -
 7
7 -
8
-
9
-
10
-
11
-
12
-
13
-
14
-
15
-
16
-
17
-
18
-
19
-
20
-
21
-
22
-
23
-
24
-
25
-
26
-
27
-
28
-
29
-
30
-
31
-
32
-
33
-
34
-
35
-
36
-
37
-
38
-
39
-
40
-
41
-
42
-
43
-
44
-
45
-
46
-
47
-
48
-
49
-
50
-
51
-
52
-
53
-
54
-
55
-
56
-
57
-
58
-
59
-
60
-
61
 |
 |